This is a guide to combining McNeel Rhino content with Cesium ion datasets within NVIDIA Omniverse, using the McNeel Rhino Omniverse connector and the Cesium for Omniverse extension.
.png?auto=compress%2Cformat&w=1320)
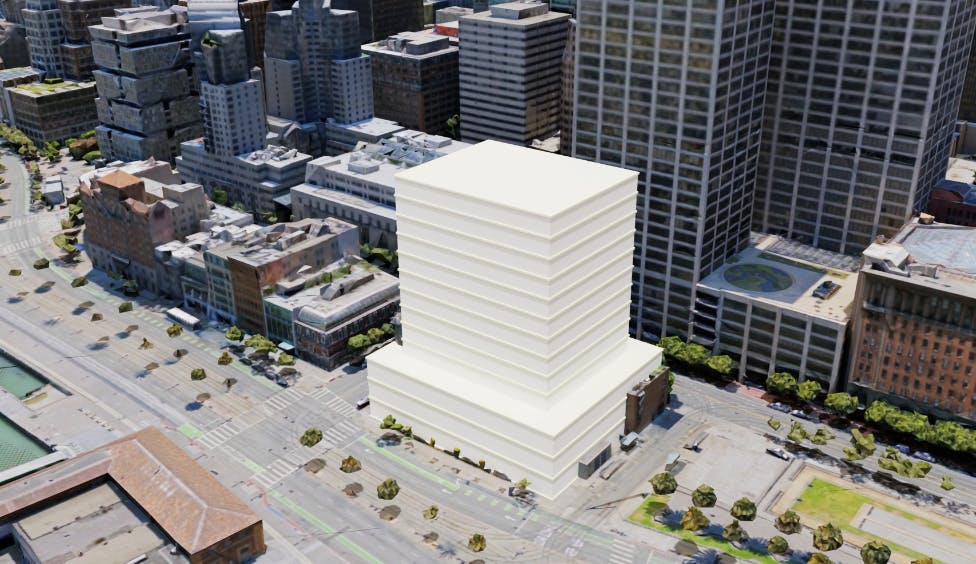
Conceptual building in San Francisco, exported from McNeel Rhino and georeferenced onto Aerometrex San Francisco high-resolution photogrammetry.
You’ll learn how to:
- Prepare and export 3D content from McNeel Rhino.
- Accurately position this content on Cesium World Terrain.
- Know how to set up a basic Cesium for Omniverse stage in NVIDIA Omniverse USD Composer. Check out our Cesium for Omniverse Quickstart guide for instructions on starting with the Cesium for Omniverse extension.
- A georeferenced Rhino scene. In this tutorial, we use a conceptual building model located in San Francisco. You can download this scene here.
- NVIDIA Omniverse USD Composer 2023.1.1 or later.
- The McNeel Rhino Omniverse connector installed from the Omniverse Launcher.
3D design software commonly favors local Cartesian coordinate systems over geographic ones to meet the demands of precision, accuracy, and simplified workflows. Local coordinate systems offer a convenient method for defining and manipulating precise measurements without the complications associated with geographic factors like Earth's curvature and latitude-longitude coordinates.
When it comes to Cesium for Omniverse, it typically adopts a geographic, Earth-centered Earth-fixed coordinate system, representing Earth as an accurate 3D globe. Consequently, to position an architectural model represented in local coordinates onto a geographic dataset such as a globe, a coordinate conversion process becomes necessary.
McNeel Rhino has the capability to geographically locate its content on the globe. It achieves this by allowing the user to specify latitude and longitude of the origin of the 3D scene. By taking these values and applying them to Cesium for Omniverse, we can render the globe such that the exact latitude and longitude specified in Rhino are located at the origin of the Rhino-created USD. For further details on Rhino's geolocation capabilities, you can refer to its EarthAnchorPoint resource.
This tutorial assumes that you already have a Rhino scene with the EarthAnchorPoint command configured. A sample scene can be downloaded here.
1Open your Rhino file. If you are using the supplied sample scene, it will look like this.
.png?auto=compress%2Cformat&w=745)
2Go to Tools > PythonScript > Edit to display the Rhino Python Editor.
.png?auto=compress%2Cformat&w=341)
3Paste in the following Python script, and press the Play button.
import Rhino
anchor_point = Rhino.RhinoDoc.ActiveDoc.EarthAnchorPoint
if anchor_point.EarthLocationIsSet(): print "Latitude: " + anchor_point.EarthBasepointLatitude.ToString() print "Longitude: " + anchor_point.EarthBasepointLongitude.ToString() print "Elevation: " + anchor_point.EarthBasepointElevation.ToString() else: print "No EarthAnchorPoint is set. Visit http://docs.mcneel.com/rhino/5/help/en-us/commands/earthanchorpoint.html for more information on configuring geo-location"
.png?auto=compress%2Cformat&w=892)
4If the EarthAnchorPoint has been correctly configured, the script will print out the scene’s latitude, longitude, and elevation values. Copy this information into a text editor for later, and close the Rhino Python Editor.
.png?auto=compress%2Cformat&w=697)
If your scene does not display geolocation information, you will not be able to continue with this tutorial. If your scene isn’t configured with geolocation information, try the supplied sample scene, or visit McNeel’s EarthAnchorPoint documentation to learn more about configuring geolocation information in Rhino.
5From the Omniverse toolbar, select Publish current model as a prop in Omniverse. You may need to sign in to your Nucleus server if this is the first time using the connector.
.png?auto=compress%2Cformat&w=412)
6Publish your USD to your preferred Nucleus server location.
.png?auto=compress%2Cformat&w=1085)
1Open Omniverse USD Composer, ensuring the Omniverse Fabric Scene Delegate is enabled as per the quickstart tutorial.
2Click Edit > Preferences to open the Preferences window.
3Click Stage; then set Z as the Default Up Axis. This will ensure our stage follows the up-axis convention of typical AECO tools, making it easier to find and adjust coordinates.
4Click File > New to create a new empty scene. Remove the default ground surface.
5Click File > Add Payload, and select the USD file created during Step 1. 24.711 and Y: 5212421.432.
6Your Rhino content should now be loaded on the stage. If you can’t see it, press F to zoom extents.
.png?auto=compress%2Cformat&w=843)
7From the Cesium window, add Cesium World Terrain + Bing Maps Aerial imagery to the stage.
.png?auto=compress%2Cformat&w=488)
8From the stage, select the CesiumGeoreference prim to display its properties in the Property window.
.png?auto=compress%2Cformat&w=410)
9In the Property window, enter the latitude, longitude, and elevation obtained from the Rhino Python script.
.png?auto=compress%2Cformat&w=397)
10If the geolocation has been successful, you should see your model accurately positioned on the surface of the globe. If not, confirm the coordinates from Step 1.4 were correctly entered in the CesiumGeoreference properties.
.png?auto=compress%2Cformat&w=937)
11Try swapping Cesium World Terrain for the Aerometrex San Francisco High Resolution 3D Model, which can be found by clicking the Add button in the Cesium for Omniverse interface (see Adding Datasets for more information).

Follow our Lighting the Stage and Capturing Images and Video tutorials to prepare your project and capture amazing visuals.