Saving and Loading Locations
When using a geospatial application, the player may want to save points of interest to come back to later. This is a crucial navigation tool for moving efficiently between distant locations on the globe.
This feature also provides an opportunity to build ergonomic user interfaces for VR. There are unique considerations for VR, including sizing hitboxes for interactive buttons, sizing text to be readable, and placing UI panels at a comfortable distance from the player.
In this tutorial, we will implement a menu for the player to save their location to disk, load other locations, delete a saved location, and select a location to immediately teleport to.
This tutorial assumes you have a basic understanding of Unreal Engine and Blueprints. We recommend reading the Getting Started series and Building a VR Application tutorial prior to this series.
You’ll learn how to:
- Save location data to disk
- Load location data from disk
- Create a static UI panel
- Build user interactions with the UI
- Unreal Engine 5
- Cesium for Unreal
- Basic understanding of Blueprints, Widget Blueprints, and Unreal Engine
Clone or download the project files here to get a more in-depth look at the project and solutions provided. Refer to the README for more information on the blueprints and levels corresponding to this tutorial, as well as headset compatibility.
In our last tutorial for visualizing metadata, we created dynamic UI panels for displaying metadata about the world. Here, we are creating an interactive UI menu for the player to select from a list of locations. Because we can’t expect the player to be in a particular location, we will create the UI panel that follows their gaze. Many of the same UI considerations from the previous tutorial apply here, with the additional elements of creating interactive buttons. Hand interactions in VR are not perfectly stable, so consideration is taken to make buttons have a minimum size for the player to comfortably hover over and select. We will also want to place the panel at an appropriate distance. It should be near the player so it feels relevant but far enough for them to easily point their controller and avoid crossing their eyes.
For saving and loading locations from disk, Unreal Engine provides a convenient Save Game system we will use. When the player saves their location, we will save the player’s current longitude, latitude, and height coordinates and the current time. When the player loads the Saved Location menu, the saved information will be shown.
For the interactive Saved Location menu, we want to determine an appropriate minimum hitbox size, text size, and distance from the user. A few years ago, the Google VR team published recommendations for designing screen interfaces for VR based on user research, and we will adopt their best practices. They define a dmm (distance-independent millimeter) as a standard unit of measurement for sizing UI. We do not use dmm in this project, instead opting to use a UI scaling method based on headset resolution, but we will convert dmm dimensions into our project-specific pixel dimensions to ensure we are following guidelines.
We should also determine the control scheme for the player to interact with the menu. We will adopt the same conventions as many existing VR applications, using the trigger for selecting menu buttons and the thumbsticks to scroll up and down through lists.
Unreal Engine’s Save Game system uses the USaveGame engine class. We can extend this class in blueprints by creating a child class of USaveGame called BP_TutorialSaveGame. This class saves our data to disk. To hold the saved location data, we will create a custom blueprint struct called FSavedLocation. This struct will contain a vector for the coordinates and an FDateTime struct for the current time.
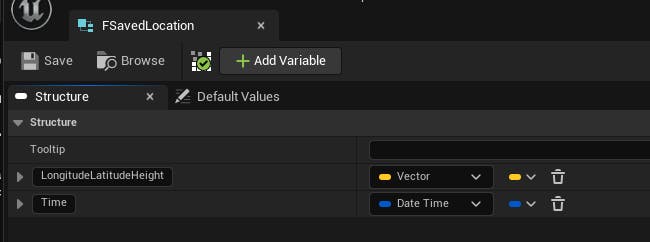
The FSavedLocation setup
Going back to BP_TutorialSaveGame, we create an array of FSavedLocation structs. That’s all we need for this class.
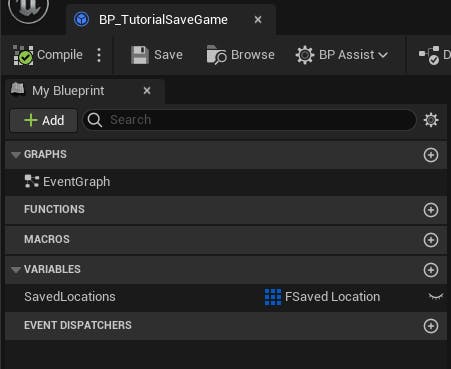
The BP_TutorialSaveGame setup
In keeping with the component-based architecture of this project, we create a new blueprint actor component BP_SavedLocationComponent. This class will have a GetSavedLocations function, which returns the list of saved locations, and a SaveCurrentLocation function, which saves the player’s current location and the system time to disk.
On BeginPlay of the component, we load the save game in the slot TutorialSlot and cast it to BP_TutorialSaveGame. If this cast fails, no save game exists, so we create a new one. If the cast succeeds, we keep a reference to the found save game.
SavedLocations > Blueprints > BP_SavedLocationComponent > BeginPlay function
After the save game is loaded on game start, we can read the list of saved locations with the GetSavedLocations function.
SavedLocations > Blueprints > BP_SavedLocationComponent > GetSavedLocations function
To save the player’s current location, the "SaveCurrentLocation" function is defined as follows:
SavedLocations > Blueprints > BP_SavedLocationComponent > SaveCurrentLocation function
Finally, saved locations can be deleted using the "DeleteSavedLocation" function:
SavedLocations > Blueprints > BP_SavedLocationComponent > DeleteSavedLocation function
Whenever a saved location is added or removed, the “UpdateSavedLocations” function is called so that the saved locations saved on disk are reflected visually in the user interface if it is open.
SavedLocations > Blueprints > BP_SavedLocationComponent > UpdateSavedLocations
This concludes the work for loading, saving, and deleting locations from disk.
The purpose of the menu is to be able to save a new location and load previous locations from a user interface. This user interface is shown in world space so that players in VR can access the buttons using the controllers. To do this, a world space widget is assigned a widget class representing the menu. The menu widget then has a list view with a custom “Entry widget class” which we will design to render information about the saved location. Below is a visualization of the relationship between these components:
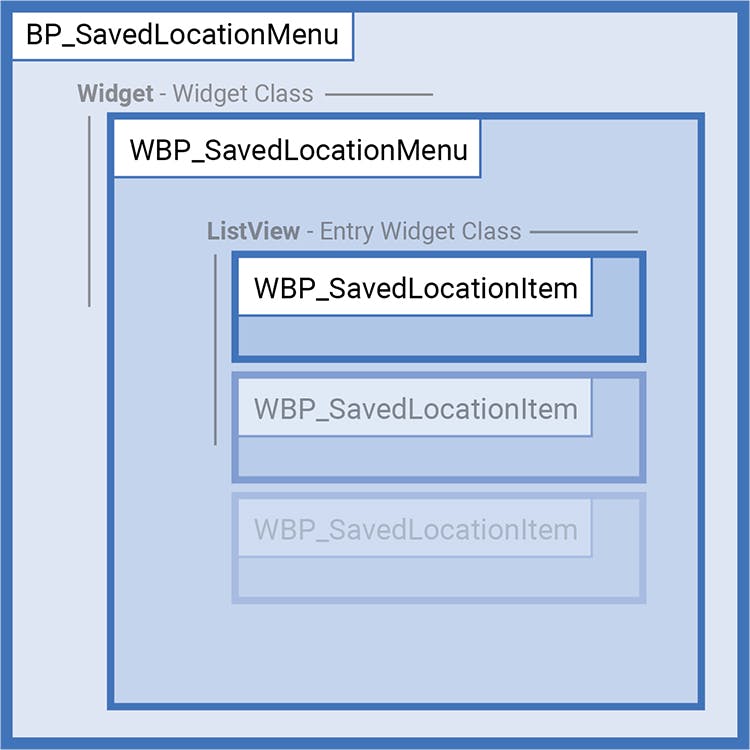
Widget and widget component relationship
The first step is to design the menu and "ListView" entry widgets with the needed buttons, text, and images.
If you are new to designing widgets, you can read more information about the UMG UI Designer here.
In the previous tutorial, we calculated the scale of our widgets such that a pixel in UMG is rendered as a pixel on the headset and got a scale value of 0.09 for the Quest 2 headset for a UI panel 1 meter away from the player. Google’s VR recommendations are in dmm, which correspond to a scale value of 0.1 for a UI panel 1 meter away (as Unreal units are equivalent to centimeters and UMG pixels are 1 Unreal unit wide on an unscaled widget). By dividing 0.1 / 0.09, we get a factor of 1.1 for converting dmm to our project’s scaling on Quest 2.
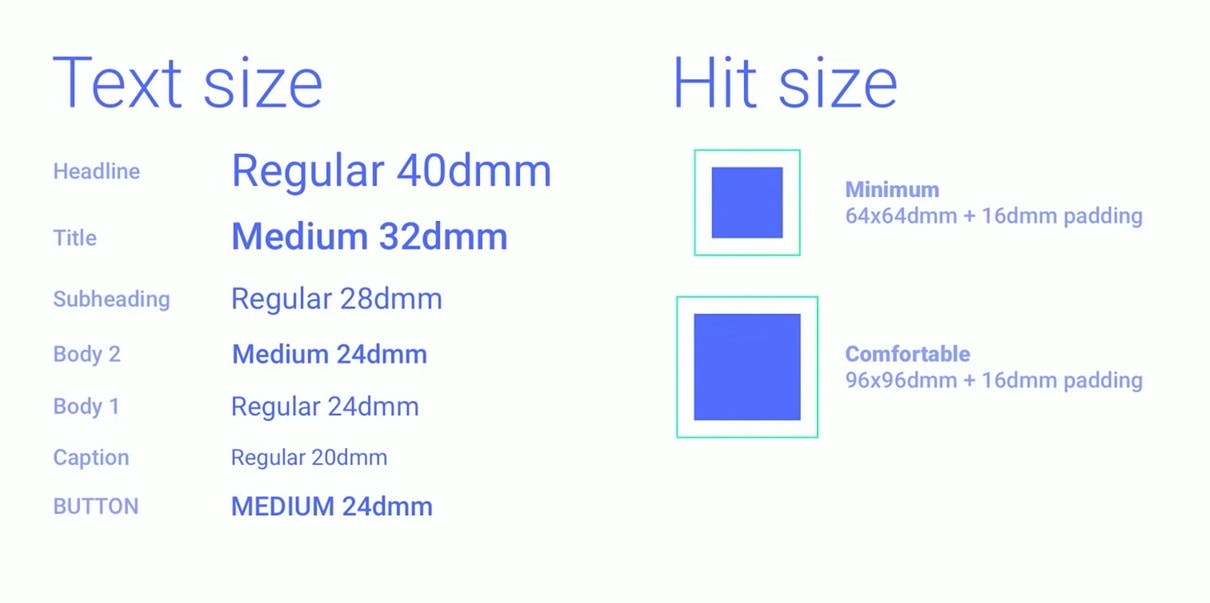
Google’s VR UI recommendations in dmm. Source: Designing Screen Interfaces for VR.
After performing the conversion, we get:
Headline: 44 px
Title: 36 px
Subheading: 32 px
Body 2: 26 px
Body 1: 26 px
Caption: 22 px
Button: 26 px
Hit size: minimum: 72x72 px, with 16 px padding
Comfortable: 104x104 px, with 16 px padding
Values have been rounded to convenient, even numbers.
If deploying on multiple headsets, one way of handling different resolutions is to design UMG widgets for the headset with the highest pixel density and downscale accordingly for the others.
Below is the design of the menu and entry widgets used in our saved location UI:
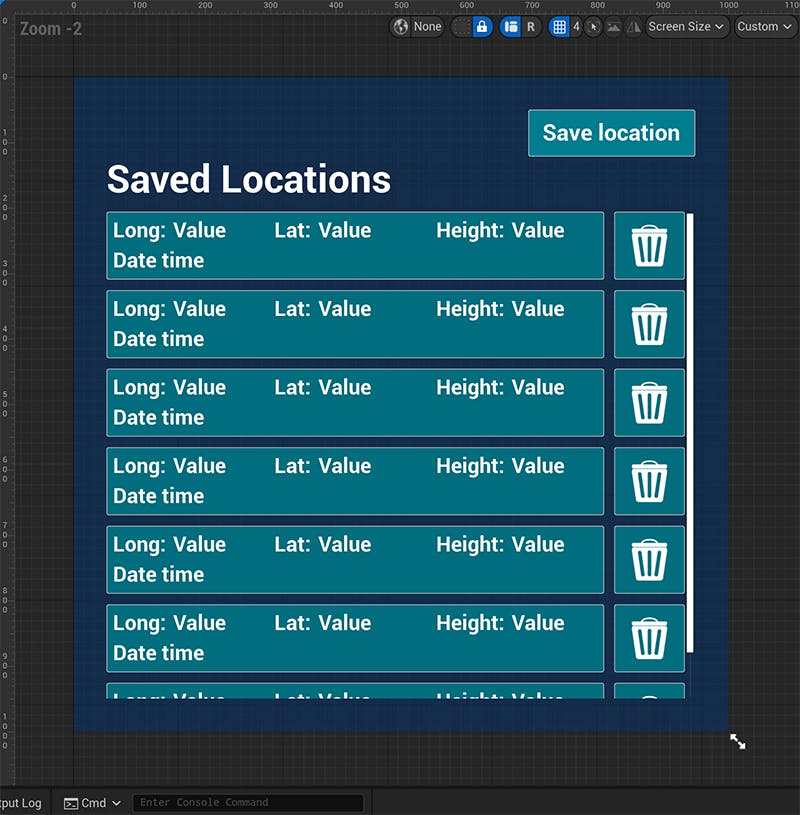
Menu widget design
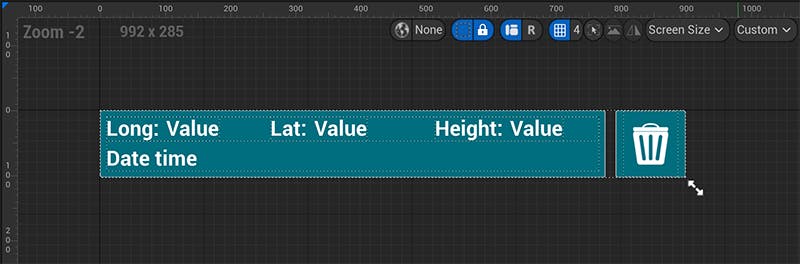
List view entry widget design
The Quest 2 has a menu button on the left-hand controller. As the saved location menu is the only menu in our application so far, we can map to that button for opening and closing the saved location menu. We can add a new input action to the project “OpenMenu” in the project setting as follows:
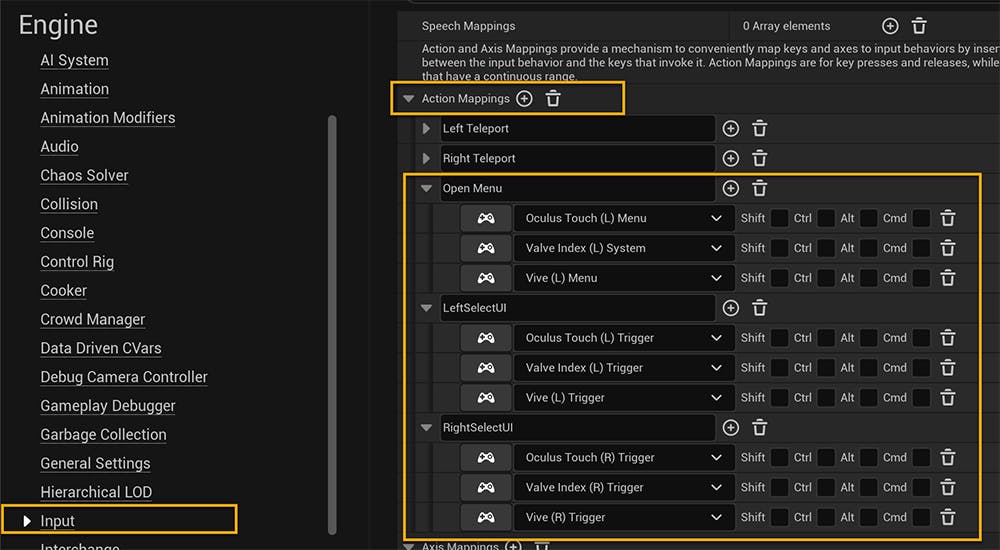
Input settings for opening the menu
Then, the pawn implements the input action fired from the button press and calls the relevant function on the BP_SavedLocationComponent.
SavedLocations > Blueprints > BP_VRPawn_SavedLocations> Input graph
The open menu function is called if the menu isn’t already open.
SavedLocations > Blueprints > BP_SavedLocationComponent > OpenMenu
If the menu button is pressed when the menu is open, the close menu function is called. This destroys the menu and makes any reference to it null.
SavedLocations > Blueprints > BP_SavedLocationComponent > CloseMenu
Because the BP_SavedLocationMenu derives from the BP_DynamicWidget, the UI will be rotated toward the player’s view and scaled according to distance from the user. The scale of the widget, regardless of distance from the player, will be such that the UI is comfortable to use as outlined above. The menu positioning is handled by the BP_SavedLocationComponent on tick:
SavedLocations > Blueprints > BP_SavedLocationComponent > Event Graph Tick
SavedLocations > Blueprints > BP_SavedLocationComponent > UpdateMenuPosition
For more information on the BP_DynamicWidget and how it scales, see the previous tutorial “Visualizing Metadata with Dynamic Widgets” here.
Once the menu is opened, or changes are made to the saved locations on disk, the “SetSavedLocations” method is called on WBP_SavedLocationMenu, which is rendered on the BP_SavedLocationMenu. This will assign a saved location to each of the entry widgets in the list view.
SavedLocations > Blueprints > WBP_SavedLocationMenu > SetSavedLocationItems
As the entry widgets are passed into the list view, “OnListItemObjectSet” is called on each list item element. At this time, events are bound to the select and delete button on the list item to select or delete the appropriate saved location.
SavedLocations > Blueprints > WBP_SavedLocationItem > OnListItemObjectSet
When the “Save location” button is selected from the saved location menu UI, the BP_SavedLocationComponent is told to save the current location.
SavedLocations > Blueprints > WBP_SavedLocationMenu > EventGraph graph
Once the menu is within view, a VR player will need to interact with the UI in world space. The WidgetInteractionComponent class, built into Unreal, is suitable for this task but will require some configuration to work properly. Firstly, widget interaction components are added to the pawn and set as children to the motion controllers.
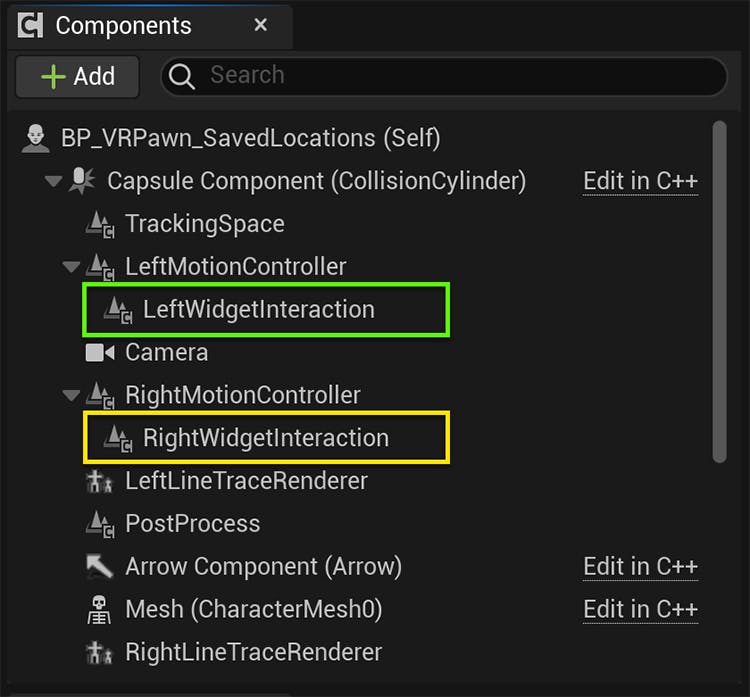
Pawn component configuration for the widget interaction components
Each widget interaction component requires a unique “Pointer Index” setting in order for the UI to distinguish interaction. The interaction distance is also set to a very high number so that we can interact with the UI from any distance. This is a useful configuration to consider when the user scales up to large sizes and the UI is positioned many world units away. Lastly, we supply a custom line trace for the widget interaction component to use, so the “Interaction Source” is set to “Custom”.
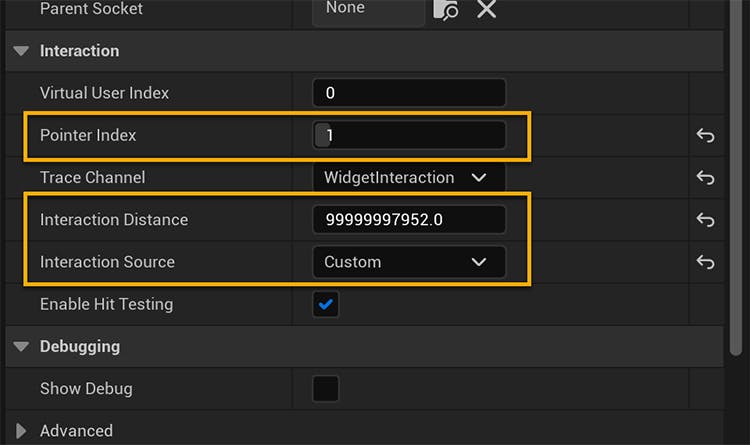
Settings for the widget interaction component. (Pointer index 1 set for right hand.)
Remember that each widget interaction component requires a unique “Pointer Index”. Typically the left hand interaction component can have an index of 0 and the right hand component an index of 1.
Before the widget interaction component is even able to interact or hover over any of the widgets on a world space UI, the widget component must have the appropriate collision settings. We have set up a collision profile called UI for our purposes, but the important part is a defined channel which this widget component can be traced against.
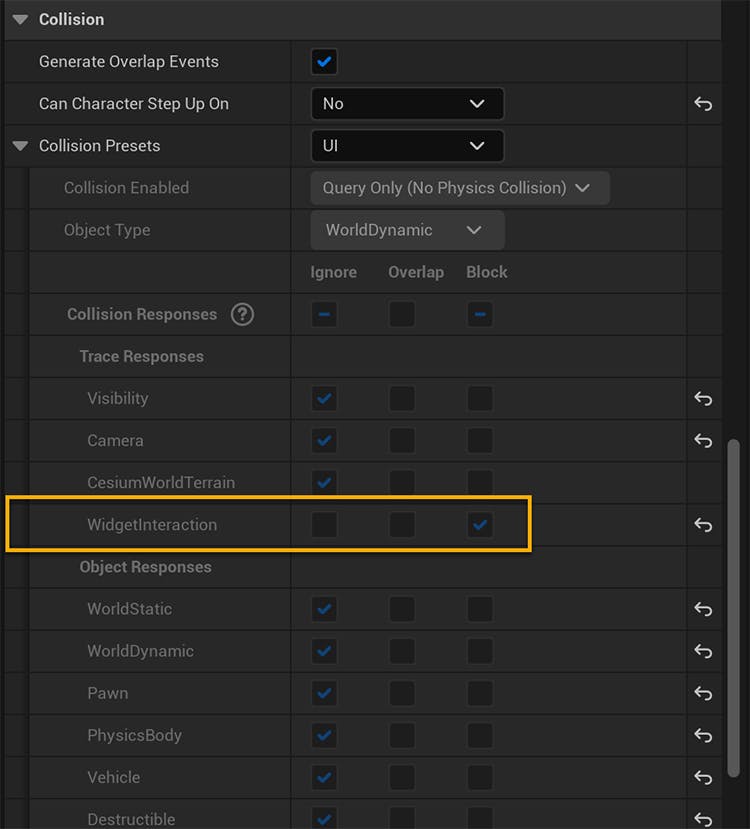
The collision settings of the widget component rendering the saved locations menu
Now that the widget interaction components are configured, we will supply a line trace to each component to utilize in interacting with the UI. The pawn does this on tick, and the trace is passed into our BP_LineTraceRenderer actor and WidgetInteractionComponent:
SavedLocations > Blueprints > BP_VRPawn_SavedLocations > EventGraph graph
SavedLocations > Blueprints > BP_VRPawn_SavedLocations > RenderWidgetInteraction function
Once the player points at the UI, they can interact by passing inputs to the WidgetInteractionComponent to simulate mouse clicks and scroll wheel interaction. These inputs will then perform actions on scroll list widgets and buttons.
SavedLocations > Blueprints > BP_VRPawn_SavedLocations > Input graph
This world space interface accounts for the VR player moving around the world, while being accessible and comfortable to interact with the VR controllers. Other menus and options can be added to this widget to give the player even more functionality.
Saved Locations are a fantastic way to navigate across the globe and provide players with a way to save a list of places they have been and are easy to return to.
This concludes our VR tutorial series using Cesium for Unreal.
Have any questions or requests for new tutorials? Post here on the Cesium for Unreal forum.