Visualize Metadata with Dynamic UI
By exposing 3D Tiles per-feature metadata to VR players, you enable them to visualize rich metadata about the world around them. For example, they can differentiate building materials such as brick and glass, or look up the composition of the ground beneath them.
When metadata is combined with a VR environment, players can explore another layer of massive geospatial datasets in an immersive, intuitive way.
In this tutorial, we will add the OSM Buildings tileset to a level and create a dynamic UI system to visualize per-building metadata such as address, floor count, and building type. As the user traces against the world, a popover will appear next to the trace hit location showing any available metadata.
For more information about 3D Tiles metadata in Cesium for Unreal, see the Per-Feature Metadata Technical Reference.
This tutorial assumes you have a basic understanding of Unreal Engine and Blueprints. We recommend reading the Getting Started series and Building a VR Application tutorial prior to this series.
You’ll learn how to:
- Create a simple UI widget
- Create dynamically resizing UI
- Query and visualize metadata
- Unreal Engine 5
- Cesium for Unreal
- Basic understanding of Blueprints, Widget Blueprints, and Unreal Engine
Clone or download the project files here to get a more in-depth look at the project and solutions provided. Refer to the README for more information on the blueprints and levels corresponding to this tutorial, as well as headset compatibility.
Although VR environments are three-dimensional, flat UI panels are still the most effective way to display information like text and charts. Unlike traditional interactive experiences, where UI can be drawn in screen space, UI in VR must be drawn in world space—that is, an actual three-dimensional location in the scene. The UI should therefore be scaled to be legible and comfortable to view, and text should appear crisp. When creating popovers for viewing metadata, an additional challenge is to scale widgets such that they appear a consistent size, regardless of how far away the widget is placed.
User interfaces in Unreal Engine are created using the Unreal Motion Graphics (UMG) framework. UMG-created UI components, called Widget Blueprints, are designed assuming screen space, so a panel that’s 100 units wide translates to 100 pixels wide when rendered. This works well for applications on flat screens like monitors and TVs. For VR experiences, however, the UI must be rendered in world space. To do that, we render UMG widgets in the scene using a Widget Component, which can be attached to an actor and configured to display widgets in world space. When rendering widget components, a unit in UMG is translated to one Unreal Engine unit, or one centimeter, in the scene. This means that our 100-pixels-wide panel is rendered across a meter in world space, which is like printing out a thumbnail image on a large poster, and will appear blurry. Our task, then, is to:
- Calculate how to scale the UI so that it’s not blurry.
- Decide what happens when the player moves away from the UI.
For the latter, there are two approaches we can take: static and dynamic.
- For static UI, we assume that the UI is at a set distance from the user—for example, a menu that appears at arm’s length. In this case, we do not resize the widget.
- For dynamic UI, we resize the widget according to its distance from the user, so that the UI always remains the same perceived size.
For the purpose of viewing metadata in the world, dynamic UI is appropriate, as the user will be tracing against locations at various distances in the scene.
The BP_DynamicWidget is an Actor with a WidgetComponent, which in turn renders a UMG Widget Blueprint. The widget blueprint is designed in the UMG editor, and the widget component is then configured to display that widget blueprint.
For more information about Unreal Motion Graphics, see here.
In the BP_DynamicWidget, the BeginPlay event caches some variables and turns off shadows from the widget onto other surfaces, which can look distracting.
DynamicWidget > Blueprints > BP_DynamicWidget > BeginPlay function
We now must figure out how to scale the widget component. This is done in two parts:
- Drawing crisp text (or images) when the player is a fixed distance away, such as 1 meter.
- Resizing the widget as the player moves farther or closer than the fixed distance.
Drawing widget blueprints at the headset resolution
To calculate the first part, we need to know some details about the headset. This tutorial series assumes the Quest 2, but the numbers will differ if you are using another device.
The Quest 2 headset has a resolution of 21 pixels per degree (PPD). This means that for each degree along a single axis in the headset’s field of view, there are 21 pixels in its display. (For reference, a person with 20/20 vision can resolve to about 60 PPD.)
For the following calculations, we’ll assume distances of 1 meter for simplicity. At a distance of 1 meter away, a 1-meter-wide line segment takes up 53 degrees of your field of view. We can then use these two values to calculate how much to scale the widget component to ensure that 1 UMG pixel corresponds to 1 headset pixel.

Because the widget blueprints are designed in pixels and we want an output value in UE units for the widget component scale, we can flip the earlier result:
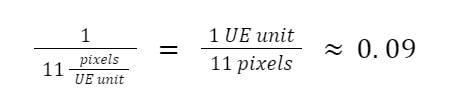
So, at a distance of 1 meter away, a widget component should be scaled to 0.09 so that its widget blueprint’s contents are drawn at the resolution of the headset.
In Blueprints, the code is the following:
DynamicWidget > Blueprints > BP_DynamicWidget > GetScalingFactor function
Resizing the widget as the player moves
To calculate the scale of the widget as the player moves, we simply take the distance in meters from the widget component to the player camera:
DynamicWidget > Blueprints > BP_DynamicWidget > DistancePlayerToWidget function
Updating on Tick
Now that we can calculate the proper scale of a widget component at 1 meter away, as well as resize it according to distance, we can combine these two values to scale the widget component such that the widget blueprint appears legible and consistent at any distance. We also rotate the widget component such that it is always facing the player, and scale the offset so that the clearance between the widget component and the actor’s root is maintained (so that the widget blueprint does not block the player’s view, for example).
DynamicWidget > Blueprints > BP_DynamicWidget > Event Tick function
Finally, we set the widget component to display in world space and set Draw at Desired Size to true:

This BP_DynamicWidget can now be used as a base class for all dynamically sized widgets in the project.
We will now switch gears and open up the UMG editor to design the UI for our popover. Create a new Widget Blueprint class named WBP_Metadata. This will be a very simple UI, just housing a Text Block for displaying metadata strings.
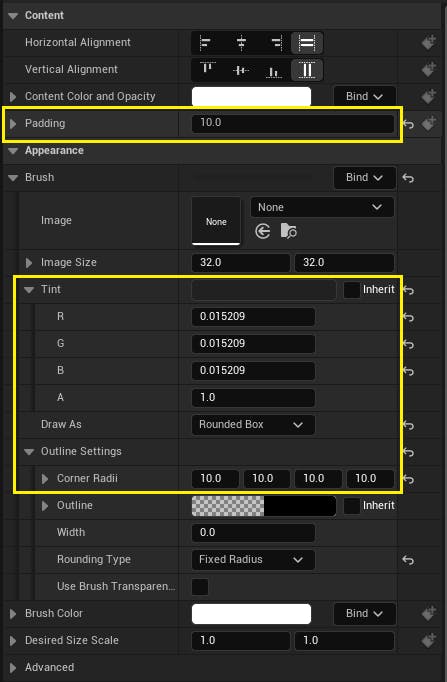
We first add a Border to provide a background for the text, with the following appearance settings:
- Padding of 10px all around, for whitespace around the text
- A dark gray tint for the border to provide contrast against white text (hex code #212121)
- Rounded box outline with radii of 10px
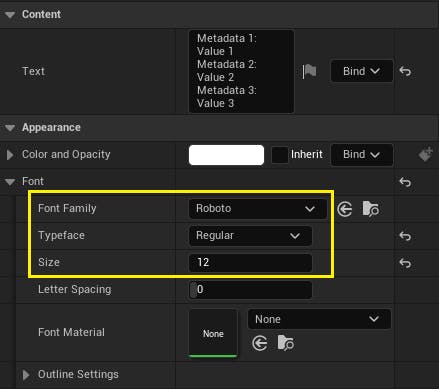
Then, we nest a Text Block inside the border, with the following settings:
- Sample text for the widget to preview the look (Shift+Enter to add a new line)
- Roboto Regular typeface, in size 12
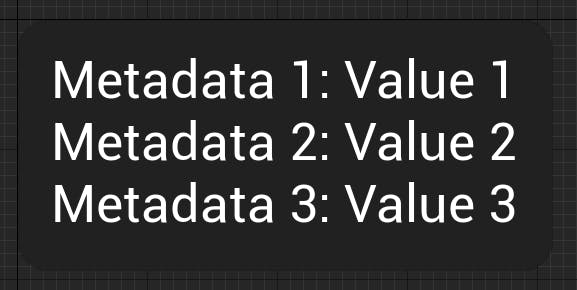
The final look will resemble this:
The widget blueprint is now finished, and we can write the blueprint logic that actually displays the strings. From the "Get Metadata Values for Face" section in the Per-Feature Metadata Technical Reference, metadata can be simply returned as a map of strings. We can create a SetMetadata function that takes in a map of strings and displays them in the text block with basic formatting, i.e., a colon separating key from value, and new lines for each entry.
DynamicWidget > Blueprints > WBP_Metadata > SetMetadata function
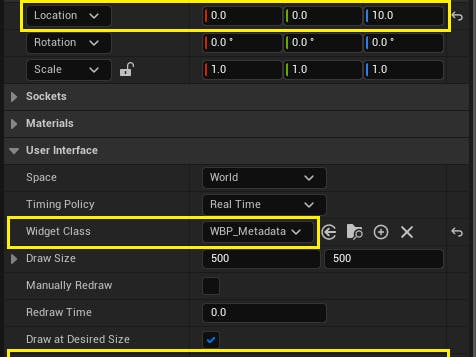
We can now create a child class of the BP_DynamicWidget, called BP_MetadataPopover, to house the WBP_Metadata widget blueprint we just created. This BP_MetadataPopover class is configured with the following settings on the widget component:
- Widget class set to WBP_Metadata
- Relative location set to 10 units on the Z axis. This will offset the popover up from the trace hit location, so it won’t block viewing of the trace.
- Pivot set to 1.0 for the Y axis. This sets the pivot to the bottom of the widget, so the widget component’s offset will scale proportionally with distance.
On the BeginPlay of the widget, we cache a reference to the WBP_Metadata class:
DynamicWidget > Blueprints > BP_MetadataPopover > BeginPlay function
We will also create a trivial SetMetadata function which forwards the map of strings to the widget.
DynamicWidget > Blueprints > BP_MetadataPopover > SetMetadata function
We can pass the map of strings “by-reference”, which will instruct the blueprint compiler to pass a reference to the underlying data rather than copy it. Doing this saves on memory usage.
Now that we have our necessary UI components, we can write the gameplay logic that traces against the world, queries for metadata, and then displays that metadata in our UI. In keeping with our componentized gameplay logic architecture, we will create an Actor Component to perform this function.
The component is called BP_MetadataTraceComponent and bears some resemblance to the BP_VRTeleportComponent created in a previous tutorial.
The component has a setup function that’s called from the owning pawn class, which creates an instance of our popover child class. Because each component instance creates its own popover instance, there will be two popovers, one for each hand.
DynamicWidget > Blueprints > BP_MetadataTraceComponent > Setup function
We also create a FindMetadata function that will get called on the pawn’s Input event. This will trace against the world along the Visibility channel and display any found metadata by passing the metadata strings to the popover instance.
DynamicWidget > Blueprints > BP_MetadataTraceComponent > FindMetadata function
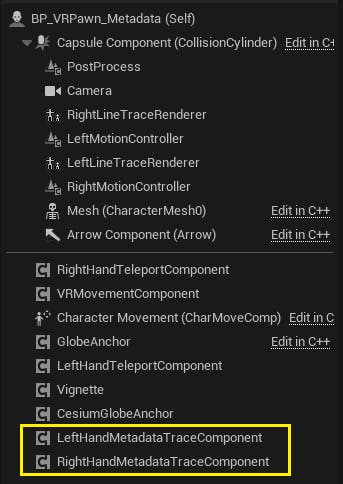
Our last piece of gameplay logic is integrating the trace component into our VR pawn. We can use the BP_VRPawn_Vignette from a previous tutorial as a starting point by making a copy of it and renaming the copy to BP_VRPawn_Metadata. This pawn will have two BP_MetadataTraceComponent instances, one per hand:
Then, we create a private _setupMetadataComponents function which calls the Setup function we just created in the BP_MetadataTraceComponent class.
DynamicWidget > Blueprints > BP_VRPawn_Metadata > _setupMetadataComponents function
This function gets appended to the sequence of other setup logic on the pawn’s BeginPlay (other logic hidden for brevity):
DynamicWidget > Blueprints > BP_VRPawn_Metadata > EventGraph graph
We then append the FindMetadata function to the Left/Right Pointer input events in the Input graph:
DynamicWidget > Blueprints > BP_VRPawn_Metadata > Input graph
Now, the pawn is fully configured with the two metadata trace components. When the player holds down the trigger on either controller, a trace is performed against the world and the resulting metadata will show in a popover above the hit location.
To tie everything together, we create a new level DynamicUI which contains the OSM Buildings tileset and is geolocated in downtown New York City. To add OSM Buildings to the level, follow step 6 of the Cesium for Unreal Quickstart tutorial with the following coordinates:
Origin Latitude = 40.71
Origin Longitude = -74.0
Origin Height = 1000.0
Contextual information can help players feel engaged and curious about the world around them. With per-feature metadata from 3D Tiles, players can view rich, granular metadata as they explore your application.
Stay tuned for more tutorials for this series coming soon.