Using the Model Tiler On-Premises
Looking for on-premises 3D Tiling? Contact sales for an evaluation. Contact Sales.
Setup
Extract the contents of Cesium-ion-3D-Tiling-Pipeline.zip.
The main executable is model-tiler and can be found under bin.
If you wish to run the examples download and extract SampleData.zip into a new SampleData directory.
Windows
Windows binaries require Visual C++ Redistributable for Visual Studio 2017. Download and run the installer.
Using the tiler
A typical tiler command follows the following format:
model-tiler -I <input-type> -i <input1.obj> <input2.dae> -o <output-directory>
Where <input-type> must be one of the following types:
PHOTOGRAMMETRY: Meshes produced by photogrammetry software.3DSCAN: Meshes captured by 3D Scanners or LiDAR.CAD: Computer-aided design models.BIM: Building information models. Includes architecture design models and city models.OTHER: All other types of 3D models. Use this option when in doubt.
A sample BIM model is available in the SampleData/OfficePlan directory. Tile it into 3D Tiles by running:
model-tiler -I BIM -i SampleData/OfficePlan/OfficePlan.obj -o OfficePlan_Tiles
This will produce a 3D Tiles tileset in the OfficePlan_Tiles directory.
Photogrammetry works the same way. A sample photogrammetry model is available in the SampleData/AGI_HQ directory. Tile it by running:
model-tiler -I PHOTOGRAMMETRY -i SampleData/AGI_HQ/AGI_HQ.obj -o AGI_HQ_Tiles
When combining multiple files, it is important to verify that the models use the same origin and do not occupy the same 3D space.
We can also specify longitude and latitude in degrees and height in meters relative to the WGS84 reference ellipsoid so the tileset will appear in the correct location when streamed in CesiumJS.
model-tiler -I PHOTOGRAMMETRY -i SampleData/AGI_HQ/AGI_HQ.obj -o AGI_HQ_Tiles --longitude=-75.5967013459 --latitude=40.0386977494 --height=50
These coordinates specify where the model's origin should be on the map. See Positioning the output below for more details.
The model tiler can take advantage of multicore systems by concurrently tiling separate spatial areas of the input model(s). By default, a concurrency level is automatically set based on available system resources. This can be configured manually with the --concurrency option.
The example below enables up to four-way concurrency.
model-tiler -I PHOTOGRAMMETRY -i Model.obj -o Tileset --concurrency=4
When running inside Docker, it is recommended to set this manually since containerization prevents the tiler from querying system resources.
Compression
Tiles can be compressed using lossless gzip compression with the --gzip option. This requires setting the content-encoding to gzip in the HTTP header on the server.
Draco compression for meshes is enabled by default and greatly optimizes streaming speed at minimal precision loss. See our blog post to learn more. Use the --compression-level option to set compression level between 0 (least compression) and 10 (highest compression), as shown below.
model-tiler -I PHOTOGRAMMETRY -i Model.obj -o Tileset --compression-level=5
Draco compression can be disabled using --disable-geometry-compression.
Available options
Below is a list of command line options to configure the tiler.
| Option | Description | Required | Default |
|---|---|---|---|
--help, -h | Display help message. | ||
--version, -v | Display version number. | ||
--input, -i | The path(s) to the OBJ and/or DAE file(s) to be tiled. Required if --input-list is not supplied. Cannot be used with --input-list. | ||
--input-list | A text file with a list of files to process, one file per line. Required if --input is not supplied. Cannot be used with --input. | ||
--input-type | Type of input to be tiled. Options are PHOTOGRAMMETRY, 3DSCAN, CAD, BIM, and OTHER. See the Using the tiler section for more details. | ✓ | |
--output, -o | The path to the output directory or .3dtiles database file. Will overwrite the existing directory if it exists, or otherwise create a new directory. | ✓ | |
--quiet | Suppress output during tiling. | false | |
--verbose | Show verbose output. | false | |
--memory, -m | A guideline in megabytes for how much memory may be used for tiling. When running inside Docker, it's recommended to set this manually since containerization prevents the tiler from querying system resources. | System available. | |
--concurrency, -x | Maximum number of processors to use for concurrent tile processing. Actual utilization depends on system resources. When running inside Docker, it's recommended to set this manually since containerization prevents the tiler from querying system resources. | System available. | |
--input-up-axis | When set, overrides the model's default up axis and treats the given axis as up. By default obj is treated as z-up for PHOTOGRAMMETRY and 3DSCAN and y-up for BIM, CAD, and OTHER, gltf is y-up always, and dae uses the up-axis specified in <asset><up_axis>. | ||
--longitude | The longitude in EPSG:4326 coordinates (degrees) at which to place the model's origin. | ||
--latitude | The latitude in EPSG:4326 coordinates (degrees) at which to place the model's origin. | ||
--height | The height in meters relative to the WGS84 ellipsoid at which to place the model's origin. | ||
--heading | The rotation in degrees from the local north direction where a positive angle is increasing eastward. | 0.0 | |
--pitch | The rotation in degrees from the local east-north plane. Positive pitch angles are above the plane. Negative pitch angles are below the plane. | 0.0 | |
--roll | The rotation in degrees applied to the local east axis. | 0.0 | |
--scale, -s | The uniform scale to apply to the model. The tiler assumes the units for the input model(s) are in meters. | 1.0 | |
--texture-format | The image format to use when encoding textures. When set to AUTO it chooses the best format based on the input. Options are PNG, JPEG, WEBP, WEBPLOSSLESS and AUTO. | AUTO | |
--texture-quality | The image quality to use when encoding textures. Range is 0 (worst quality, smallest filesize) to 100 (best quality, largest filesize). Only valid when --texture-format is JPEG or WEBP. | 80 | |
--compression-level | Draco compression level between 0 and 10. In general, the highest setting, 10, will have the most compression but worst decompression speed. 0 will have the least compression, but best decompression speed. Compression level does not affect precision. | 7 | |
--compression-precision-meters | Precision in meters for Draco compression. Defaults to millimeter precision. Set to 0 for lossless compression which produces larger tile sizes. | 0.001 | |
--disable-geometry-compression | Disable Draco geometry compression. See the Compression section for more details. | false | |
--gzip | Save tiles with gzip compression. | false | |
--double-sided | When true, double-sided geometry will be produced. Use when the geometry is not closed or to be able to view it from the inside in CesiumJS. | false | |
--tileset-version | A version number or string to assign to the tileset. This is written to tileset.json and can be used as metadata to track changes. |
Next steps
Now that we've tiled our models into 3D Tiles, the next step is to stream them into CesiumJS. All we need is a web server to host our tiles, and then we can pass a URL to our tileset as shown below.
var viewer = new Cesium.Viewer('cesiumContainer');

var tileset = viewer.scene.primitives.add(new Cesium.Cesium3DTileset({
    url : '<URL to tileset.json>'
}));

viewer.zoomTo(tileset);
The Hosting 3D Content tutorial walks you through setting up the Cesium ion Asset Server and streaming 3D content with CesiumJS.
Positioning the output
The `longitude`, `latitude`, and `height` options allow you to control the position of the model's origin, which we define as the Cartesian coordinate (0, 0, 0) in model space. All positions in the specified OBJ files (or all transformed positions in the specified COLLADA or glTF files) are Cartesian offsets in meters relative to this origin. For example, if a house model's origin is the tip of the chimney, most of the house's coordinates will be negative, because they specify points below the chimney and therefore below (0, 0, 0).
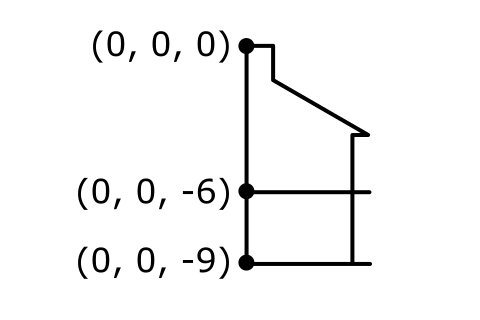
# house.obj - OBJ files specify position using "v" and inline comments using "#"

# tip of chimney
v 0 0 0

# second floor (US/Canadian convention), below tip of chimney
v 0 0 -6

# ground floor, below tip of chimney
v 0 0 -9
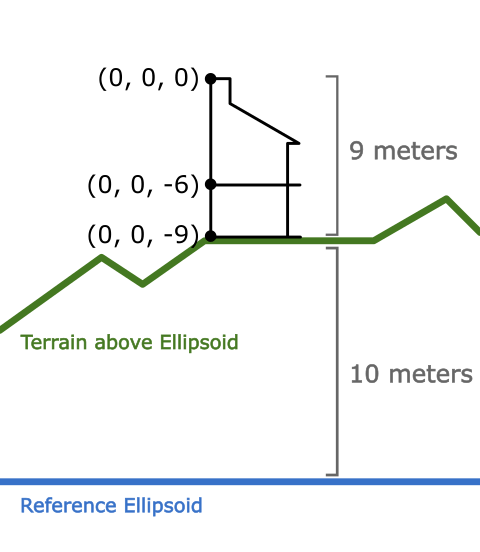
When tiling this dataset, the input coordinates should be the longitude, latitude, and height of the model's origin, with height relative to the WGS84 reference ellipsoid.
So if the tip of the chimney (the model's origin) is 9 meters above the ground floor, and if the target CesiumJS app does not use terrain, an input height of 9 will place the model's ground floor directly on the ellipsoid surface.
If the app uses terrain, we need to take this into account when placing the model. Assume we want the house to be on a hill 10 meters above the WGS84 reference ellipsoid. We add 10 meters (terrain height) to the 9 meters of the model origin height. Providing an input height of 19 will place the house dataset with model's ground floor on the terrain.
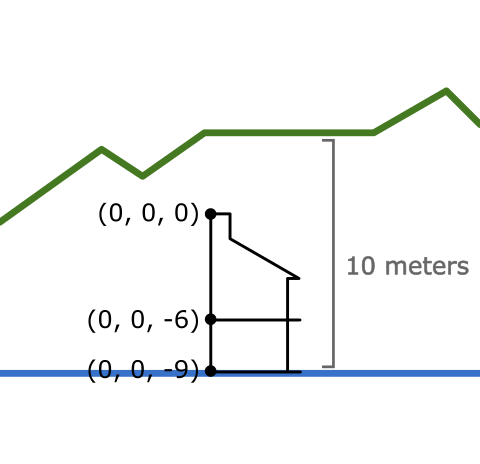
If we take into account only the model's origin position and provide an input height of 9, the house will end up below terrain in CesiumJS because the height input is relative to the WGS84 ellipsoid and not relative to terrain. In other words, the tileset is on the ellipsoid surface, but the ellipsoid surface is buried beneath terrain.
Similarly, if we provide an input height of 10, the house will be under terrain in CesiumJS because we have taken the terrain into account, but not the height of the model's origin.
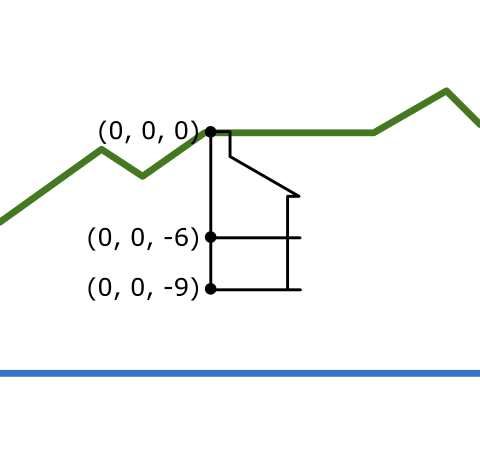
The examples above focus on height, but longitude and latitude are relative to the model's origin in the same way.
The produced tileset's position can also be offset in CesiumJS as shown in this Sandcastle example.
Troubleshooting
Tileset is sideways in CesiumJS
Check the input-up-axis option, which defaults to Z for OBJs. A sideways tileset could indicate that this must be changed to input-up-axis=Y as shown below.
model-tiler -I PHOTOGRAMMETRY -i Model.obj -o Tileset --memory=8192 --input-up-axis=Y
Tileset isn't in the right location in CesiumJS
Make sure --longitude, --latitude, and --height are specified when running the tiler.
longitude and latitude are in degrees, with longitude between (-180, 180) and latitude between (-90, 90).
Height is in meters.
Note that these options are case sensitive. See Positioning the output above for more details.
Tileset is too small or too large in CesiumJS
The tiler assumes the units for the input model(s) are in meters. Use the --scale option to adjust.
No textures in the output model in CesiumJS
If using OBJs, make sure the textures are accessible via the .mtl and the .obj file can access the .mtl.
The tiler supports .jpeg/.jpg and .png textures.
For best results use power-of-two textures.
Some triangles are missing from the tileset
The input models may not be using a consistent winding order, so some triangles may be oriented inwards, causing them to render on the wrong side. Use the --double-sided option to generate a tileset that forces all triangles to face both ways. This may cause a slight performance hit in CesiumJS.
License
Third-party licenses used by the tilers can be found in ThirdParty.pdf.
Patents: US10878613 US10878628 US10872469