Cesium for Unity Quickstart
This is a quickstart guide to building a Cesium for Unity app with Cesium World Terrain and Cesium OSM Buildings.
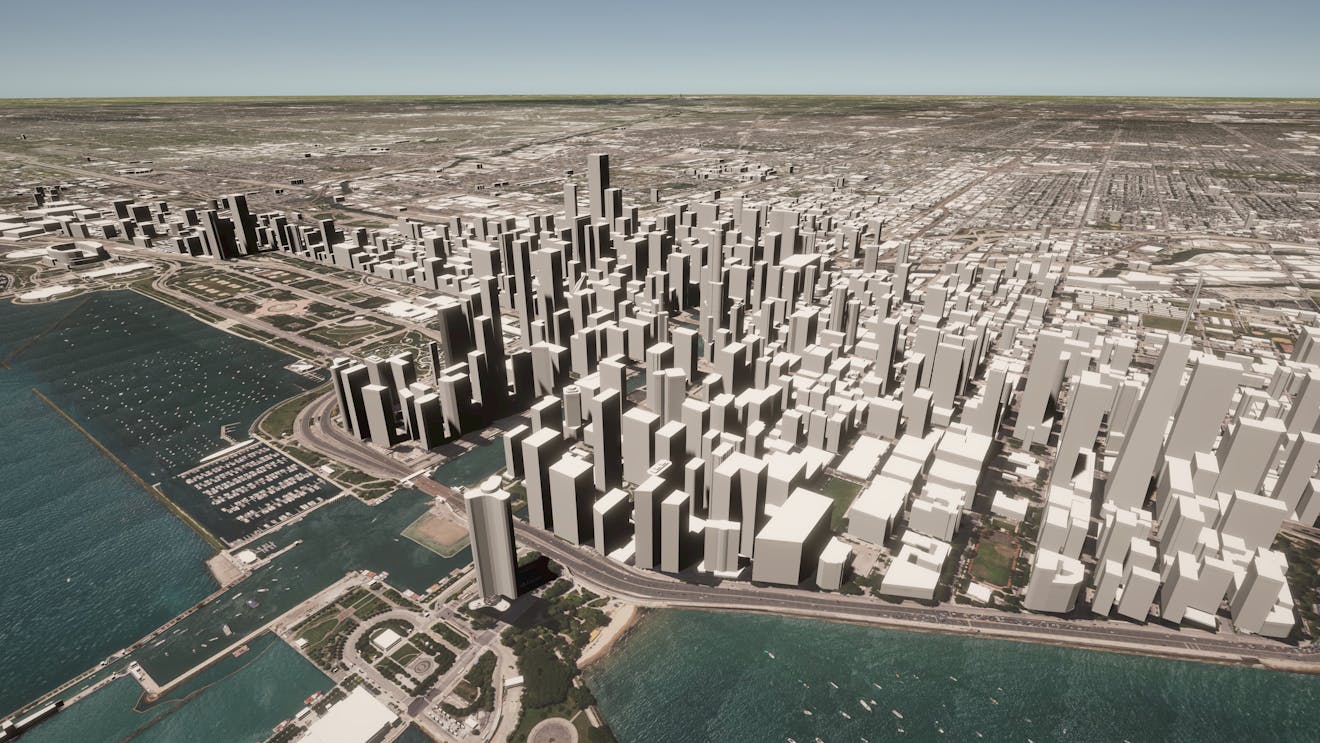
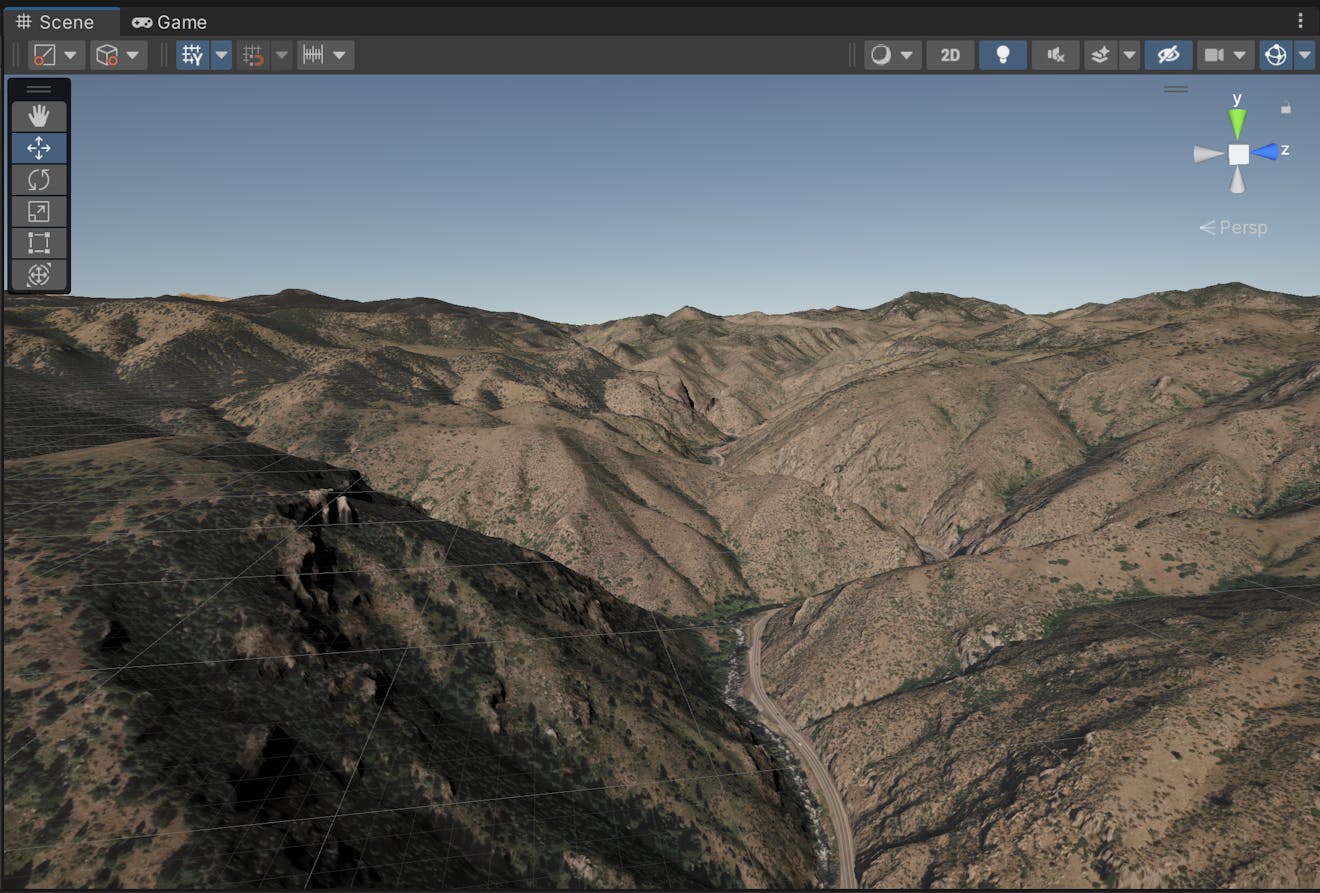
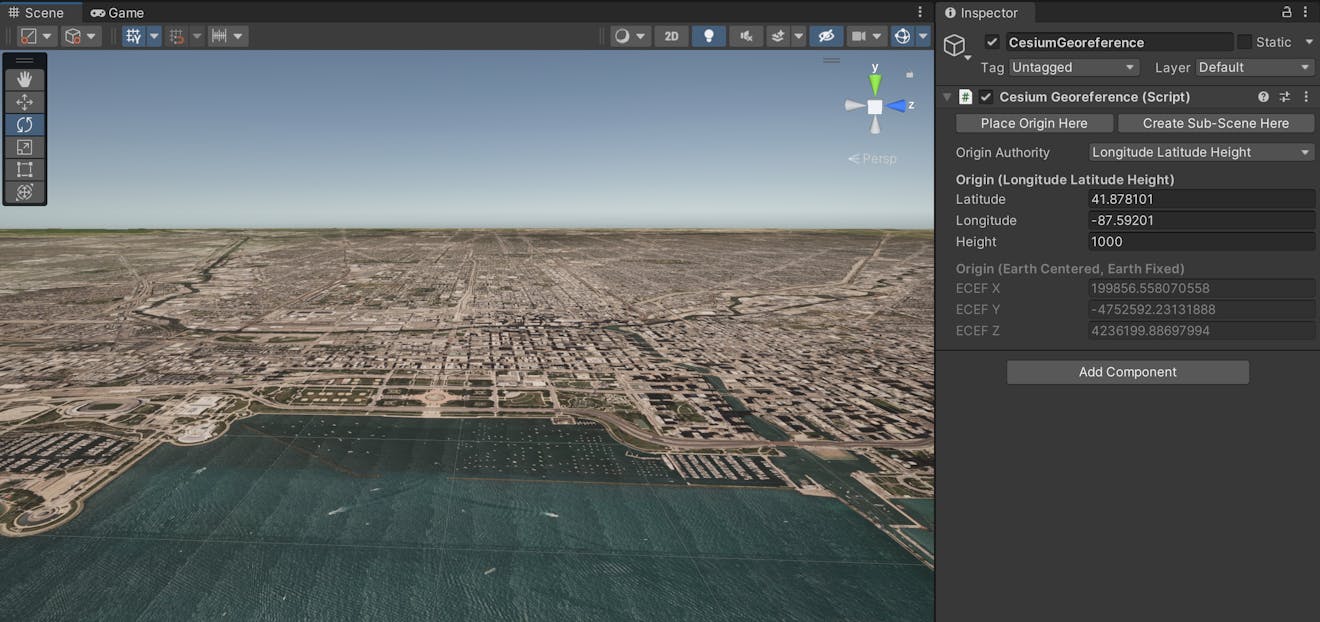
A Cesium for Unity scene with Cesium World Terrain and Cesium OSM Buildings, set in Chicago.
You’ll learn how to:
- Import the Cesium for Unity package into Unity
- Create a level and import assets from Cesium ion
- Set your project's default ion asset token
- Navigate your scene with Cesium's DynamicCamera
Prerequisites
- An installed version of Unity 2021.3.2f1 or later. The latest version of Unity 2021.3+ LTS is recommended. For instructions on installing Unity, visit the Unity download page and refer to the Installing Unity guide.
- A Cesium ion account to stream terrain and building assets into Unity. Sign up for a free Cesium ion account if you don’t already have one.
Cesium ion is an open platform for streaming and hosting 3D content, and includes global, curated data that you can use to create your own real-world applications.
1. Create a new Unity project. Unity recommends creating projects with the Unity Hub, which you can download here. This tutorial was written with Unity Hub 3.3.0.
Create a new project from the Projects tab by clicking the New project button.
A new window should open, allowing you to configure your project. This tutorial uses the 3D (URP) template, but the 3D (HDRP) template will also work. Give your project a name and choose its file location. Then, press Create project. Your new project will open momentarily.
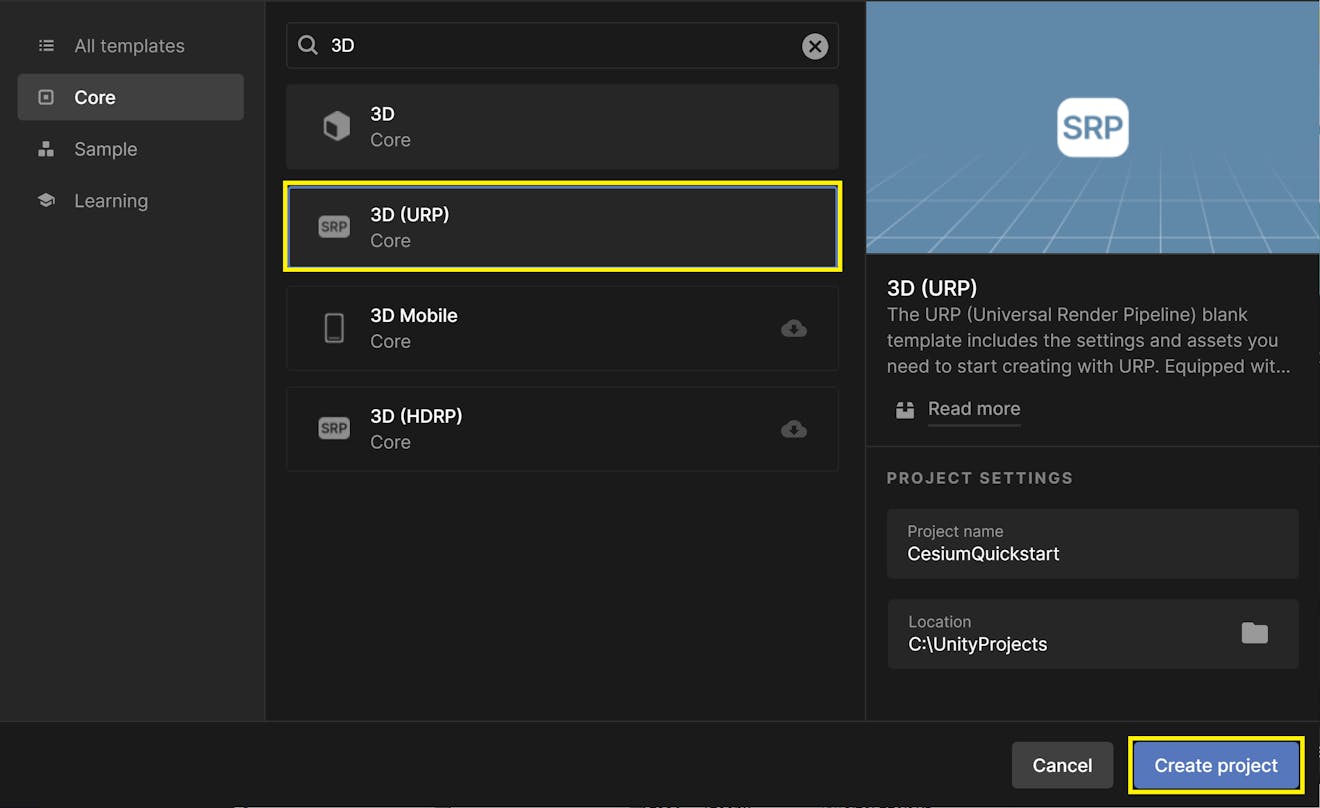
Cesium for Unity works with both the Universal Render Pipeline (URP) and High Definition Render Pipeline (HDRP). However, it does not support Unity’s built-in renderer. If you choose the empty 3D project as your template, the datasets loaded by Cesium will not render properly.
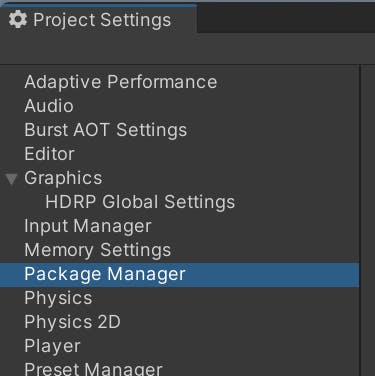
2. Once the project has fully loaded, open the Project Settings by going to Edit > Project Settings... in the menu.
3. Click the Package Manager section on the left.
4. Add a new Scoped Registry with the following settings and click Save:
Name: Cesium
URL: https://unity.pkg.cesium.com
Scope(s): com.cesium.unity

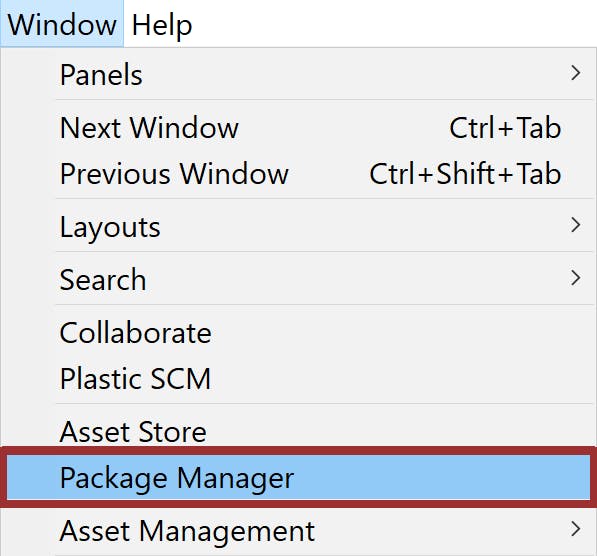
5. Close the project settings and then open the Package Manager by going to Window > Package Manager in the menu.
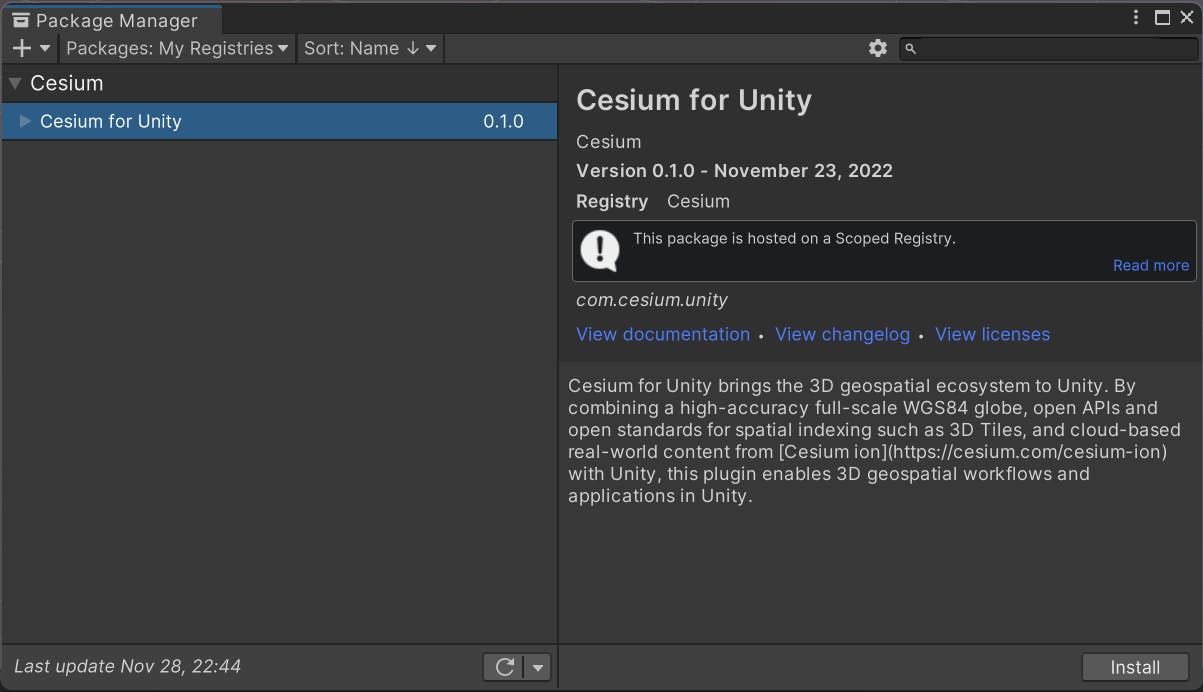
6. In the Package Manager, click on the Packages drop-down and select My Registries.
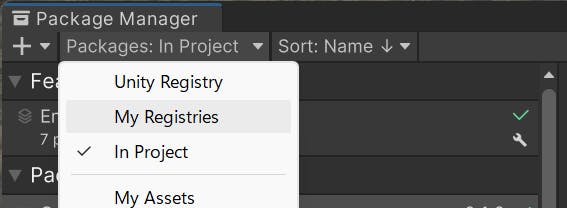
7. Cesium for Unity will appear in the package list. Click on it, and then click Install. Cesium for Unity and its dependencies will be downloaded and installed.
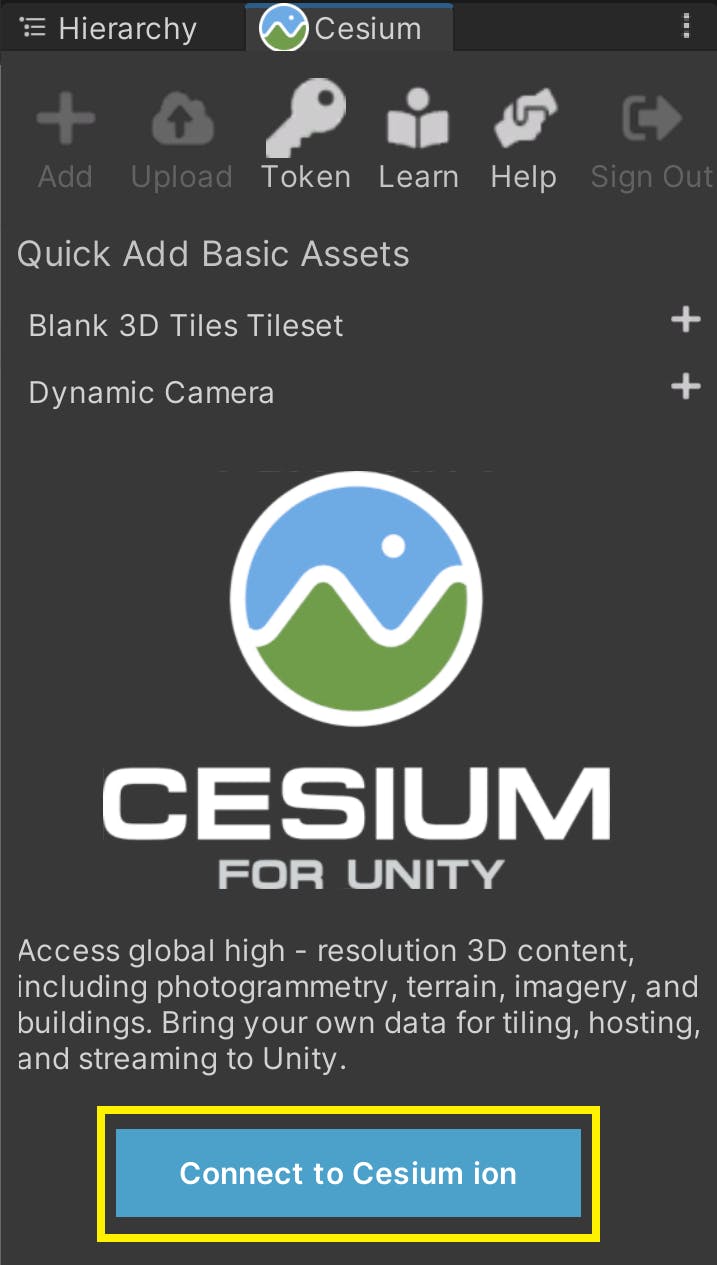
1. Open the Cesium window by selecting Cesium > Cesium from the menu.

2. Click the Connect to Cesium ion button.
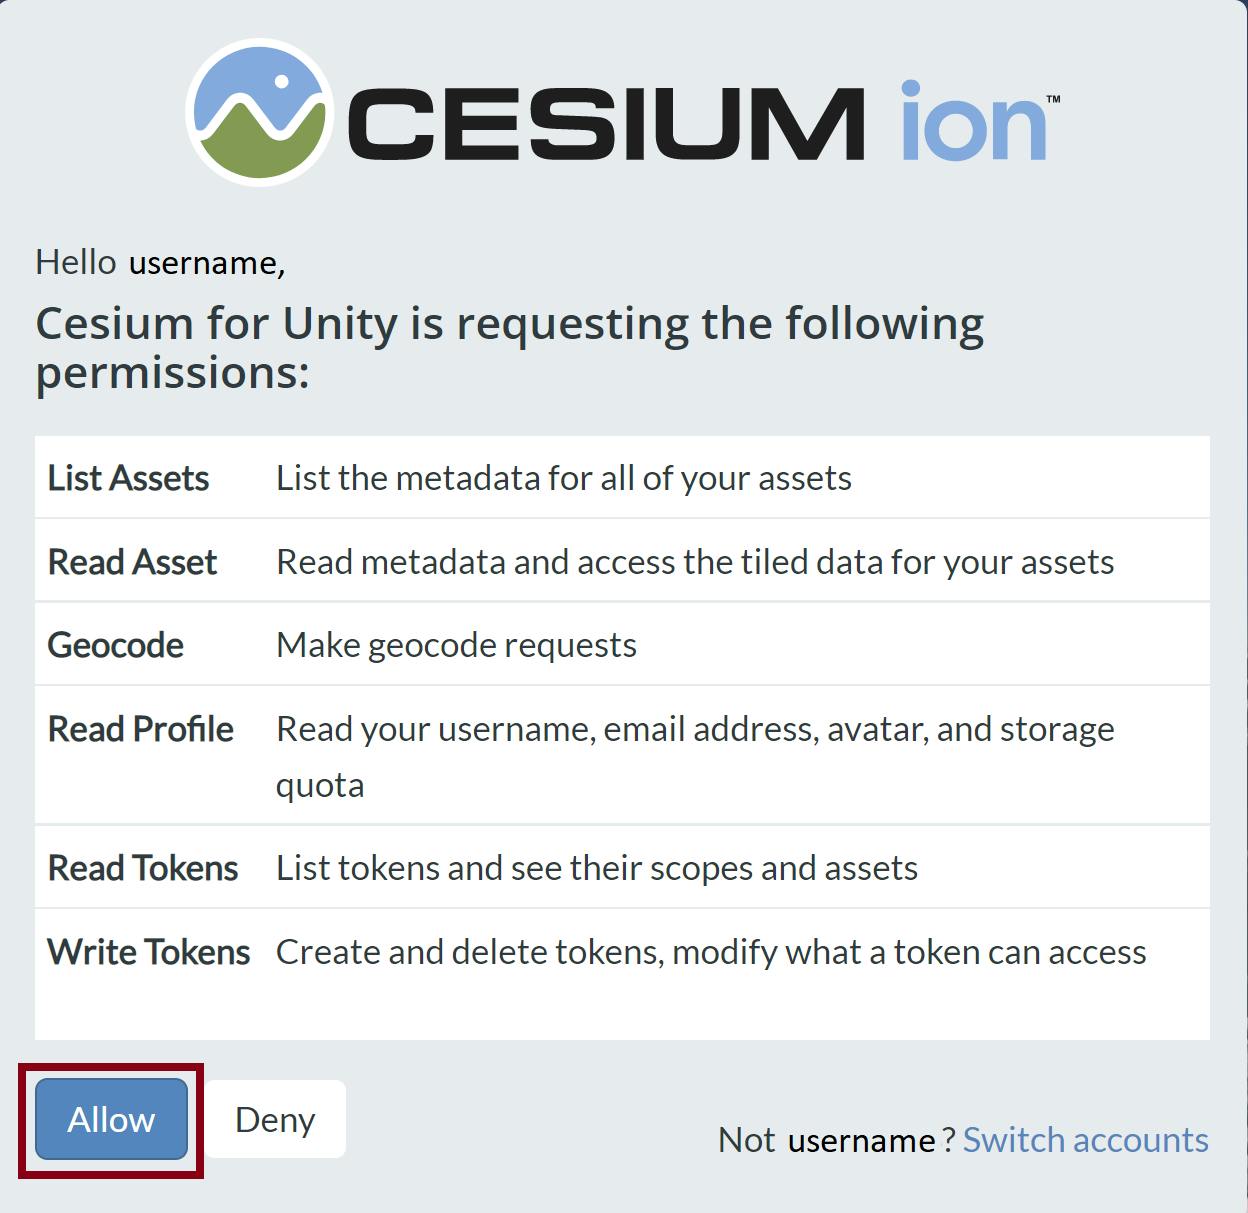
3. A pop-up browser window will open. If you are not logged in, log in to your Cesium ion account. You can also sign in with your Epic Games, Github, or Google account.
4. Once you are logged in, you'll see a prompt asking you to allow Cesium for Unity to access your assets. Select Allow, then return to Unity to continue.
5. Now you'll create a default access token for your project. Every asset that you stream from Cesium ion requires an access token. In this tutorial, you'll set a project-wide access token that all your assets will use.
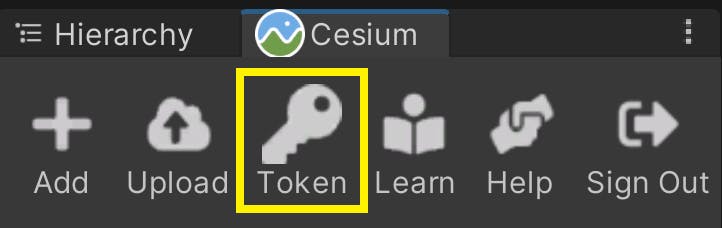
Click on the Token button at the top of the Cesium window.
6. A new window will appear to configure the token. Select the Create a new token option, and rename the token if you wish. Then, press the Create New Project Default Token button.
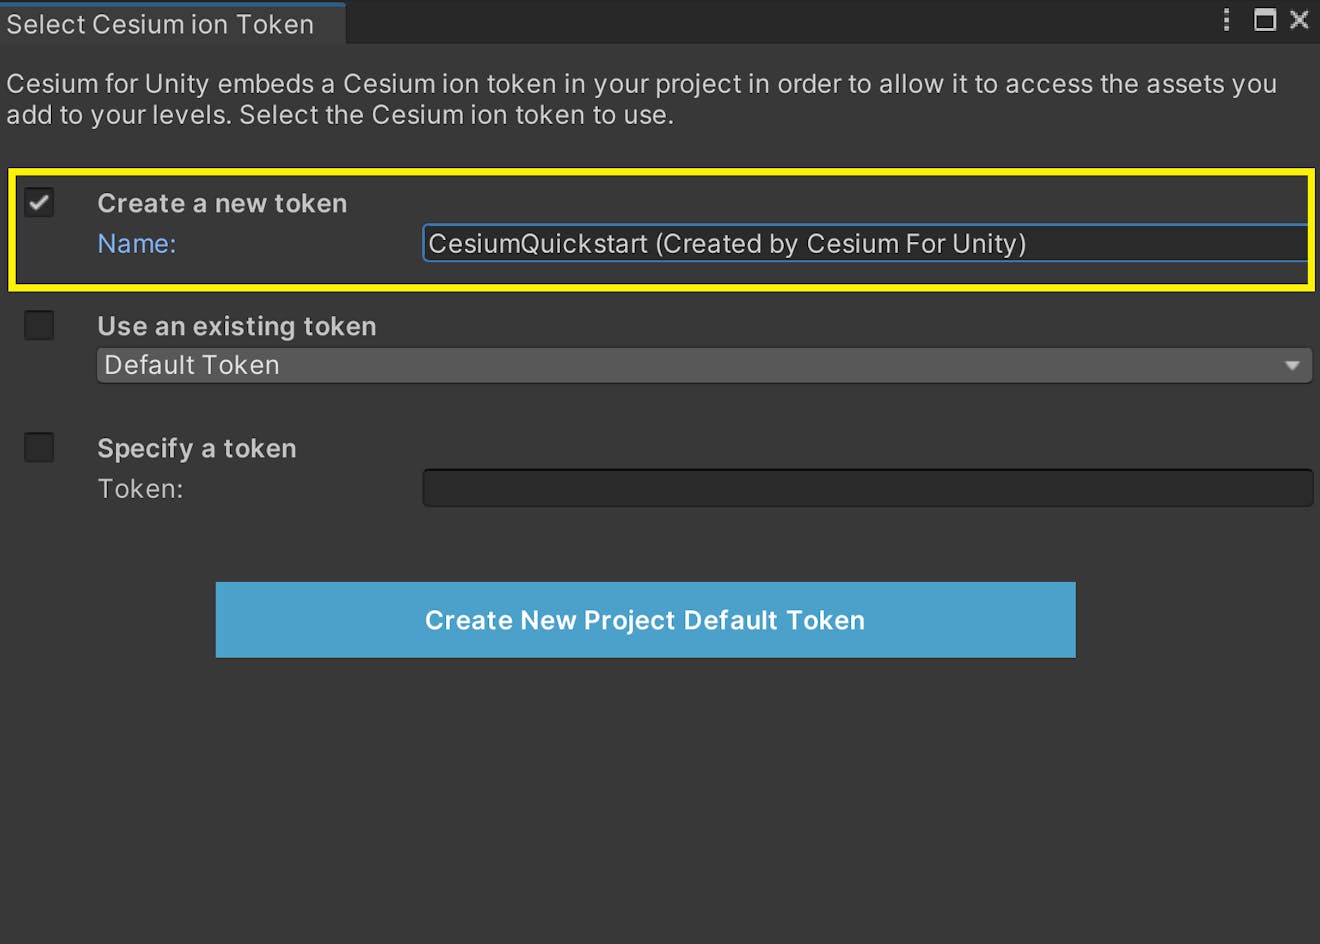
The new token you created will be added to your Cesium ion account.
If you already have a token in your Cesium ion account that you would like to use, you can select it from the "Use an existing token" drop-down instead of creating a new one.
Tokens created by Cesium for Unity access only the assets that you allow. This follows security best practices for your Cesium ion account. Whenever you use the Cesium panel or Cesium ion Assets panel to add an asset to your scene, Cesium for Unity will automatically update the appropriate permission for the token.
You may choose to manually configure your token and add or remove assets using the Access Tokens page on Cesium ion.
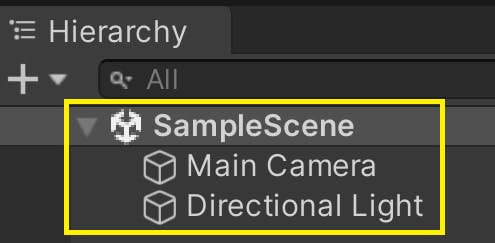
Unity creates a new SampleScene whenever you create a new project. Feel free to rename your scene. Verify that it contains a Main Camera and a Directional Light in the Hierarchy window.
If either of these objects is missing, you can add it from the menu by clicking GameObject > Camera or GameObject > Light > Directional Light, respectively. You may have additional objects in your scene depending on which render pipeline you chose, which is fine.
With these basic objects in your scene, you are ready to add an asset from Cesium ion.
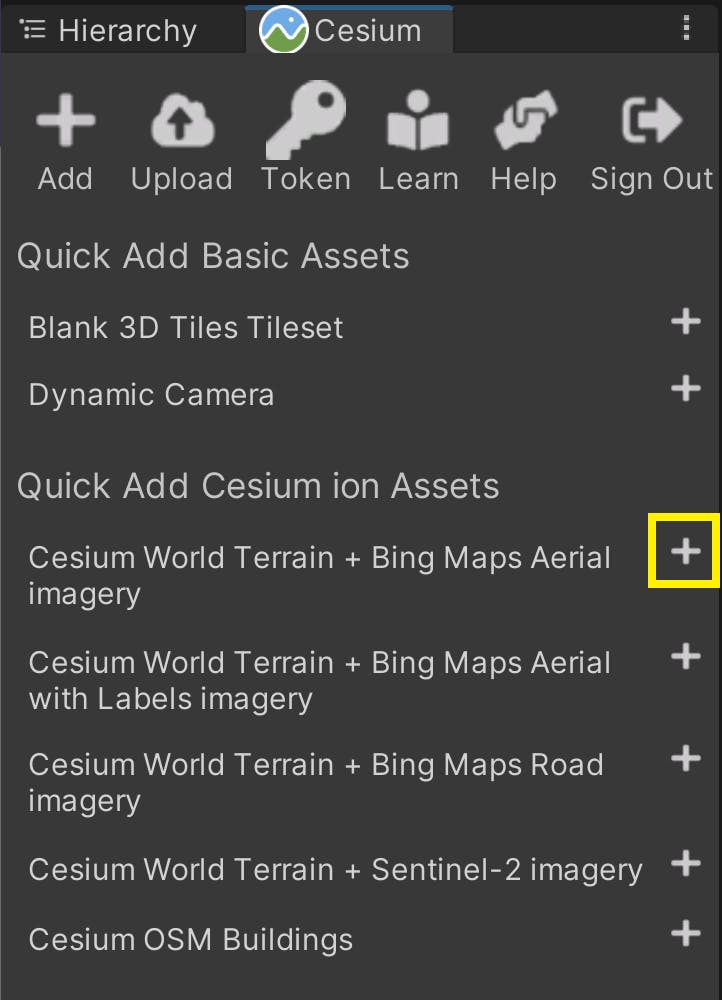
1. From the Cesium window, add "Cesium World Terrain + Bing Maps Aerial imagery" by clicking the button next to that entry.
Terrain will start to appear in the scene.
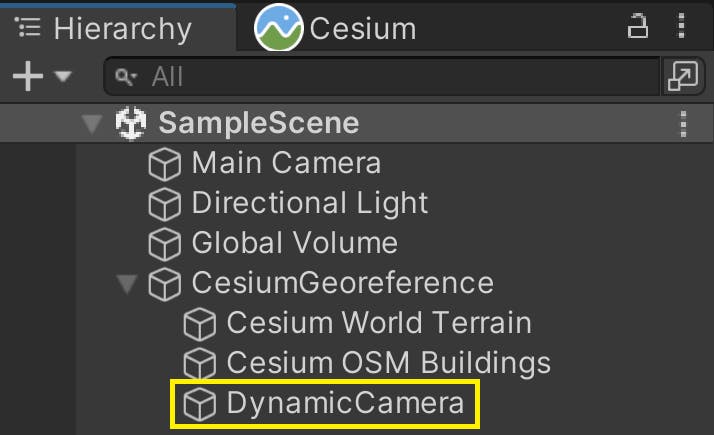
2. Take a look at the Hierarchy window. You should see two new game objects. One of them, Cesium World Terrain, is the tileset you just created. The parent of the tileset, CesiumGeoreference, is created automatically the first time you add a 3D Tileset to the scene.
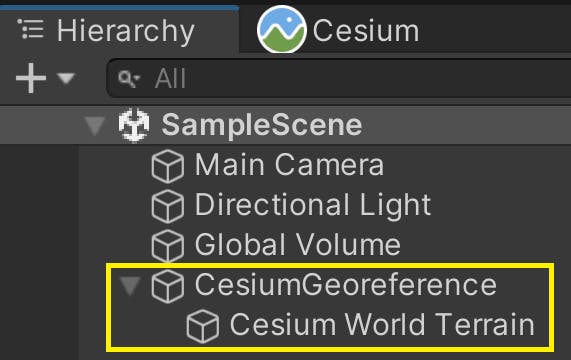
3. If Cesium World Terrain is not already selected, select it now. In the Inspector window, you'll see more information about this game object.
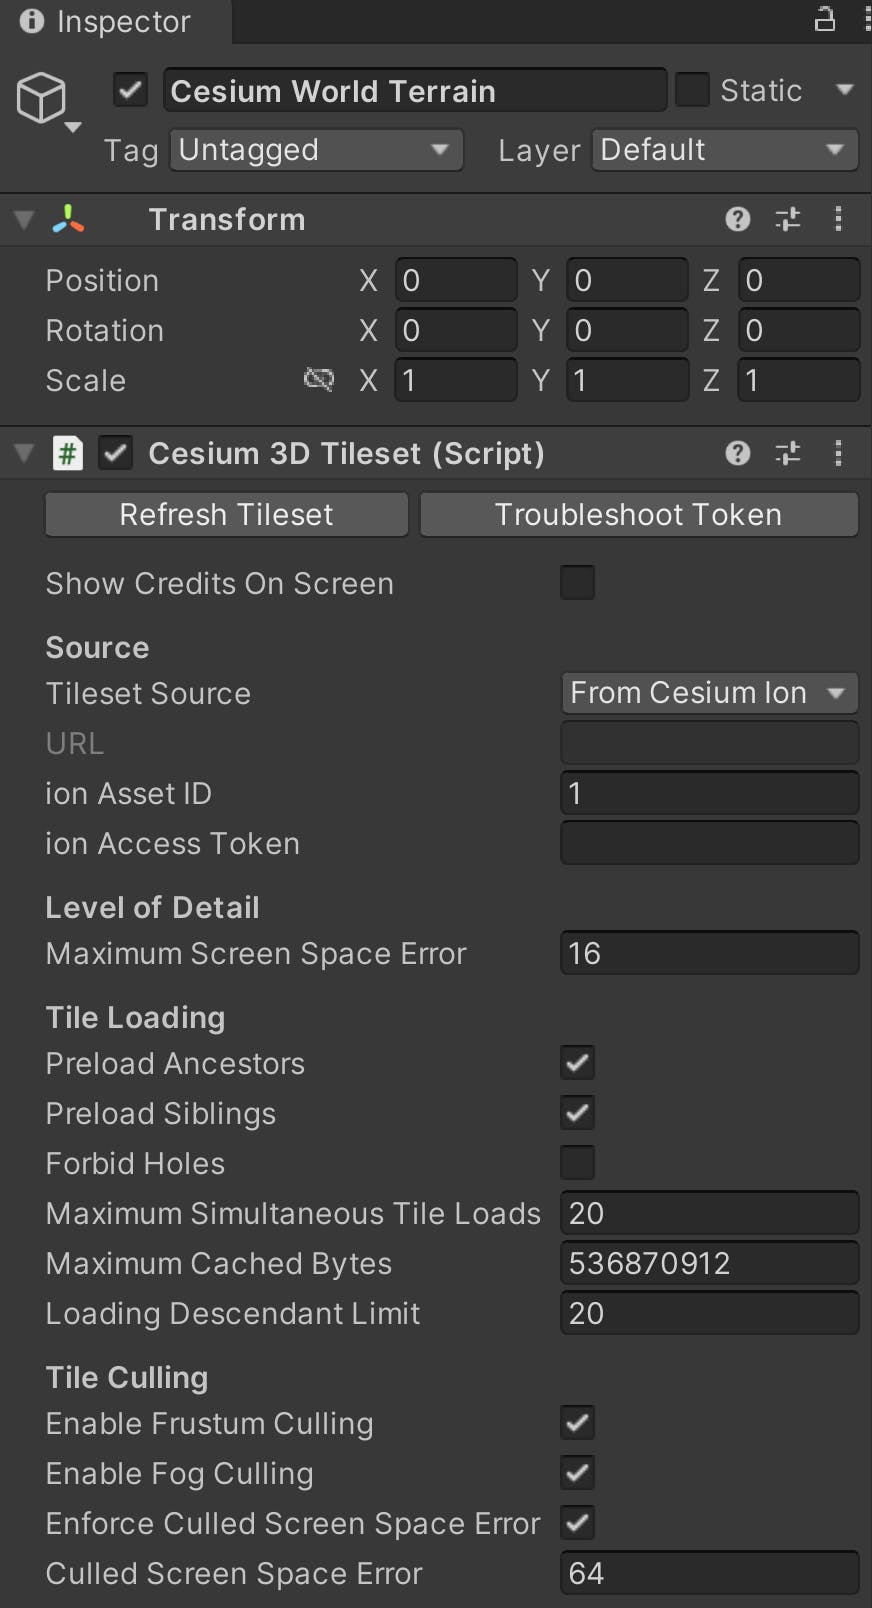
This is a Cesium3DTileset component. When attached to a game object, it streams 3D Tiles data into Unity and provides ways to configure that tileset.
You'll learn about many of the available settings in future tutorials. For now, feel free to explore and try out the different settings yourself. Hover over any setting with your mouse to learn more about what it does.
Once you're ready, continue to the next section.
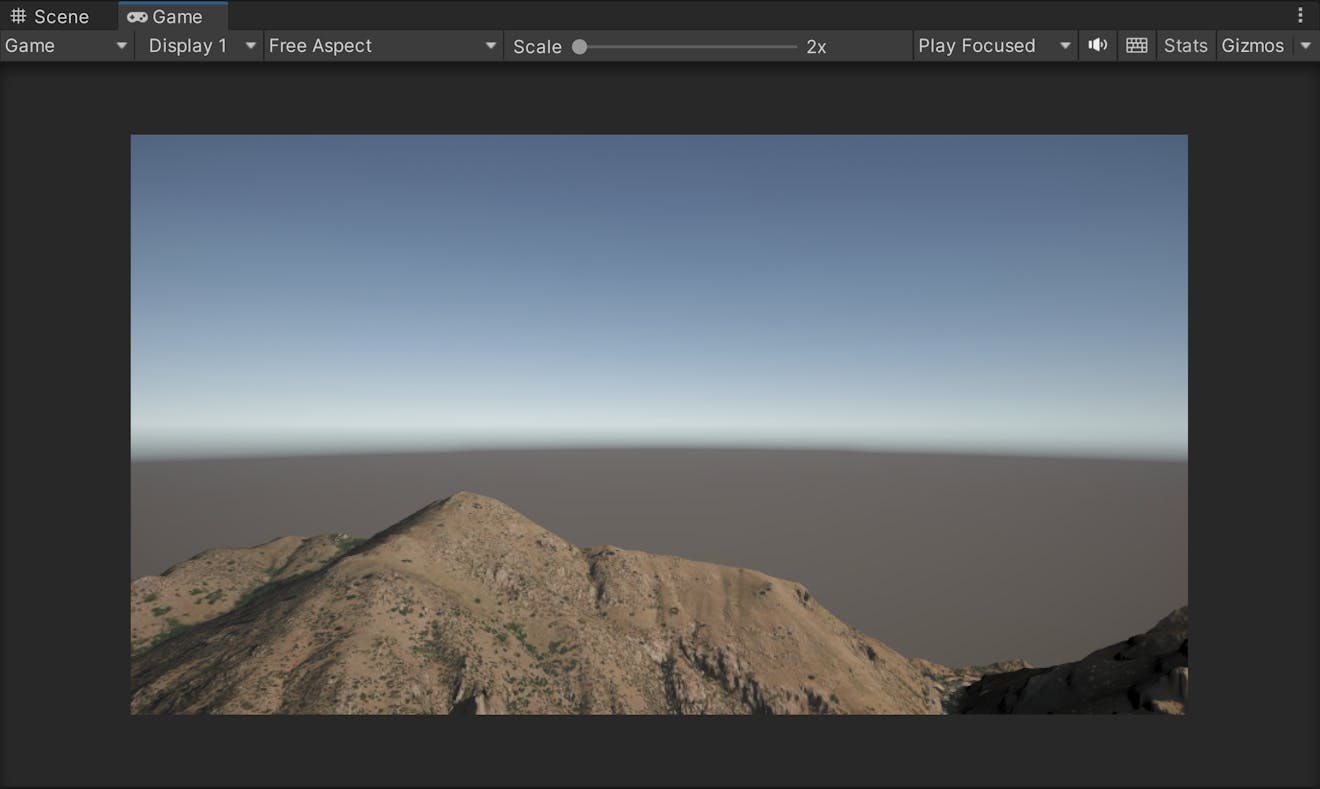
In your scene, you should have a game object named Main Camera with a Camera component attached. If you added a camera to the level yourself, it may be called Camera instead. This camera will capture your scene during Play Mode. You can preview this by clicking the Game tab.

You may notice that the terrain on the horizon is strangely cut off. This clipping can also happen in the Scene view while moving the Editor camera around, though it is usually less obvious.
This happens because cameras in Unity can only see a limited range in front of them. If you view your camera from the Scene view, you can see its range visualized as a frustum, like below.
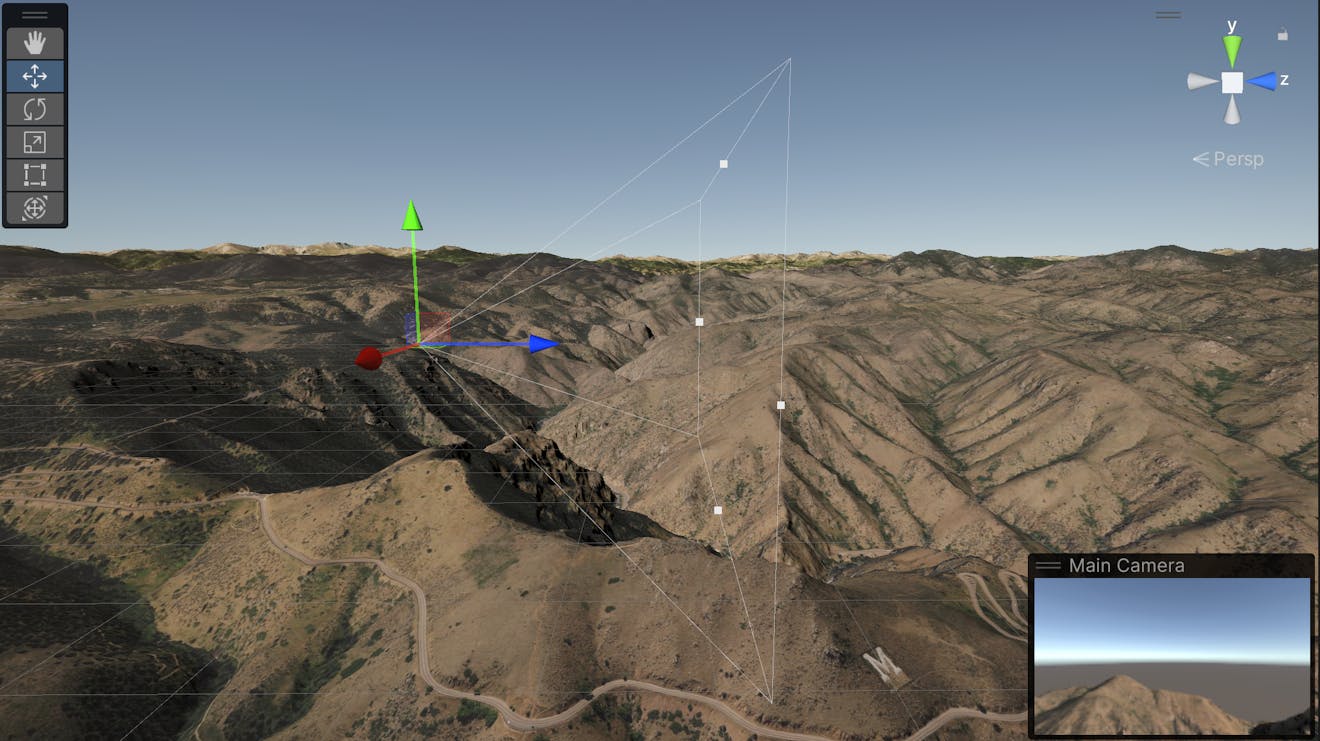
The start and end of the camera’s frustum are defined by the clipping planes. These represent the distances from the camera at which objects will show up. It is clear that the camera cannot see very far in the distance.
Cesium World Terrain is a full-scale globe, so Unity is rendering terrain that spans hundreds of thousands of miles, just from this camera view! However, Unity’s cameras are not configured to see objects this far by default. Fortunately, you can manually adjust the clipping planes so the camera can properly view the scene in Play Mode.
1. Select your camera from the Hierarchy window, and go to the Camera settings in the Inspector. Find the values of the Clipping Planes.
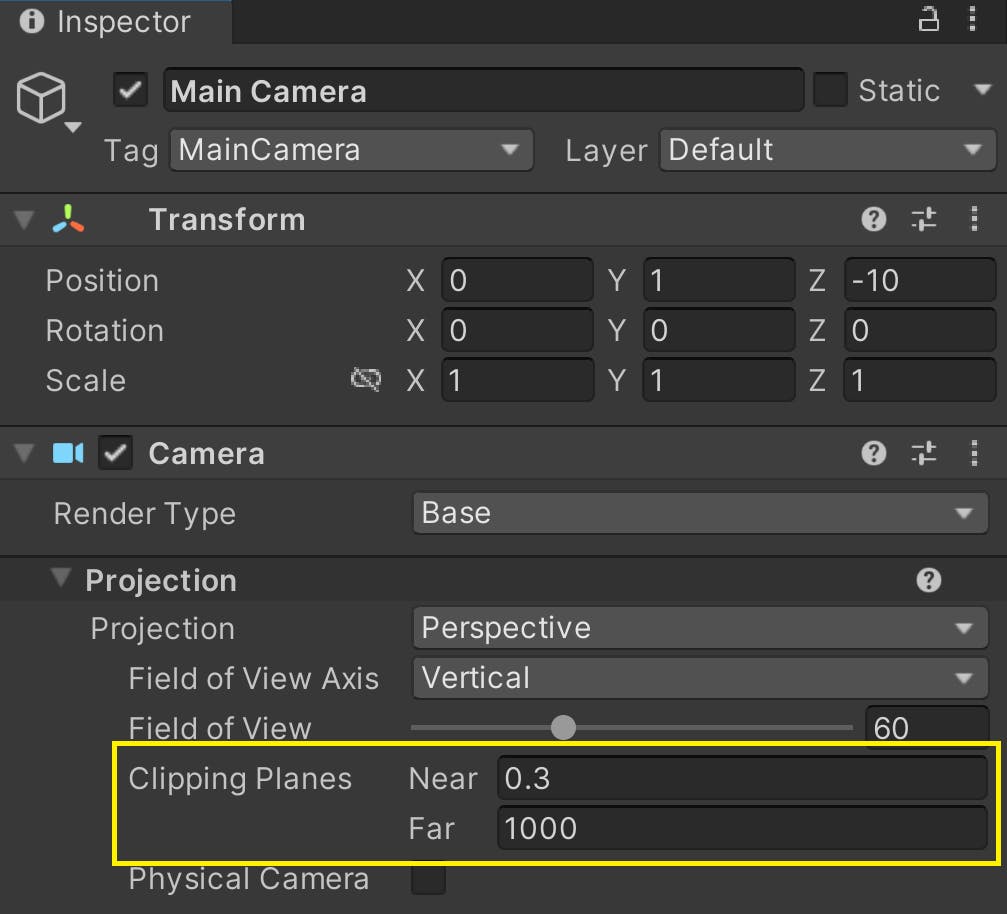
The Near clipping plane is the minimum distance from the camera where objects start to appear. If this is a large value, objects close to the camera will not show up. On the other hand, the Far clipping plane is the maximum distance from the camera that objects will appear. Anything farther than the Far plane will not appear.
It is clear that the camera cannot see very far in the distance. However, this can be easily changed in the Camera component.
2. Set the Near value to 1 and the Far value to a large value, at least 100,000. This will significantly extend the sight of the camera and prevent the terrain from being clipped in-game.

In your own applications, these values can change depending on your use cases. For example, you can set the Near plane to a larger value if you plan to show data only from far away. Try not to let the Far plane get too far away from the Near plane, or you may run into rendering issues. See the Unity documentation for the Camera component for more details.
Now that your camera can see more of the scene, feel free to position the camera to get the best view of the terrain. You can use the Move and Rotate tools in the Scene view to move the camera to the perfect spot. You can also switch to these tools by pressing the W and E keys on your keyboard respectively.
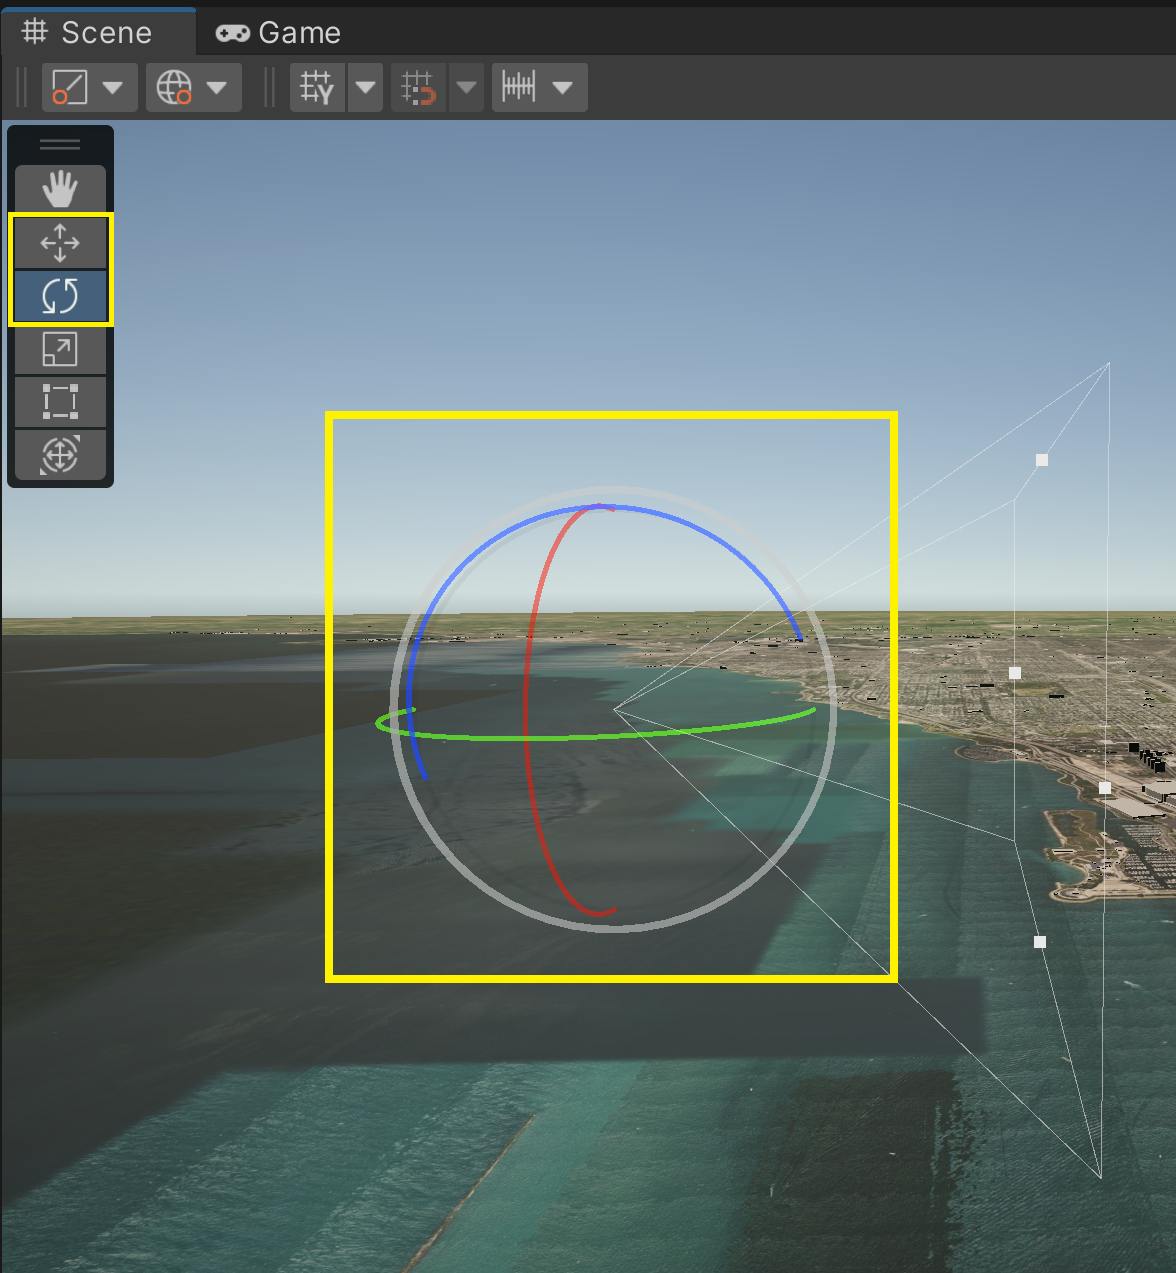
The Unity Editor’s camera works a bit differently than the in-game cameras. You can view its settings by clicking the camera icon from the Scene view.

The editor camera has an option for Dynamic Clipping, which automatically adjusts the Near and Far values of the camera depending on what is visible in your scene. When this option is checked, the Near and Far planes cannot be manually adjusted.
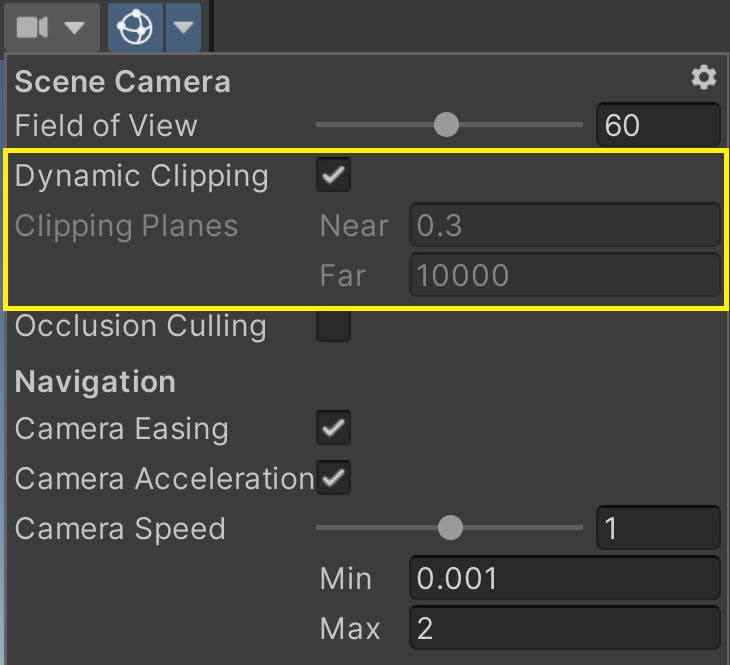
This setting is useful when working with Cesium for Unity, especially when zooming in and out on the globe. However, the automatic adjustments are not always precise, and clipping may still occur. If necessary, you can disable this option and set the Near and Far values yourself. You can also change the Camera Speed if you want to travel around the globe faster in the Editor.
Now that you’ve adjusted your camera to render more of the Unity scene, let’s return to adding content to the world. Cesium for Unity can visualize more than just terrain, which we can demonstrate with a global dataset of city buildings.
- Select the CesiumGeoreference game object in the Hierarchy window. This object determines where in the world your Unity scene is set. The scene's current latitude, longitude, and height can be changed with this game object.
- In the Inspector window, look for the Latitude, Longitude, and Height variables under the Origin (Longitude Latitude Height) header.
These coordinates currently point to the hills outside Denver, Colorado, USA.
3. Change these variables to the coordinates of your favorite city. This tutorial uses the following coordinates for Chicago, Illinois, USA.
Latitude: 41.878101
Longitude: -87.59201
Height: 1000.0
After entering these coordinates, the scene will have shifted to the new location.
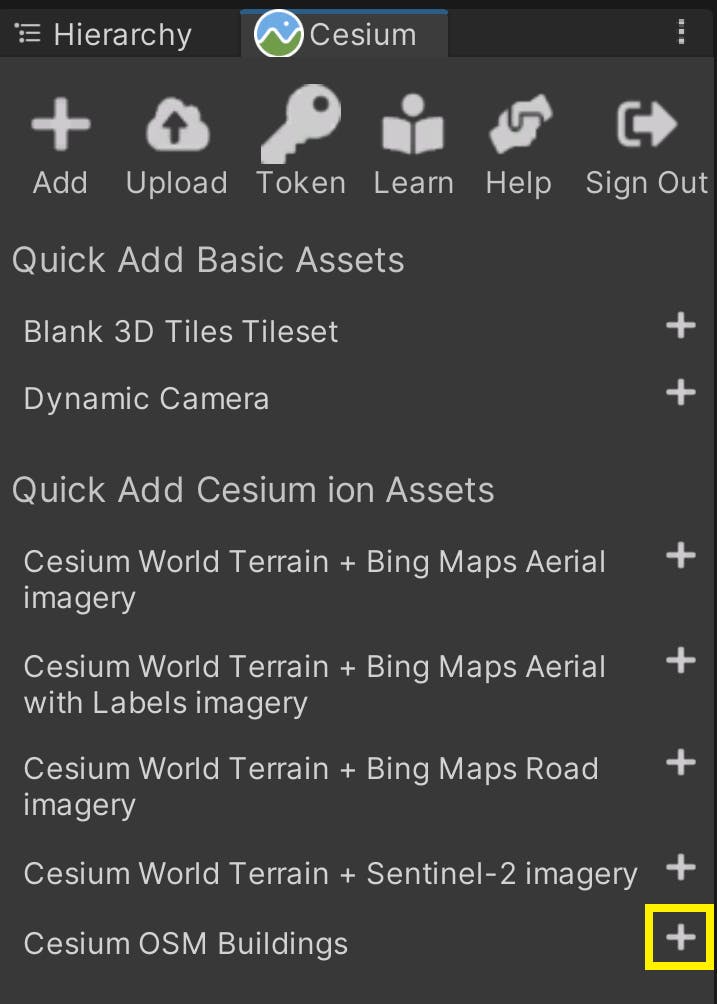
4. The city looks very flat because Cesium World Terrain doesn't include building details. Fortunately, the Cesium OSM Buildings dataset can be added to fill the empty space.
In the Cesium window, locate the Cesium OSM Buildings option underneath Quick Add Cesium ion Assets. Click to add the data to the scene.
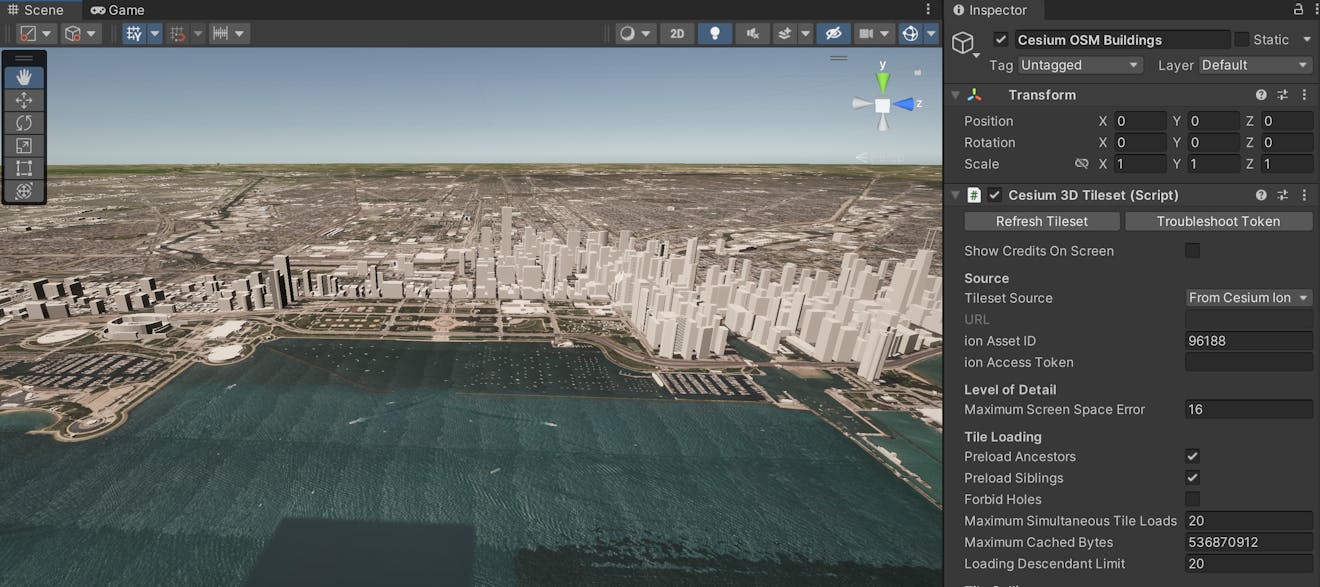
The buildings should now appear on top of the terrain. You may be able to recognize some of the buildings that make up the Chicago skyline!
Now that you have added global real-world content to your scene, let’s learn how to navigate it. You’ll learn multiple ways to move the Editor camera through your scene. You’ll also learn about the Dynamic Camera, a controller included in the Cesium for Unity package that will help you navigate the Earth's immense size during play mode.
The Editor camera can be controlled by using your keyboard and mouse. With the Scene View selected, use the arrow keys to move the camera forward, backward, left, or right. You can pan the camera by either selecting the hand icon in the Tools menu or holding the middle mouse button, then dragging across the Scene View window.

To look around with the camera, hold the right mouse button and drag the mouse across the Scene View. You can also rotate the camera by holding Alt and dragging with the left mouse button. Lastly, you can use the mouse’s scroll wheel, or hold Alt while dragging with the right mouse button, to zoom in and out of the scene.
If the Editor camera is moving too slowly, you can adjust the Camera Speed as described in the previous step.
For play mode, Unity provides a Character Controller component that you can attach to your camera to move it through the scene. However, you may need a controller that accounts for the scale of real-world data and can efficiently navigate the globe at any altitude. This is where Cesium for Unity’s Dynamic Camera comes in.
Q: What is the Dynamic Camera?
Cesium's DynamicCamera is a globe-aware camera controller that can adjust its orientation based on where it is on the globe. The DynamicCamera is able to dynamically adjust its clipping planes so the globe is not clipped as it zooms out. It also offers easier navigation of the globe by allowing users to adjust its movement speed with the mouse wheel, and providing the ability to fly between global locations along a curved path.
1. Using the Cesium panel, add a Dynamic Camera to your scene.
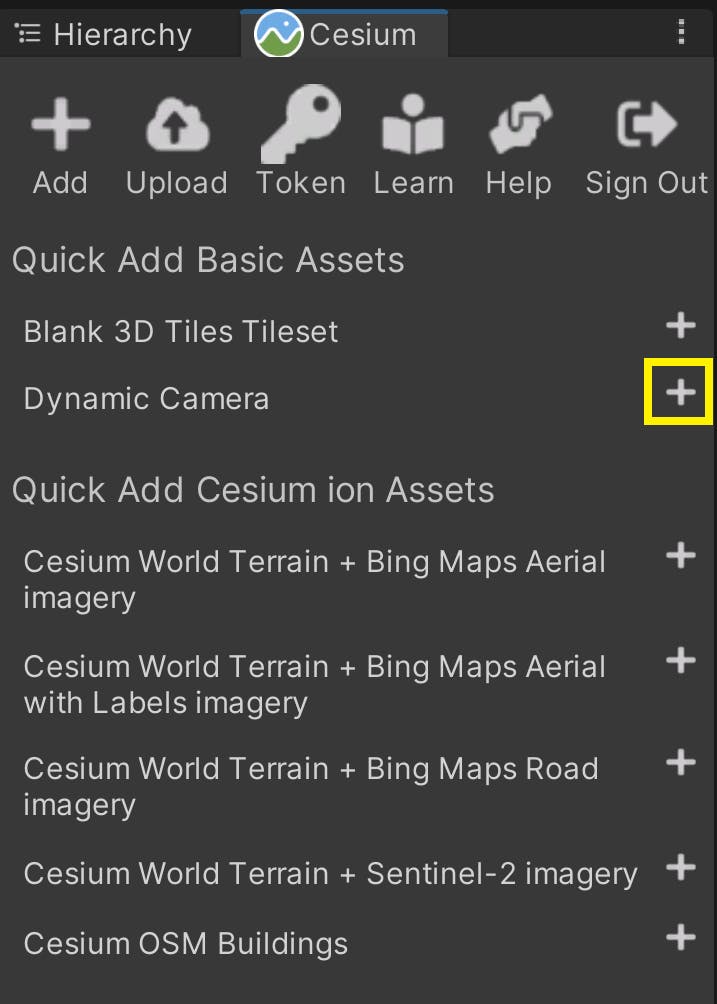
The DynamicCamera should appear under the existing CesiumGeoreference in the Hierarchy window.
2. Disable the Main Camera by selecting it in the Hierarchy window and unchecking the box next to its name in the Inspector. The DynamicCamera will become the new main camera of the scene. You can also remove the Main Camera object from the scene entirely.

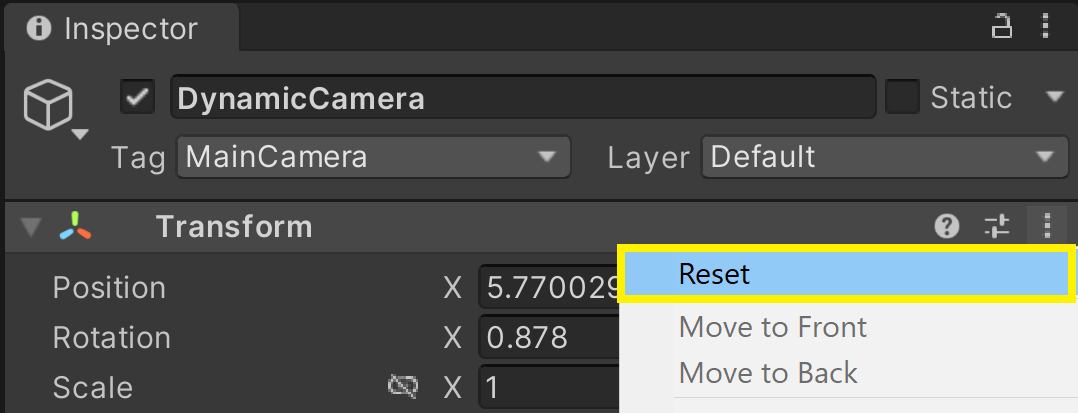
3. Since the DynamicCamera is a georeferenced object, it will maintain its position relative to its coordinates on the globe, and not the standard Unity world coordinates. This means that if the CesiumGeoreference’s Origin is changed to a different location, the DynamicCamera will stay behind.
If you'd like to move it to your new location, select it in the Hierarchy window and find its Transform in the Inspector. Change its Position’s X, Y, and Z coordinates to 0 to move it to the Unity origin. You can also right-click the three dots on the Transform component and select Reset from the drop-down menu.
4. You're ready to test out your scene! Press the Play button at the top toolbar.

You can use the W, A, S, and D keys and the mouse to fly around. You can also use the Q and E keys to move the camera vertically with respect to the globe. Use the mouse scroll wheel if you need to change your speed.
You've created your first scene with Cesium for Unity. Feel free to explore and check out the world!
Now you are ready to add your own assets to the scene. Continue on to Adding Datasets.