Using Custom Controllers
In this tutorial, you will learn how to set up controllers other than Cesium’s DynamicPawn and build out a level based on imported photogrammetry.
Video version of this tutorial. Keep reading for the written tutorial.
You’ll learn how to:
- Import a Content Pack
- Change the game mode in your level
- Use physics-based controls on Cesium 3D Tilesets
- Change between character controllers in play
- Optimize level settings for a smooth experience
- Know how to set up a basic Cesium for Unreal application. Check out our Cesium for Unreal Quickstart guide for instructions on starting with the Cesium for Unreal plugin.
- Know how to import a photogrammetry tileset from Cesium ion. Read the Adding Datasets guide.
Start with the 01_CesiumWorld level in the Cesium for Unreal Samples. Or, set up a new world with a Cesium World Terrain and Cesium SunSky as outlined in the Cesium for Unreal Quickstart guide.
1This level will use a high-resolution dataset of Denver, Colorado, USA. Open the Cesium ion window and click the Add button. Search in your ion assets to find “Aerometrex Denver Photogrammetry”, then click the Add to Level button.
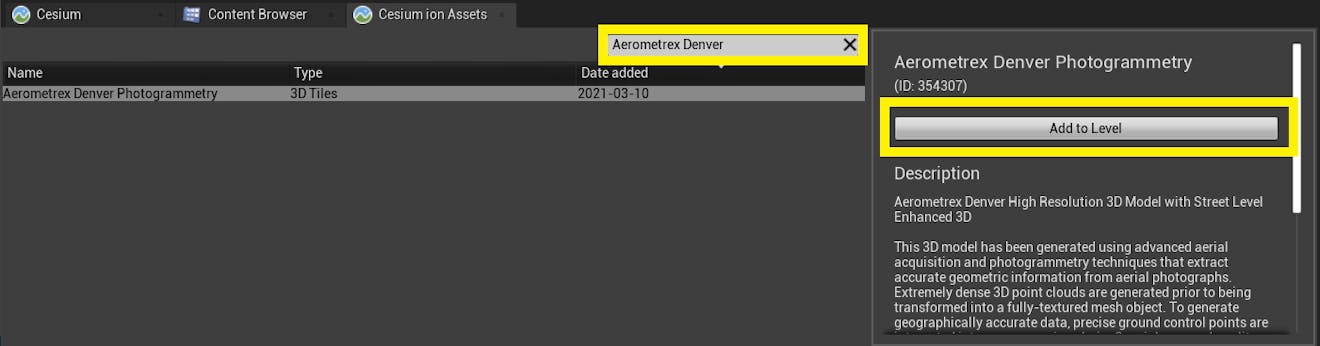
Is Aerometrex Denver Photogrammetry missing from the asset list? Visit the Aerometrex Denver Photogrammetry Asset Depot page and click Add to my assets. Then return to Unreal Engine, close the Cesium ion Assets panel, and click the Add button again on the Cesium panel to re-open and refresh the asset list.
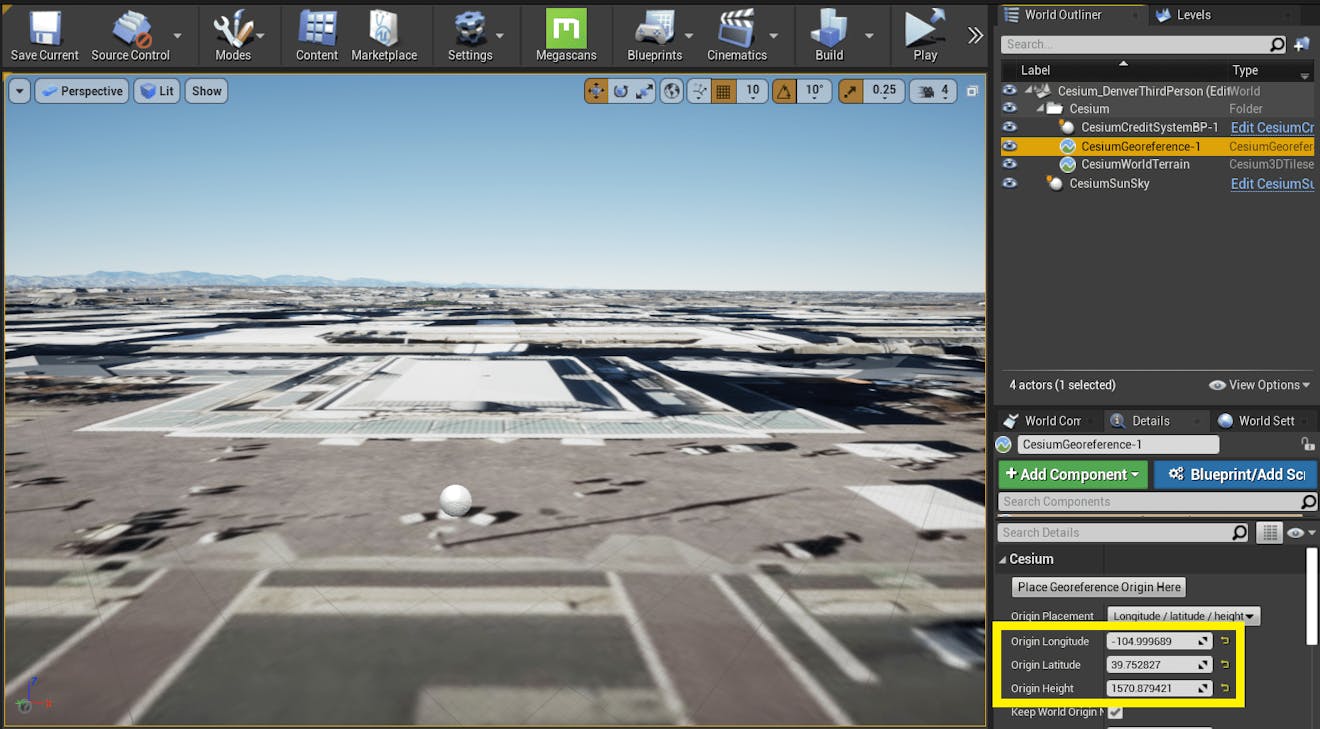
2There are two ways to set the georeference. If you have a specific longitude and latitude in mind, you can set it directly: Select the CesiumGeoreference actor in the World Outliner and in the Details panel, look for the Origin Latitude, Origin Longitude, and Origin Height parameters. Set them to the following coordinates to start in Denver:
Origin Latitude = 39.752827
Origin Longitude = -104.999689
Origin Height = 1570.879421
Alternatively, you can double click on the Aerometrex Denver Photogrammetry in the World Outliner. This will move the scene view to the location of the photogrammetry. You can navigate using the scene view to the location where you would like the world origin to be, and use the Place Georeference Origin Here button.
3You’ll see that the Cesium World Terrain is clipping through the Denver photogrammetry.
4In the Outliner, select the Aerometrex Denver Photogrammetry actor and set the Z Location to 600.0. This will raise the height so that the Cesium World Terrain and the photogrammetry don’t intersect.
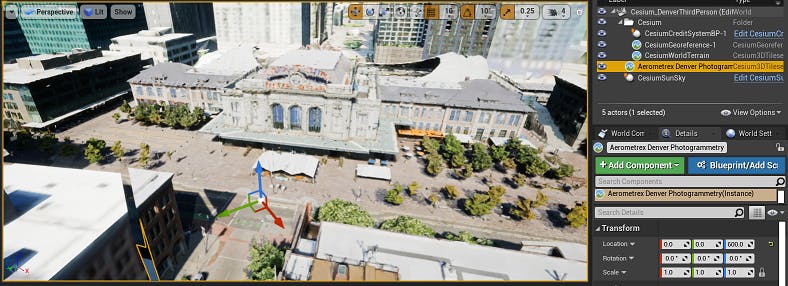
Changing the Z location of a tileset is a quick fix to avoid overlapping tilesets, and is the recommended approach if you intend to use physics-based controllers on a tileset. If you'd like to learn how to "clip away" Cesium World Terrain visually to make room for the tileset, visit the Cartographic Polygons tutorial.
The Cesium for Unreal Samples already contain a ThirdPersonCharacter and ThirdPersonGameMode. If you are using the sample project, you can skip this section. The Sample Project ThirdPersonCharacter can be found in CesiumSamples/Maps/03/ThirdPersonController.
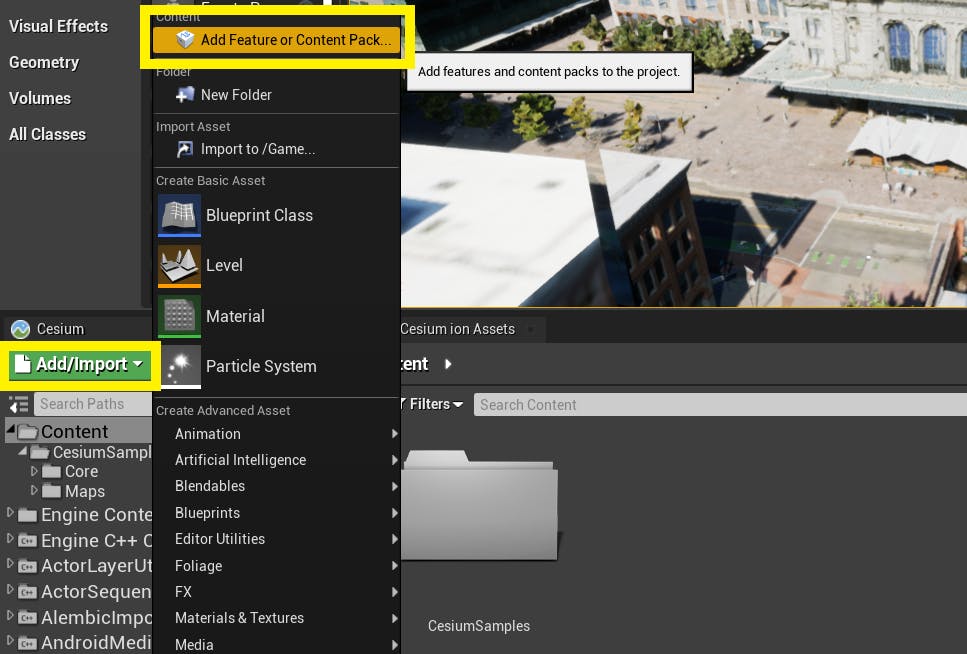
1In the Content Browser window, select the green Add/Import button. Then, select Add Feature or Content Pack at the top of the menu that appears.
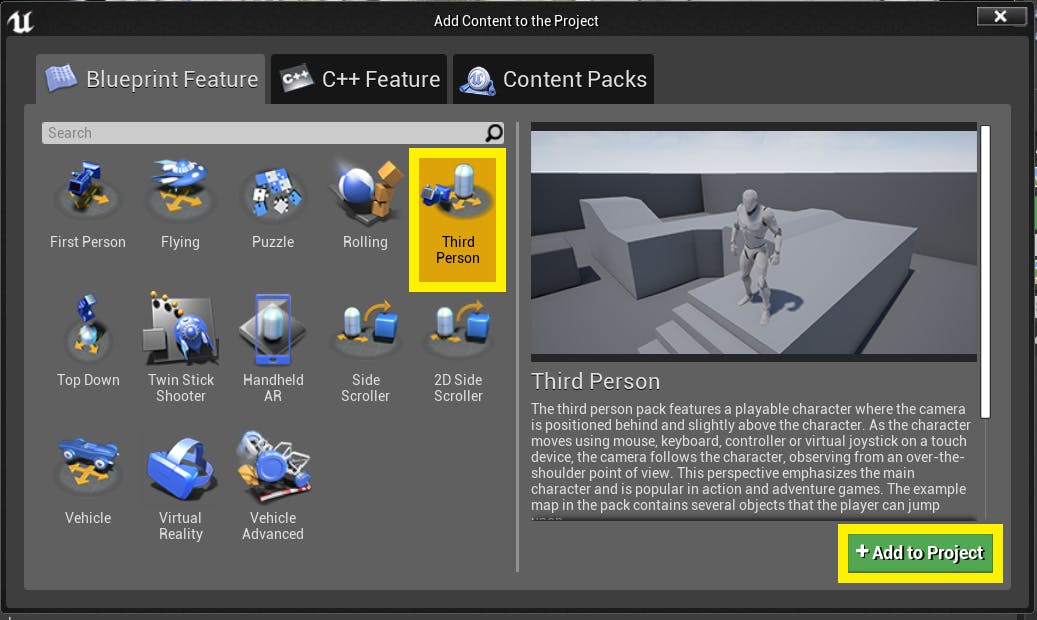
2A new window will appear to add content to the project. For this tutorial, import the Third Person template - Select Third Person, then the green Add to Project button. Feel free to import other templates, or build your own.
Importing this content has added four new folders to the top level of the project’s Content folder - Geometry, Mannequin, ThirdPerson, and ThirdPersonBP. Reorganize these as needed to fit your project’s organization system.
In this step, you’ll learn how to place your pawn in the world. If you wish to have the pawn spawned when beginning play, you can alternatively place a PlayerStart actor in the level and change the GameMode Override in the World Settings panel to the desired game mode.
1In the Place Actor panel, search for “Third Person Character”. Drag-and-drop this actor into the scene. To focus on the pawn, double-click its label in the World Outliner.

Sometimes the ThirdPersonCharacter may not show up in the Place Actor panel. If that occurs, find the actor via the Content Browser. If using the Sample Project, the actor will be in CesiumSamples/Maps/03/ThirdPersonController. Otherwise, the default location after importing the Third Person template is ThirdPersonBP/Blueprints.
2In the Details panel with the ThirdPersonCharacter selected, find the Transform section. Click the yellow arrow next to the location axes to reset its position.
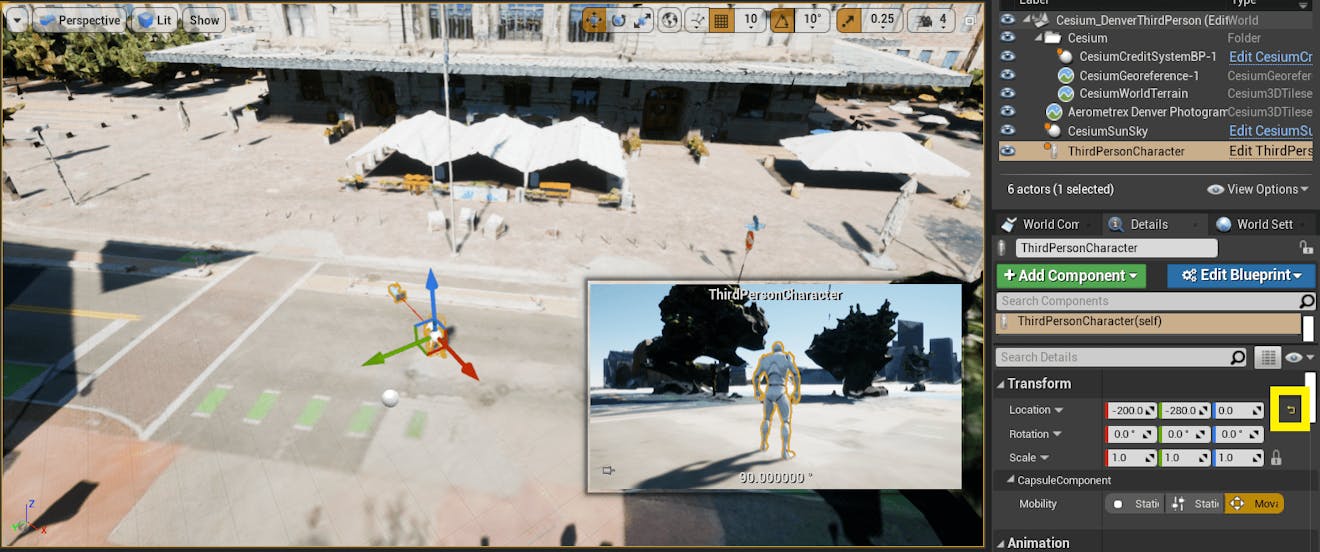
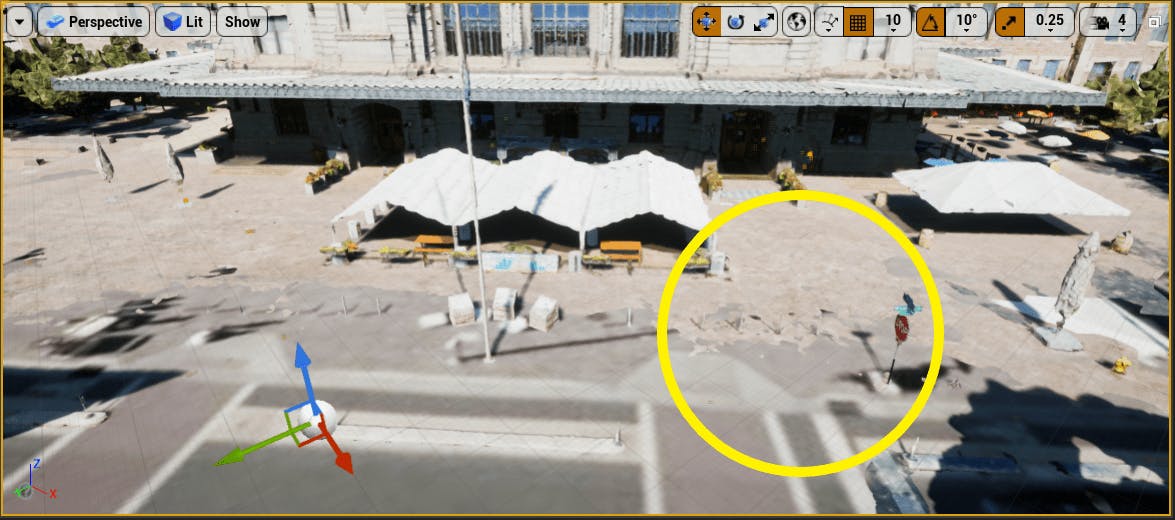
To make sure the player is facing the right direction when entering play mode, set the third rotation value to 220.0. The ThirdPersonCharacter should now be facing Union Station.
3In the Details panel, search for “possess”. Select the dropdown next to Auto Possess Player and select Player 0.
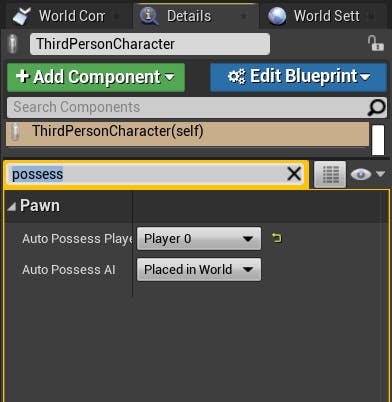
Now in Play mode, you will be able to control the ThirdPersonCharacter with the mouse and WASD keys or a handheld game controller.
If you try to play the level right now, you’ll notice that your actor may begin to fall before the Denver photogrammetry is fully loaded. Read on to find out how to fix this. For this reason, it is also recommended that you disable physics on any physics objects that you are not currently interacting with.
Because 3D Tiles tilesets contain quite a bit of data and are streamed to Unreal Engine, they may take a moment to load in fully. This can cause problems for actors that begin simulating right away, like the physics on your character. In this step, you will place some geometry underneath the photogrammetry to ensure a safe spawn.
1In the Place Actor panel, drag a Cube into the game world.
2Reset the location of the Cube and set the scale to 4.0, 4.0, 0.5.
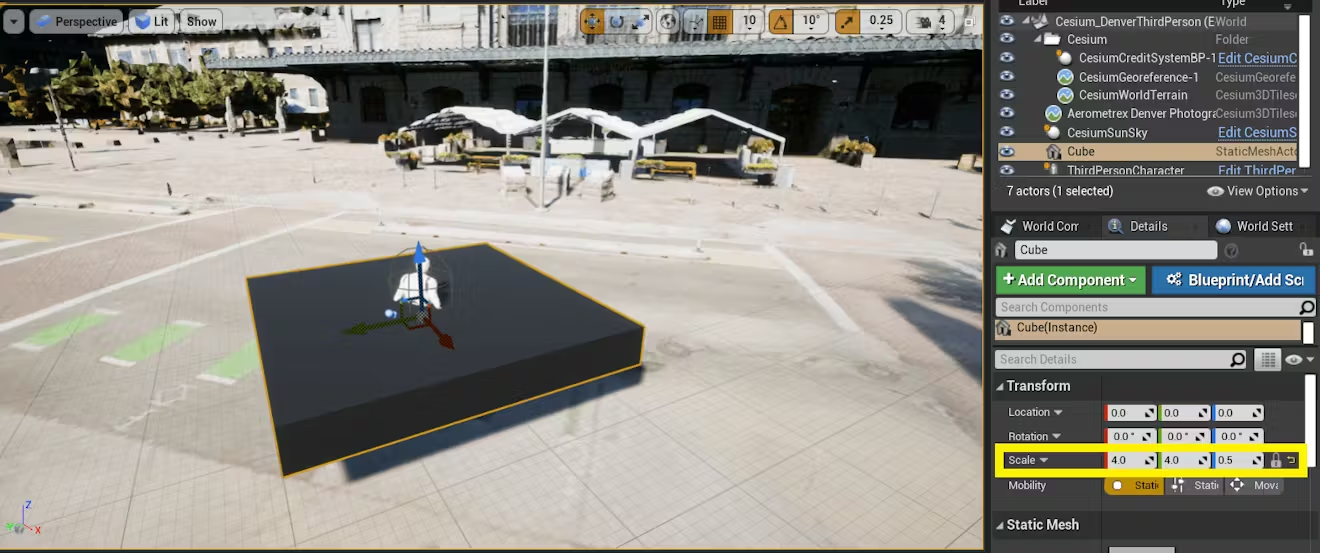
3Using the translate gizmo, move the cube down in the Z axis until it is just barely hidden under the floor, or set the Z Location to -130.0.

4Press Play. The ThirdPersonCharacter should now stay in place as the world is loaded in.
Placing actors in a level is safe as long as you do not change the CesiumGeoreference origin. Changing the CesiumGeoreference origin now will result in all these actors moving to the new origin. To learn more about how to safely place and georeference actors, read Placing Objects on the Globe and Building Global Scenes with Sublevels.
1Follow the procedure outlined in Step 2 to import the Vehicle Advanced template.

2Drag the VehicleBlueprint into the scene. Place it on the street in front of the ThirdPersonCharacter.
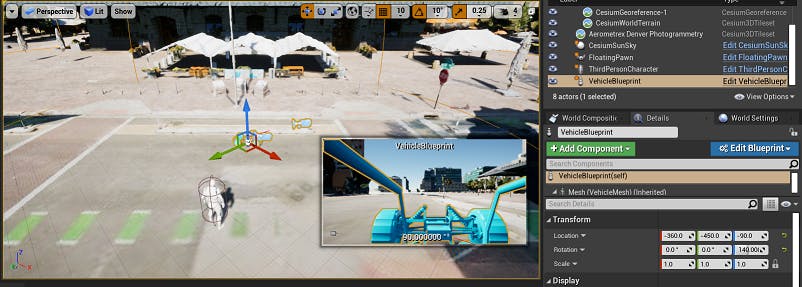
3Create another cube to act as the starting platform for the VehicleBlueprint. Place it just under the photogrammetry where the VehicleBlueprint is.
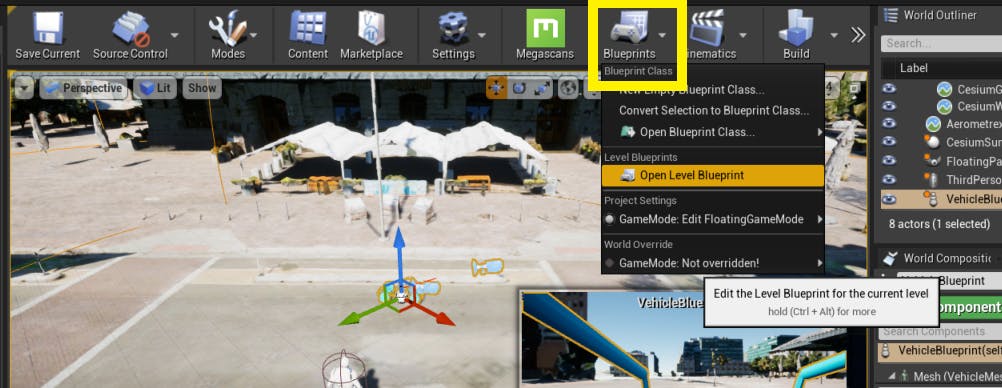
4Unlike the ThirdPersonCharacter, this pawn does not get automatically possessed. Instead, you’ll set up a simple Blueprint to switch the controlled pawn in play. Open the Level Blueprint using the top bar.
5From the World Outliner, drag-and-drop the VehicleBlueprint and ThirdPersonCharacter actors into the Event Graph in the Level Blueprint. You will see a node for each actor has been created in the Event Graph.
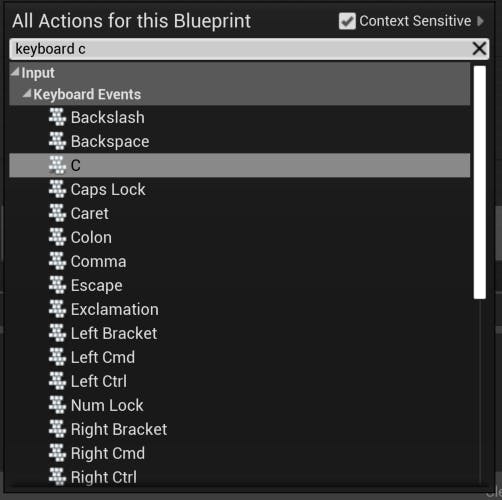
6Right click on an empty area in the Event Graph to pull up a menu for adding nodes. Search for “keyboard c” to find the C keypress event. Click on this to create a Keyboard Event.
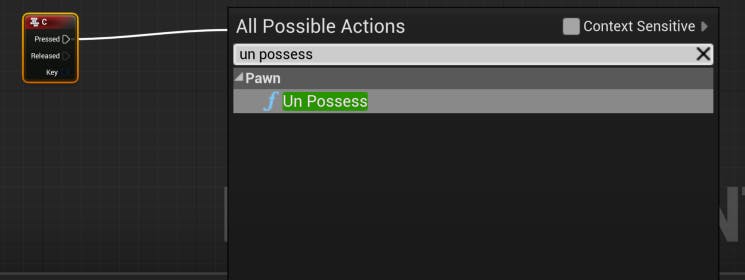
7From the “Released” pin on the Keyboard Event, drag onto an empty spot on the graph and release the mouse. The search menu will appear again. Uncheck the Context Sensitive box, and search for un possess to find the Un Possess node.
8Add a Possess node and a Get Player Controller node. Link them as shown in the below image.
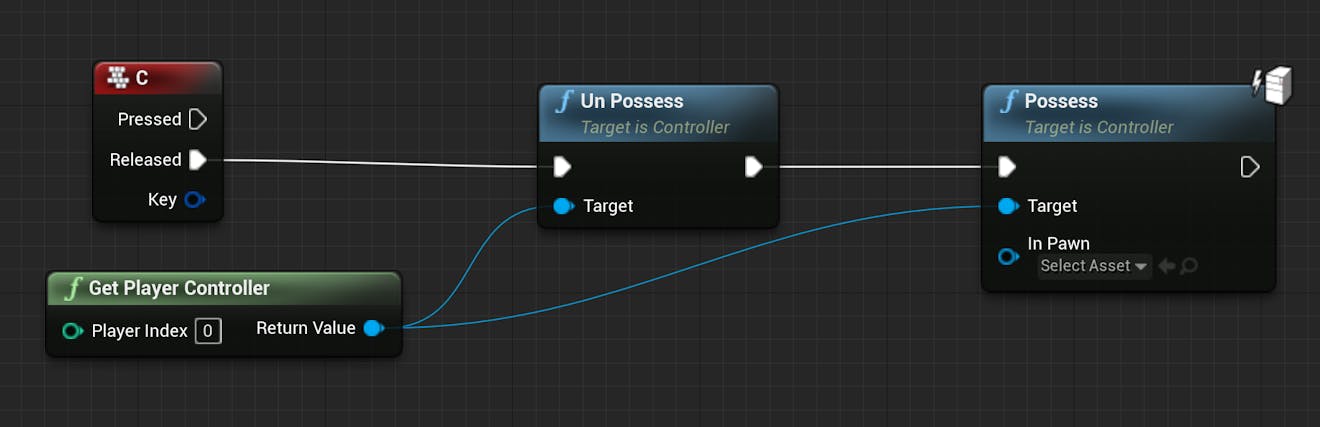
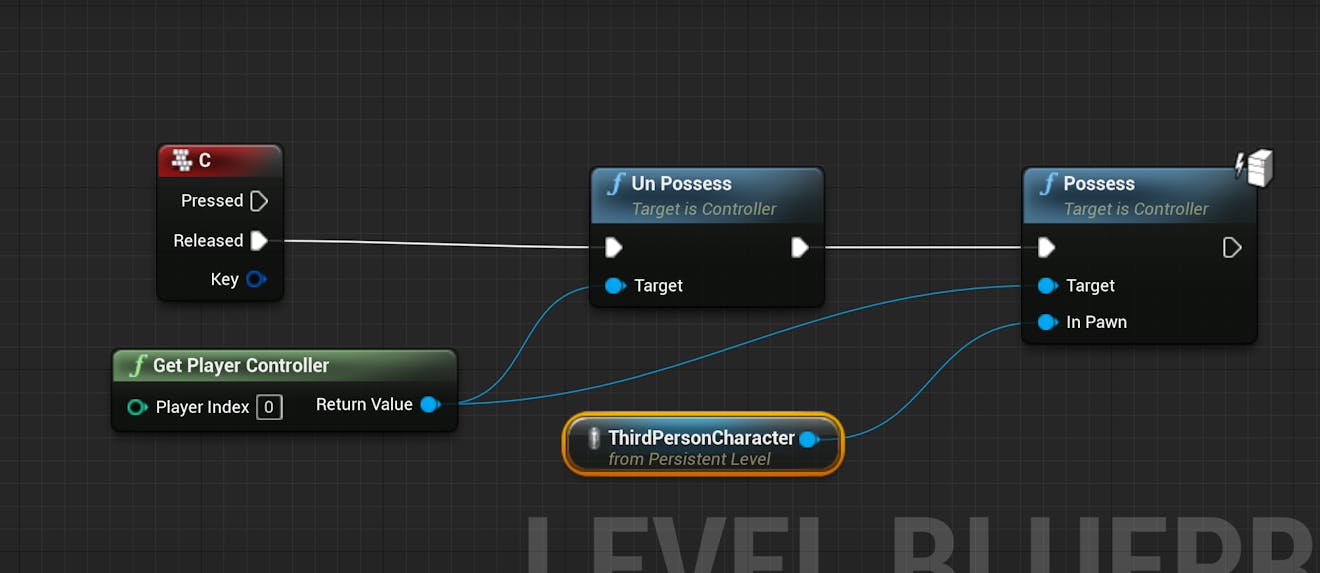
9The C key will switch controls to the ThirdPersonCharacter. Connect the ThirdPersonCharacter node to the empty “In pawn” input on the Possess node.
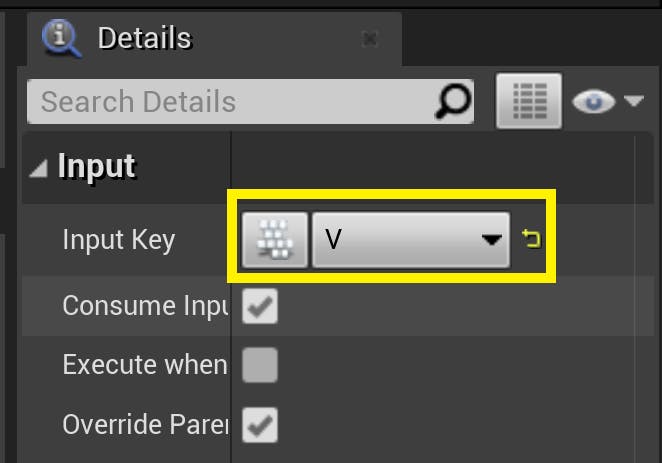
10Select the entire graph and copy-paste it to duplicate it. Select the new Keyboard Event node. In the Details panel, change the input key from C to V.
11Hook up the new V Keyboard Event to the duplicated event graph and replace the “In Pawn” of the Possess node to the VehicleBlueprint.
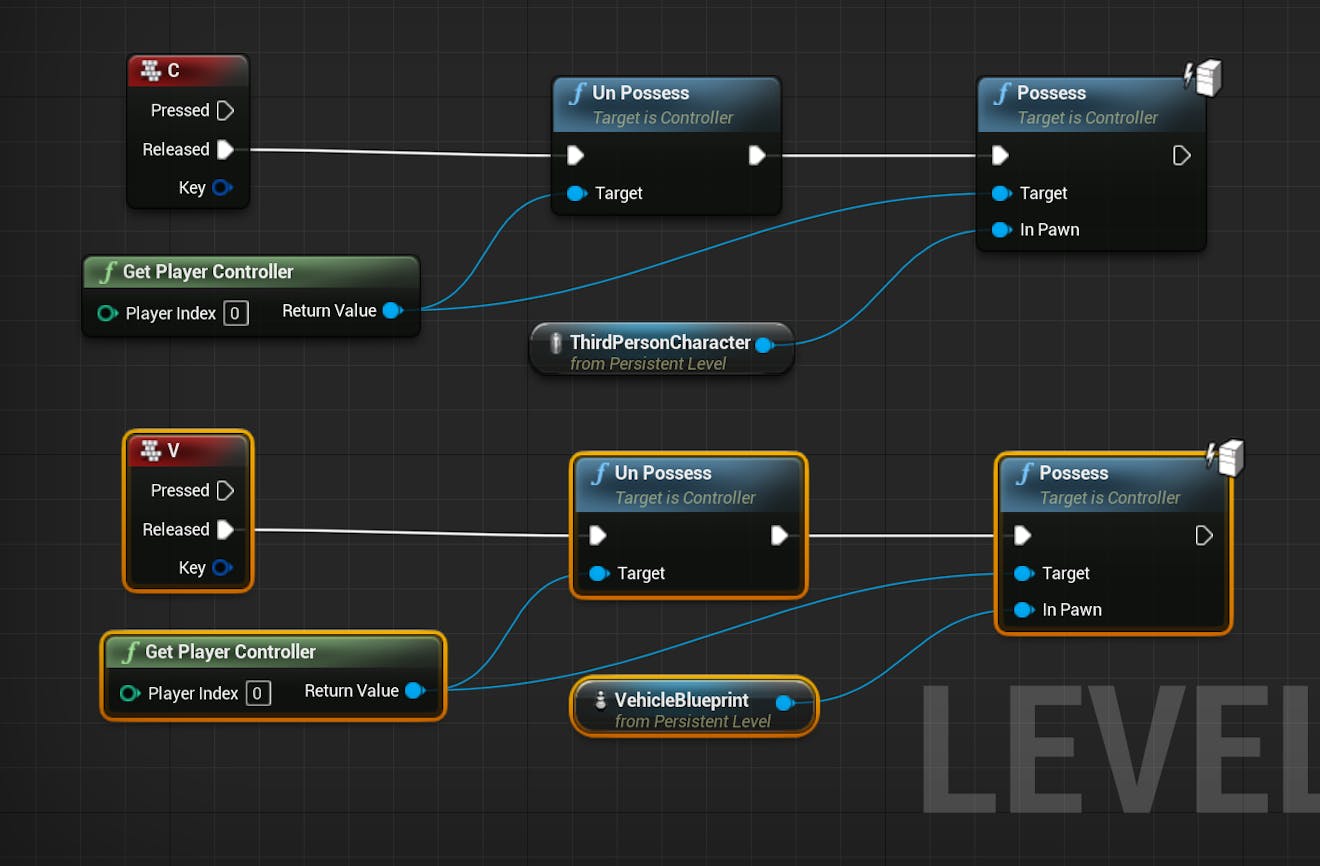
12Press the Compile button and the Save buttons on the top bar. Now, if you play the level, you’ll be able to switch to the VehicleBlueprint by pressing V, and the ThirdPersonCharacter by pressing C.
13You’ll notice that if you drive away with the car and then switch back to the character controller, the car might fall through the world due to tiles unloading. This also happens when you look away from the car if you have “Frustrum Culling” enabled. You’ll need to disable physics when not controlling the car. Back in the Level Blueprint, create a new Set Simulate Physics node.
To learn more about Frustrum Culling, visit the Placing Objects on the Globe page. It will also be explained a little more later in this tutorial.
14Connect the Set Simulate Physics node to the Possess node for the ThirdPersonCharacter. Duplicate the VehicleBlueprint node and connect it to the “Target” input of the Set Simulate Physics node. The Blueprint Editor will automatically create a conversion node to get the VehicleBlueprint’s mesh.
15Make sure the “Simulate” input on the Set Simulate Physics node is set to false.
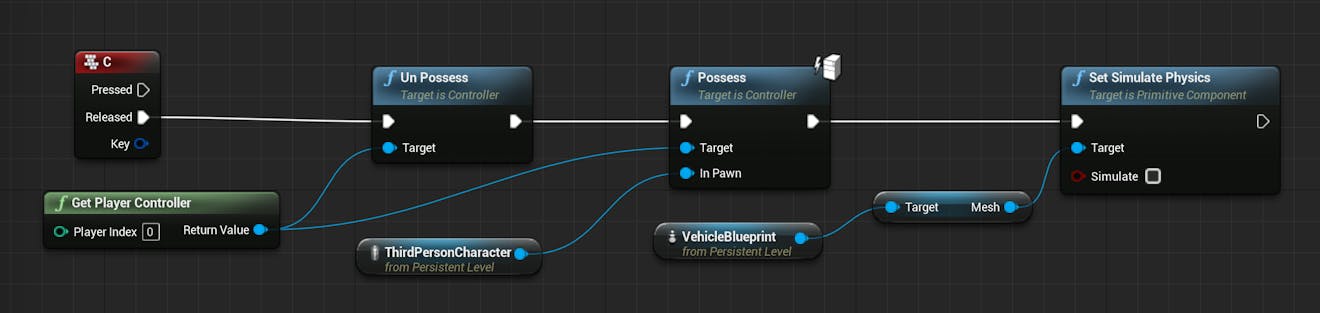
16Copy and paste the new nodes and connect the duplicates to the V Keyboard Event graph. This time, make sure the “Simulate” input on the Set Simulate Physics node is set to true.

17Press Play - The vehicle should now stay right where you left it.
In this step, you will adjust two available settings to help ensure a smooth experience. While you will need to decide the best settings for your project based on your performance requirements, you’ll learn about these settings and their benefits and drawbacks.
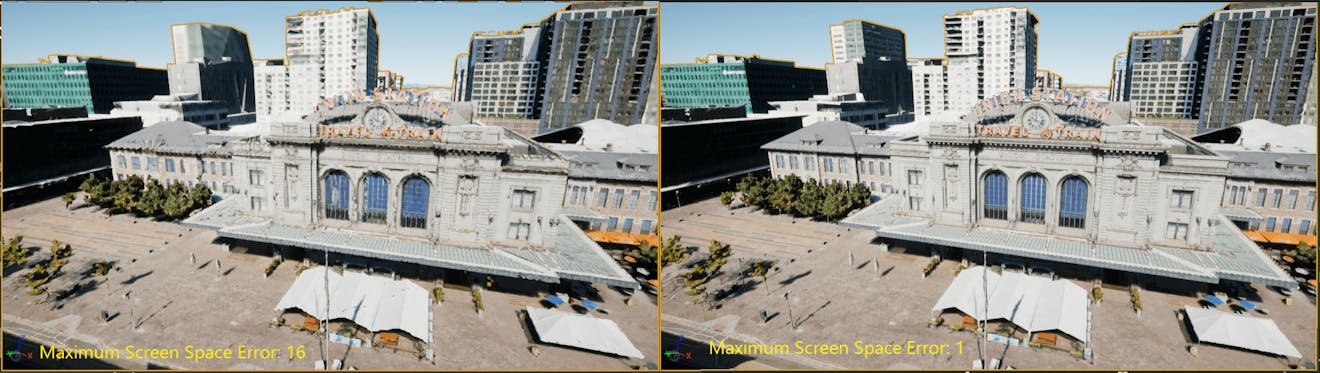
1With the Aerometrex Denver Photogrammetry actor selected, find the Cesium section in the DetailsPanel. Open the first section, Level of Detail to reveal the Maximum Screen Space Error setting.
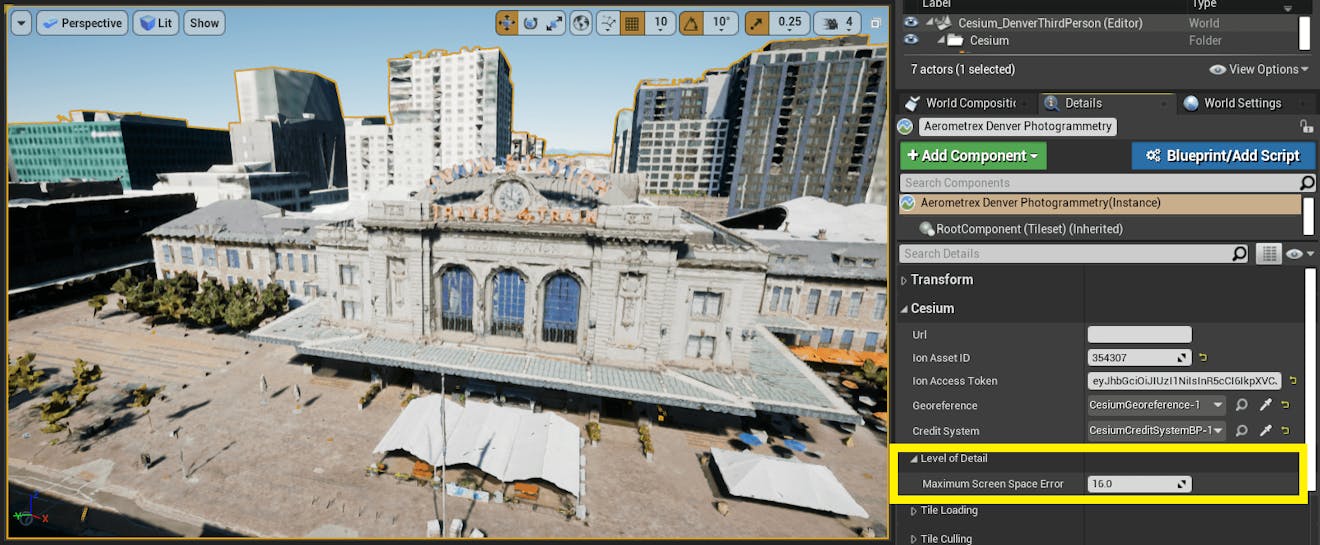
2The Maximum Screen Space Error setting allows you to control the Level of Detail of your 3D Tileset. A higher number corresponds with a lower level of detail, and better performance. By default, it’s set to 16. Try lowering it to 2 - You’ll see a much higher resolution, but the scene will take longer to load fully.
3As you play, you may notice that tiles that are out of view stop rendering and may take some time to load again when you turn around. Open the Tile Culling section of the Details panel to find the setting, Enable Frustrum Culling.
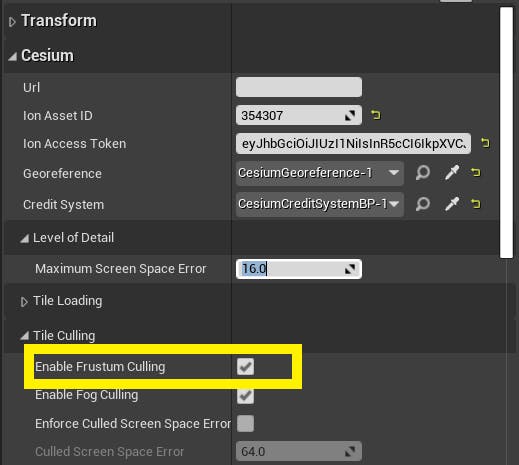
Disabling this setting will ensure that tiles will no longer be unloaded as you turn the camera. However, you may notice the overall quality of tiles may drop with this setting disabled.
Want to try out a different project? Visit the Build a Flight Tracker with Cesium for Unreal tutorial. Or, take a look at the Build Worlds tutorial section.