
Creating Entities
Learn to use the Entity API in CesiumJS for drawing spatial data such as points, markers, labels, lines, models, shapes, and volumes.
New to Cesium?
- Check out the Visualize a Proposed Building or Build a Flight Tracker tutorial for an overview of how Cesium apps are built and how you can visualize and interact with 3D entities.
- For help setting up an app for the first time, start with the Quickstart tutorial.
CesiumJS has a rich API for spatial data that can be split into two categories: a low-level Primitive API geared towards graphics developers, and a high-level Entity API for data-driven visualization.
The low-level Primitive API exposes the minimal amount of abstraction needed to perform the task at hand. It is structured to provide a flexible implementation for graphics developers, not for API consistency. Loading a model is different from creating a billboard, and both are radically different from creating a polygon. Each type of visualization is its own distinct feature. Furthermore, each has different performance characteristics and requires different best practices. While this approach is powerful and flexible, most applications are better served with a higher level of abstraction.
The Entity API exposes a set of consistently designed high-level objects that aggregate related visualization and information into a unified data structure, which we call an Entity. It lets us concentrate on the presentation of data rather than worrying about the underlying mechanism of visualization. It also provides constructs for easily building complex, time-dynamic visualization in a way that fits naturally alongside static data. While the Entity API actually uses the Primitive API under the hood, that’s an implementation detail we (almost) never have to concern ourselves with. By applying various heuristics to the data we give it, the Entity API is able to provide flexible, high-performance visualization while exposing a consistent, easy to learn, and easy to use interface.
To start, open the Hello World example in Sandcastle.
Add a polygon for the US state of Wyoming from a list of longitude and latitude degrees.
const viewer = new Cesium.Viewer("cesiumContainer");

const wyoming = viewer.entities.add({
  polygon: {
    hierarchy: Cesium.Cartesian3.fromDegreesArray([
      -109.080842, 45.002073, -105.91517, 45.002073, -104.058488, 44.996596,
      -104.053011, 43.002989, -104.053011, 41.003906, -105.728954, 40.998429,
      -107.919731, 41.003906, -109.04798, 40.998429, -111.047063, 40.998429,
      -111.047063, 42.000709, -111.047063, 44.476286, -111.05254, 45.002073,
    ]),
    height: 0,
    material: Cesium.Color.RED.withAlpha(0.5),
    outline: true,
    outlineColor: Cesium.Color.BLACK,
  },
});

viewer.zoomTo(wyoming);
Hitting the Run button in the toolbar (or F8 on the keyboard) produces the following:
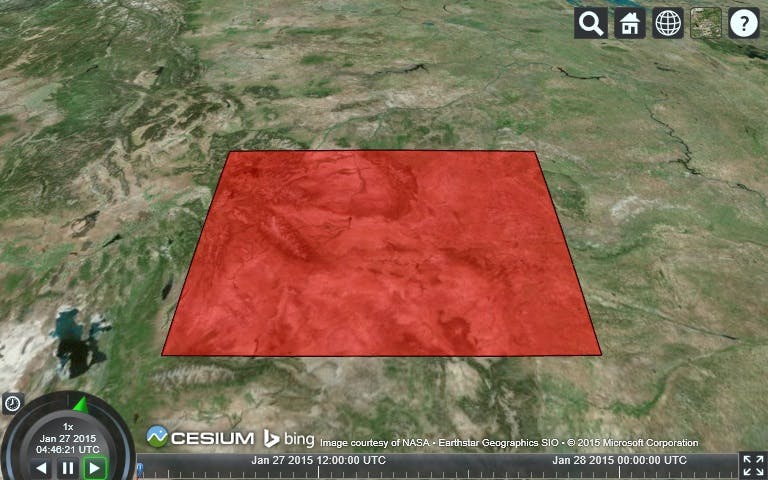
Our first entity.
The code above creates the Viewer, which creates the globe and other widgets. We created a new Entity via viewer.entities.add. The object we pass to add provides initial values for the entity. The return value is the actual Entity instance. Finally, viewer.zoomTo zooms the camera to view the entity.
There are many entity options. We specified translucent red for the polygon fill and a black outline.
Here’s a complete list of supported shapes and volumes we can create using the Entity API:


Materials and outlines
All shapes and volumes have a common set of properties that control their appearance. The fill property specifies if the geometry is filled in, and the outline property specifies if the geometry is outlined.
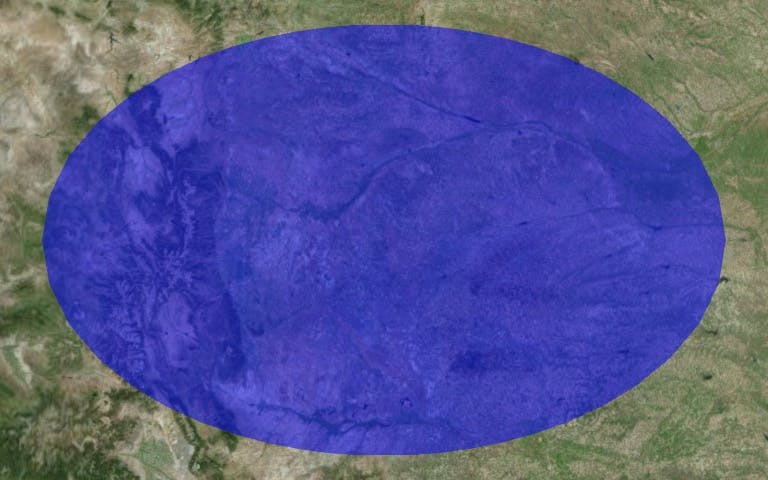
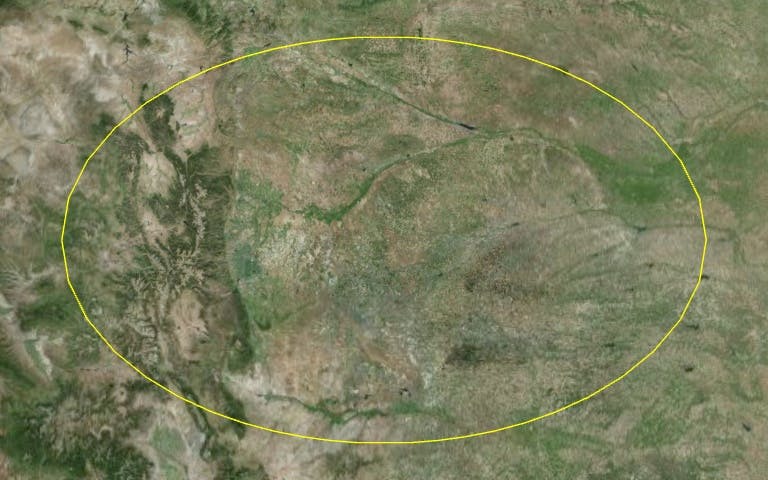
When fill is true, the material property determines what that fill looks like. The following creates a translucent blue ellipse.
const entity = viewer.entities.add({
  position: Cesium.Cartesian3.fromDegrees(-103.0, 40.0),
  ellipse: {
    semiMinorAxis: 250000.0,
    semiMajorAxis: 400000.0,
    material: Cesium.Color.BLUE.withAlpha(0.5),
  },
});
viewer.zoomTo(viewer.entities);

const ellipse = entity.ellipse; // For upcoming examples
ellipse.material = "/docs/tutorials/creating-entities/images/cats.jpg";
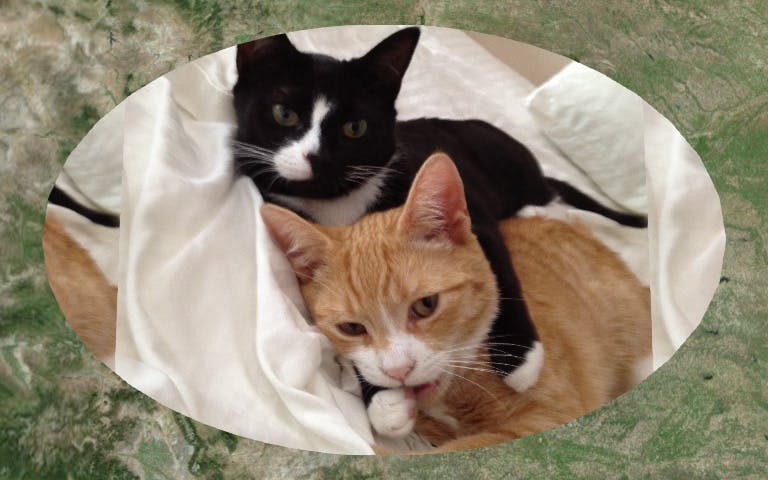
In both the above cases, a ColorMaterialProperty or ImageMaterialProperty is created for us automatically on assignment. For more complex materials, we need to create a MaterialProperty instance ourselves. Currently, entity shapes and volumes support colors, images, checkerboard, stripe, and grid materials.
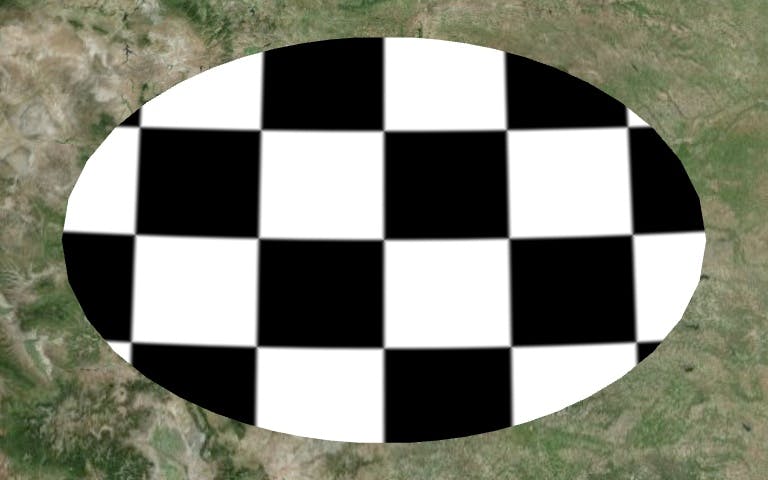
Checkerboard
ellipse.material = new Cesium.CheckerboardMaterialProperty({
  evenColor: Cesium.Color.WHITE,
  oddColor: Cesium.Color.BLACK,
  repeat: new Cesium.Cartesian2(4, 4),
});
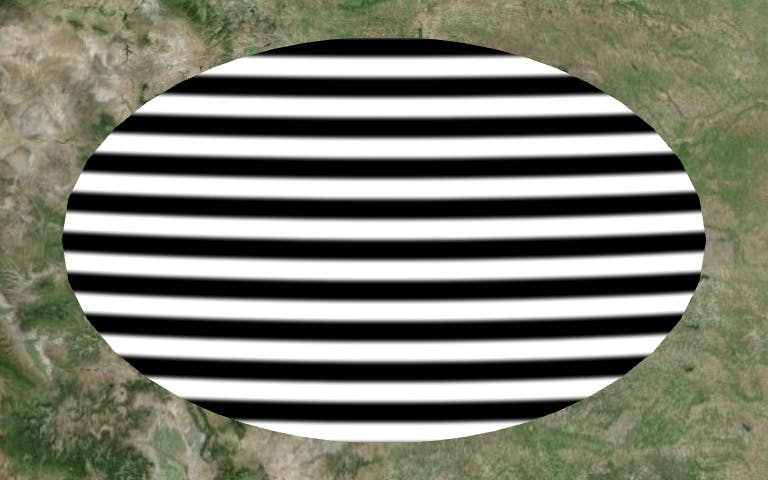
ellipse.material = new Cesium.StripeMaterialProperty({
  evenColor: Cesium.Color.WHITE,
  oddColor: Cesium.Color.BLACK,
  repeat: 32,
});
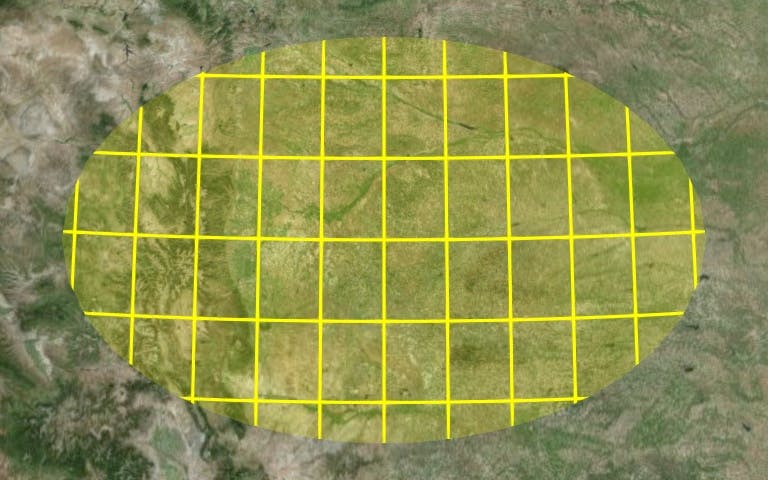
ellipse.material = new Cesium.GridMaterialProperty({
  color: Cesium.Color.YELLOW,
  cellAlpha: 0.2,
  lineCount: new Cesium.Cartesian2(8, 8),
  lineThickness: new Cesium.Cartesian2(2.0, 2.0),
});
ellipse.fill = false;
ellipse.outline = true;
ellipse.outlineColor = Cesium.Color.YELLOW;
ellipse.outlineWidth = 2.0;
const entity = viewer.entities.add({
  polyline: {
    positions: Cesium.Cartesian3.fromDegreesArray([-77, 35, -77.1, 35]),
    width: 5,
    material: Cesium.Color.RED,
  },
});
viewer.zoomTo(viewer.entities);

const polyline = entity.polyline; // For upcoming examples

polyline.material = new Cesium.PolylineOutlineMaterialProperty({
  color: Cesium.Color.ORANGE,
  outlineWidth: 3,
  outlineColor: Cesium.Color.BLACK,
});

polyline.material = new Cesium.PolylineGlowMaterialProperty({
  glowPower: 0.2,
  color: Cesium.Color.BLUE,
});

Heights and extrusions
Surface shapes including corridor, ellipse, polygon, and rectangles can be placed at altitude or extruded into a volume. In both cases, the shape or volume will still conform to the curvature of the WGS84 ellipsoid.
Set the height property (in meters) on the corresponding graphics object. The below line of code raises the polygon to 250,000 meters above the earth.
wyoming.polygon.height = 250000;
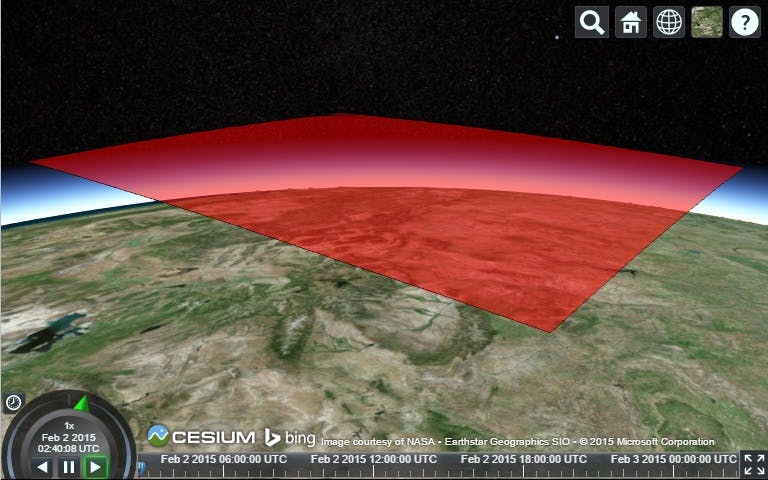
Wyoming at 250,000 meters.
To extrude the shape into a volume, set the extrudedHeight property. The volume will be created between height and extrudedHeight. If height is undefined, the volume starts at 0. Create a volume that starts at 200,000 meters and extends to 250,000 meters.
wyoming.polygon.height = 200000;
wyoming.polygon.extrudedHeight = 250000;
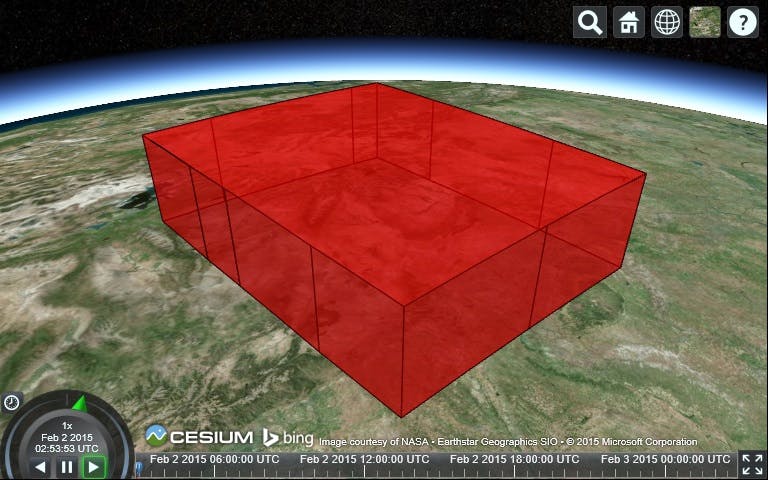
We can easily extrude a flat polygon into a volume.
These are the functionality the Viewer provides for working with entities out-of-the-box.
Selection and description
Clicking on an entity in the Viewer will show the SelectionIndicator widget at the entity’s location and bring up the InfoBox to provide more information. We can set a name, which determines the title of the InfoBox. We can also provide HTML as the Entity.description property.
wyoming.name = "Wyoming";
wyoming.description =
  '\
<img\
  width="50%"\
  style="float:left; margin: 0 1em 1em 0;"\
  src="/docs/tutorials/creating-entities/Flag_of_Wyoming.svg"/>\
<p>\
  Wyoming is a state in the mountain region of the Western \
  United States.\
</p>\
<p>\
  Wyoming is the 10th most extensive, but the least populous \
  and the second least densely populated of the 50 United \
  States. The western two thirds of the state is covered mostly \
  with the mountain ranges and rangelands in the foothills of \
  the eastern Rocky Mountains, while the eastern third of the \
  state is high elevation prairie known as the High Plains. \
  Cheyenne is the capital and the most populous city in Wyoming, \
  with a population estimate of 63,624 in 2017.\
</p>\
<p>\
  Source: \
  <a style="color: WHITE"\
    target="_blank"\
    href="http://en.wikipedia.org/wiki/Wyoming">Wikpedia</a>\
</p>';
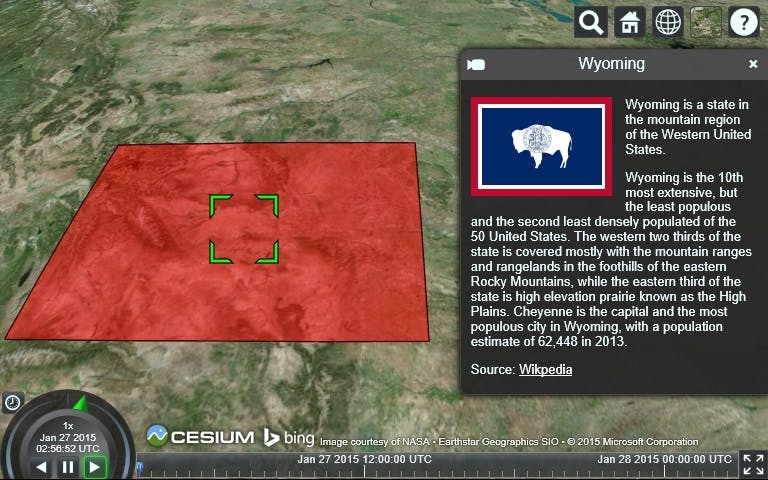
Setting the entity description allows for HTML formatted information to be displayed in the InfoBox.
All HTML shown in the InfoBox is sandboxed. This prevents external data sources from injecting malicious code into a Cesium application. To run JavaScript or browser plugins inside of a description, access the iframe used for sandboxing via the viewer.infoBox.frame property. See this article for more information on controlling iframe sandboxing.
Use the viewer.zoomTo command to view a particular entity. There is also a viewer.flyTo method that performs an animated camera flight to the entity. Both of these methods can be passed to an Entity, EntityCollection, a DataSource, or an array of entities.
Either method calculates a view of all provided entities. By default, the camera is oriented north and is looking down from a 45 degree angle. Customize this by passing in a HeadingPitchRange.
const heading = Cesium.Math.toRadians(90);
const pitch = Cesium.Math.toRadians(-30);
viewer.zoomTo(wyoming, new Cesium.HeadingPitchRange(heading, pitch));
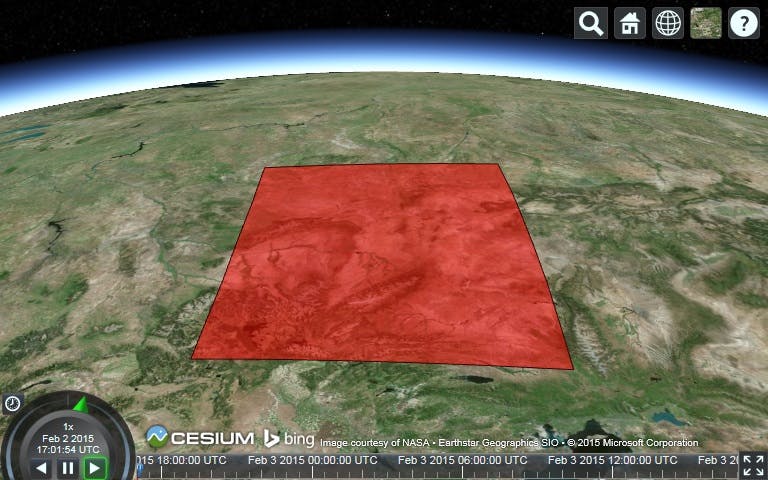
Wyoming viewer from the east.
Both zoomTo and flyTo are asynchronous functions; that is, they are not guaranteed to have completed before they return. For example, flying to an entity happens over many animation frames. Both of these functions return Promises that can be used to schedule a function to be executed after the flight or zoom is completed. Replace zoomTo in our example with the snippet below. This flies to Wyoming and selects it after the flight is completed.
const result = await viewer.flyTo(wyoming);
if (result) {
  viewer.selectedEntity = wyoming;
}
The resulting parameter passed to our callback function will be true if the flight completed successfully or false if the flight was canceled, i.e., a user initiated another flight or zoom before this one completed, or because the target has no corresponding visualization, i.e., there’s nothing to zoom to.
Sometimes, particularly when working with time-dynamic data, we want the camera to remain centered on an entity rather than on the Earth. This is accomplished by setting viewer.trackedEntity. Tracking an entity requires position to be set.
wyoming.position = Cesium.Cartesian3.fromDegrees(-107.724, 42.68);
viewer.trackedEntity = wyoming;
Stop tracking by setting viewer.trackedEntity to undefined or by double clicking away from the entity. Calling zoomTo or flyTo will also cancel tracking.
EntityCollection is an associative array for managing and monitoring a group of entities. viewer.entities is an EntityCollection. EntityCollection includes methods such as add, remove, and removeAll for managing entities.
Sometimes we need to update an entity that we previously created. All entity instances have a unique id that can be used to retrieve an entity from the collection. We can specify an ID, or one will be automatically generated.
viewer.entities.add({
  id: "uniqueId",
});
Retrieve the entity using getById. In the event that no entity with the provided ID exists, undefined is returned.
const entity = viewer.entities.getById("uniqueId");
To fetch an entity or create a new one if it does not exist, use getOrCreateEntity.
const entity = viewer.entities.getOrCreateEntity("uniqueId");
Create a new entity manually and add it to the collection using add. This method throws if an entity with the same id already exists in the collection.
const entity = new Entity({
  id: "uniqueId",
});
viewer.entities.add(entity);
The power of EntityCollection shines using the collectionChanged event. This notifies listeners when an entity has been added, removed, or updated in the collection.
Use the Geometry Showcase example in Sandcastle. Paste the following code after the line creating the viewer.
function onChanged(collection, added, removed, changed) {
  let message = "Added ids";
  for (var i = 0; i < added.length; i++) {
    message += "\n" + added[i].id;
  }
  console.log(message);
}
viewer.entities.collectionChanged.addEventListener(onChanged);
You should see about 65 messages in the console when you run the example, one for every call to viewer.entities.add.
When updating a large amount of entities at once, it’s more performant to queue up changes and send one big event at the end. This way Cesium can process required changes in a single pass. Call viewer.entities.suspendEvents before the viewer.entities.add and call viewer.entities.resumeEvents at the end of the example. When we run the demo again, we now get a single event containing all 65 entities. These calls are reference counted, so multiple suspend and resume calls can be nested.
Picking (clicking to select an object) is one of the areas where we need to interface briefly with the Primitive API. Use scene.pick and scene.drillPick to retrieve an entity.
/**
 * Returns the top-most entity at the provided window coordinates
 * or undefined if no entity is at that location.
 *
 * @param {Cartesian2} windowPosition The window coordinates.
 * @returns {Entity} The picked entity or undefined.
 */
function pickEntity(viewer, windowPosition) {
  const picked = viewer.scene.pick(windowPosition);
  if (Cesium.defined(picked)) {
    const id = Cesium.defaultValue(picked.id, picked.primitive.id);
    if (id instanceof Cesium.Entity) {
      return id;
    }
  }
  return undefined;
}

/**
 * Returns the list of entities at the provided window coordinates.
 * The entities are sorted front to back by their visual order.
 *
 * @param {Cartesian2} windowPosition The window coordinates.
 * @returns {Entity[]} The picked entities or undefined.
 */
function drillPickEntities(viewer, windowPosition) {
  let picked, entity, i;
  const pickedPrimitives = viewer.scene.drillPick(windowPosition);
  const length = pickedPrimitives.length;
  const result = [];
  const hash = {};

  for (i = 0; i < length; i++) {
    picked = pickedPrimitives[i];
    entity = Cesium.defaultValue(picked.id, picked.primitive.id);
    if (entity instanceof Cesium.Entity && !Cesium.defined(hash[entity.id])) {
      result.push(entity);
      hash[entity.id] = true;
    }
  }
  return result;
}
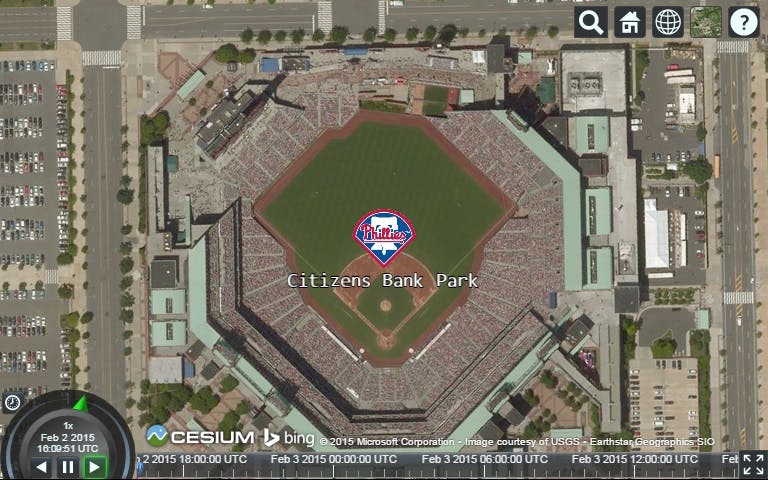
const viewer = new Cesium.Viewer("cesiumContainer");

const citizensBankPark = viewer.entities.add({
  name: "Citizens Bank Park",
  position: Cesium.Cartesian3.fromDegrees(-75.166493, 39.9060534),
  point: {
    pixelSize: 5,
    color: Cesium.Color.RED,
    outlineColor: Cesium.Color.WHITE,
    outlineWidth: 2,
  },
  label: {
    text: "Citizens Bank Park",
    font: "14pt monospace",
    style: Cesium.LabelStyle.FILL_AND_OUTLINE,
    outlineWidth: 2,
    verticalOrigin: Cesium.VerticalOrigin.BOTTOM,
    pixelOffset: new Cesium.Cartesian2(0, -9),
  },
});

viewer.zoomTo(viewer.entities);

Citizens Bank Park in Philadelphia, PA, home of the Philadelphia Phillies.
By default, the label is centered horizontally and vertically. Since the label and point share the same position, they overlap on the screen. To avoid this, specify the label origin VerticalOrigin.BOTTOM and set a pixel offset of (0, -9).
Replace the point with a billboard, which is a marker that’s always facing the user.
const citizensBankPark = viewer.entities.add({
  position: Cesium.Cartesian3.fromDegrees(-75.166493, 39.9060534),
  billboard: {
    image: "/docs/images/tutorials/creating-entities/Philadelphia_Phillies.png",
    width: 64,
    height: 64,
  },
  label: {
    text: "Citizens Bank Park",
    font: "14pt monospace",
    style: Cesium.LabelStyle.FILL_AND_OUTLINE,
    outlineWidth: 2,
    verticalOrigin: Cesium.VerticalOrigin.TOP,
    pixelOffset: new Cesium.Cartesian2(0, 32),
  },
});
The Philadelphia Phillies logo as a billboard at our entity’s position.
See the Sandcastle Labels and Billboards Sandcastle examples for more customization options.
const viewer = new Cesium.Viewer("cesiumContainer");
const entity = viewer.entities.add({
  position: Cesium.Cartesian3.fromDegrees(-123.0744619, 44.0503706),
  model: {
    uri: "../../../../Apps/SampleData/models/GroundVehicle/GroundVehicle.glb",
  },
});
viewer.trackedEntity = entity;
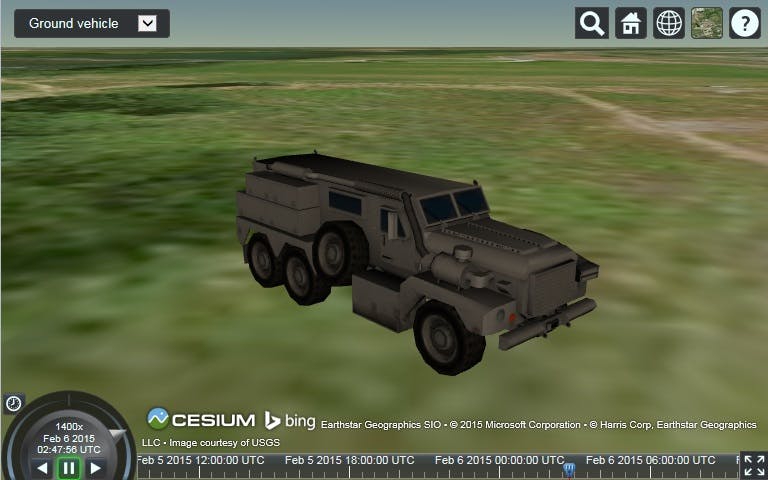
The example truck model that ships with CesiumJS.
By default, the model is oriented upright and facing east. Control the orientation of the model by specifying a Quaternion for the Entity.orientation property. This controls the heading, pitch, and roll of the model.
const viewer = new Cesium.Viewer("cesiumContainer");
const position = Cesium.Cartesian3.fromDegrees(-123.0744619, 44.0503706);
const heading = Cesium.Math.toRadians(45.0);
const pitch = Cesium.Math.toRadians(15.0);
const roll = Cesium.Math.toRadians(0.0);
const orientation = Cesium.Transforms.headingPitchRollQuaternion(
  position,
  new Cesium.HeadingPitchRoll(heading, pitch, roll)
);

const entity = viewer.entities.add({
  position: position,
  orientation: orientation,
  model: {
    uri: "../../../../Apps/SampleData/models/GroundVehicle/GroundVehicle.glb",
  },
});
viewer.trackedEntity = entity;
If you create your own models, be sure to see our post on glTF Tips for Artists.
All values we define for our entities are stored as Property objects. For example, see the value of our Wyoming outline:
console.log(typeof wyoming.polygon.outline);
outline is an instance of ConstantProperty. This tutorial uses a form of shorthand called implicit property conversion, which automatically takes raw values and creates a corresponding Property under the hood. Without this shorthand, we would have had to write a much longer version of the initial example:
const wyoming = new Cesium.Entity();
wyoming.name = "Wyoming";

const polygon = new Cesium.PolygonGraphics();
polygon.material = new Cesium.ColorMaterialProperty(
  Cesium.Color.RED.withAlpha(0.5)
);
polygon.outline = new Cesium.ConstantProperty(true);
polygon.outlineColor = new Cesium.ConstantProperty(Cesium.Color.BLACK);
wyoming.polygon = polygon;

viewer.entities.add(wyoming);
Properties are used because the Entity API is capable of expressing not only constant values, but also values as they change over time. See the Callback Property and Interpolation Sandcastle examples to take a look at some time dynamic properties.