Visualize a Proposed Building in a 3D City
In this tutorial, you’ll learn how to create a Cesium app to replace buildings in a real city with your own 3D model.
You can use this as a way to visualize the impact of a proposed building. How does it change the skyline? And what will the view look like from a specific floor or room?
We’ll cover how to:
- Set up and deploy your Cesium app on the web.
- Add base layers of global 3D buildings, terrain, and imagery.
- Hide individual buildings and replace them with your own 3D models.
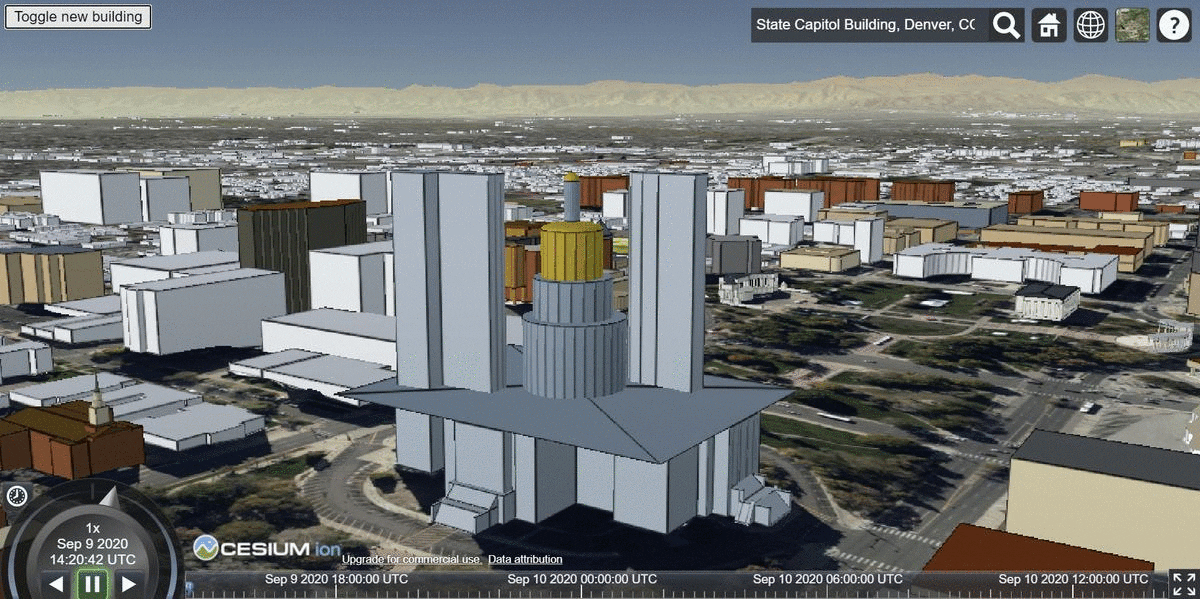
This is the app you’ll build. You can toggle the proposed building and view it from multiple angles.
Before you get started
We’re going to get global satellite imagery, 3D buildings, and terrain from Cesium ion, an open platform for streaming and hosting 3D content.
Sign up for a free Cesium ion account if you don’t already have one.
Once you’re logged in:
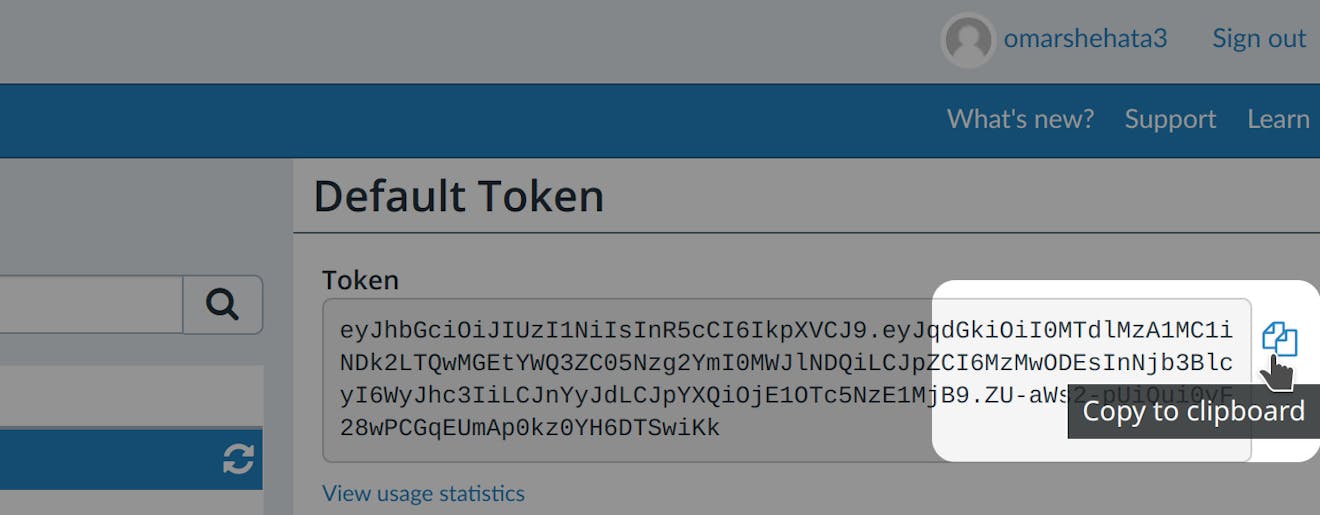
- Go to your Access Tokens tab.
- Note the copy button next to the default token. We’ll use this token in the next step.
We’re going to create our app using CesiumJS, an open source JavaScript engine. We’ll use Glitch, an online IDE, to host our app.
1Create a new Glitch project using the basic template we put together.
2Click on index.html in the left-side panel to see the app’s code.
3Replace your_token_here with your access token from your tokens page.
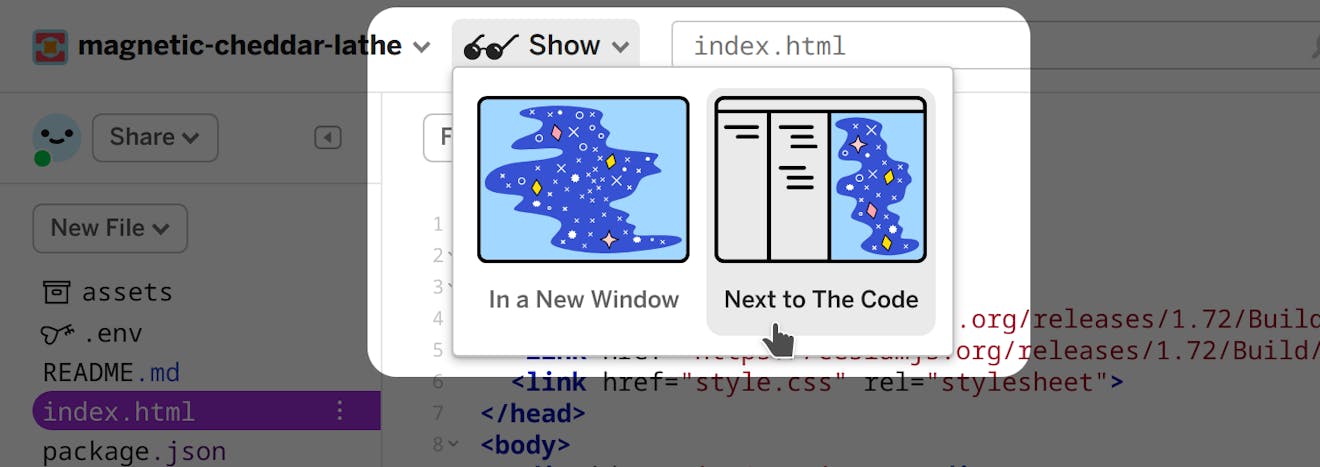
4Run the app by clicking Show in the top and select Next to The Code.
The code in index.html so far does three things:
- Imports the CesiumJS library. The JavaScript and CSS files are loaded in these two lines:
<script src="https://cesium.com/downloads/cesiumjs/releases/1.116/Build/Cesium/Cesium.js"></script>
<link href="https://cesium.com/downloads/cesiumjs/releases/1.116/Build/Cesium/Widgets/widgets.css" rel="stylesheet">
- Adds an HTML container for the scene:
<div id="cesiumContainer"></div>. - Initializes the viewer with
const viewer = new Cesium.Viewer('cesiumContainer');.
You now have a basic CesiumJS app running in your browser with global satellite imagery from Cesium ion.
Configure auto-refresh
Glitch will automatically refresh the page every time the code changes. You can toggle this by clicking on the project name in the top left and unchecking this box:
Use the refresh button on top of the app window to re-run the app:
Cesium OSM Buildings is a global base layer with over 350 million buildings derived from OpenStreetMap data. It’s served as 3D Tiles, an open standard created by Cesium, that makes it possible to stream 3D content to any compatible client.
Let’s add these layers then move the camera to the city that our fictional new building will be placed in—Denver, Colorado, USA.
1Replace your JavaScript code in index.html with the code below, keeping your access token line from before.
2Click and drag to move the camera. Hold CTRL while dragging to tilt.
3Click on any building to see its metadata.
// Keep your Cesium.Ion.defaultAccessToken = 'your_token_here' line above.
// STEP 2 CODE
// Initialize the viewer with Cesium World Terrain.
const viewer = new Cesium.Viewer('cesiumContainer', {
  terrain: Cesium.Terrain.fromWorldTerrain(),
});

// Fly the camera to Denver, Colorado at the given longitude, latitude, and height.
viewer.camera.flyTo({
  destination: Cesium.Cartesian3.fromDegrees(-104.9965, 39.74248, 4000)
});

// Add Cesium OSM Buildings.
const buildingsTileset = await Cesium.createOsmBuildingsAsync();
viewer.scene.primitives.add(buildingsTileset);
At this point, your complete index.html will look like this (except for your access token). In future steps, you’ll add new code below the existing code, inside the script tag.
<!DOCTYPE html>
<html lang="en">
<head>
  <script src="https://cesium.com/downloads/cesiumjs/releases/1.116/Build/Cesium/Cesium.js"></script>
  <link href="https://cesium.com/downloads/cesiumjs/releases/1.116/Build/Cesium/Widgets/widgets.css" rel="stylesheet">
  <link href="style.css" rel="stylesheet">
</head>
<body>
  <div id="cesiumContainer"></div>
  <script type="module">
    // Your access token can be found at: https://ion.cesium.com/tokens.
    // Replace `your_access_token` with your Cesium ion access token.
    Cesium.Ion.defaultAccessToken = 'your_access_token';

    // Keep your Cesium.Ion.defaultAccessToken = 'your_token_here' line above.
    // STEP 2 CODE
    // Initialize the viewer with Cesium World Terrain.
    const viewer = new Cesium.Viewer('cesiumContainer', {
      terrain: Cesium.Terrain.fromWorldTerrain(),
    });

    // Fly the camera to Denver, Colorado at the given longitude, latitude, and height.
    viewer.camera.flyTo({
      destination: Cesium.Cartesian3.fromDegrees(-104.9965, 39.74248, 4000)
    });

    // Add Cesium OSM Buildings.
    const buildingsTileset = await Cesium.createOsmBuildingsAsync();
    viewer.scene.primitives.add(buildingsTileset);
  </script>
</body>
</html>
Cesium OSM Buildings is clamped to a global high-resolution 3D terrain layer, Cesium World Terrain. This makes it ideal for applications that require accurate building heights, like flood-analysis tools.
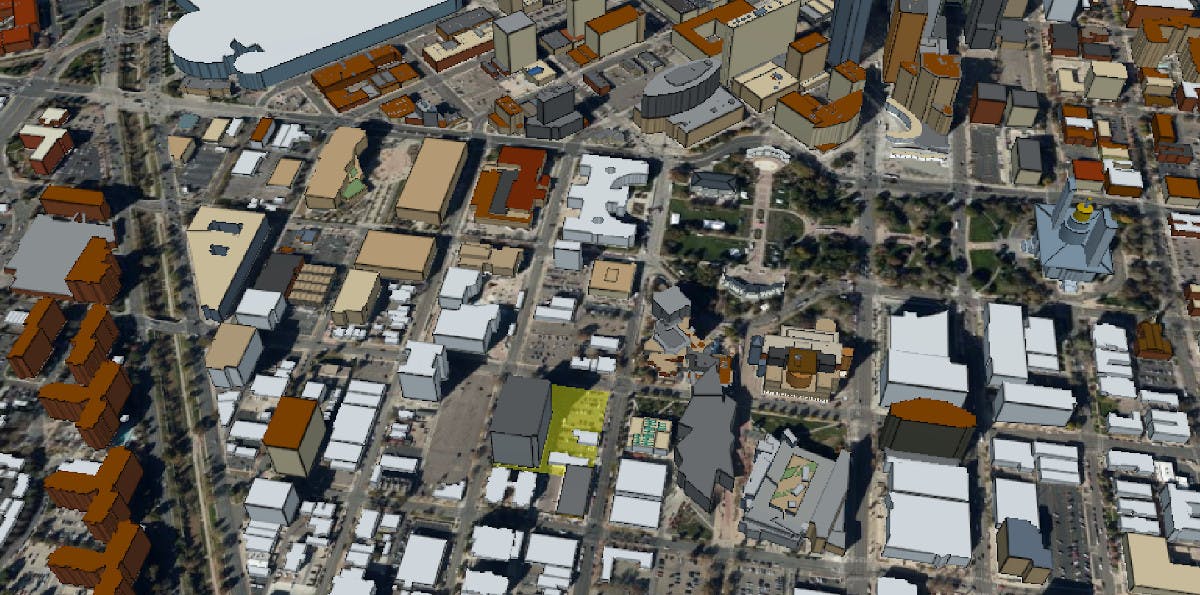
Before we add the new building, let’s add a GeoJSON file to mark the footprint for it. This will show us which existing buildings need to be removed.
1Download the GeoJSON file.
2Drag and drop the GeoJSON file in your Cesium ion dashboard.
3Press Upload.

1Add the code below in index.html.
- Replace
your_asset_idwith your asset ID. The ID is a number, so you don't need quotes.
// STEP 3 CODE
async function addBuildingGeoJSON() {
  // Load the GeoJSON file from Cesium ion.
  const geoJSONURL = await Cesium.IonResource.fromAssetId(your_asset_id);
  // Create the geometry from the GeoJSON, and clamp it to the ground.
  const geoJSON = await Cesium.GeoJsonDataSource.load(geoJSONURL, { clampToGround: true });
  // Add it to the scene.
  const dataSource = await viewer.dataSources.add(geoJSON);
  // By default, polygons in CesiumJS will be draped over all 3D content in the scene.
  // Modify the polygons so that this draping only applies to the terrain, not 3D buildings.
  for (const entity of dataSource.entities.values) {
    entity.polygon.classificationType = Cesium.ClassificationType.TERRAIN;
  }
  // Move the camera so that the polygon is in view.
  viewer.flyTo(dataSource);
}
addBuildingGeoJSON();
You’ll see the building footprint on the ground now. Zoom in with the mouse wheel or right click + drag to take a closer look.
Now that we’ve identified where the new building will go, we can see which buildings are currently there. We’re going to use 3D Tiles styling language to hide them.
In the footprint above, we can see that there are six buildings on the site of our new proposed building—one large building and five much smaller ones.
1Add the following code. It hides all the smaller 3D buildings.
// STEP 4 CODE
// Hide individual buildings in this area using 3D Tiles Styling language.
buildingsTileset.style = new Cesium.Cesium3DTileStyle({
  // Create a style rule to control each building's "show" property.
  show: {
    conditions : [
      // Any building that has this elementId will have `show = false`.
      ['${elementId} === 332469316', false],
      ['${elementId} === 332469317', false],
      ['${elementId} === 235368665', false],
      ['${elementId} === 530288180', false],
      ['${elementId} === 530288179', false],
      // If a building does not have one of these elementIds, set `show = true`.
      [true, true]
    ]
  },
  // Set the default color style for this particular 3D Tileset.
  // For any building that has a `cesium#color` property, use that color, otherwise make it white.
  color: "Boolean(${feature['cesium#color']}) ? color(${feature['cesium#color']}) : color('#ffffff')"
});
2Extend this code to hide the remaining 3D building.
- Click on the building to find its
elementId. - Add another line like:
['${elementId} === large_building_elementId', false],.
Let’s upload the proposed building model.
2Drag and drop it in your Cesium ion dashboard.
3Select 3D Model (tile as 3D Tiles) and press Upload.
4After it’s done tiling, click the Adjust Tileset Location button at the top of the asset preview window.
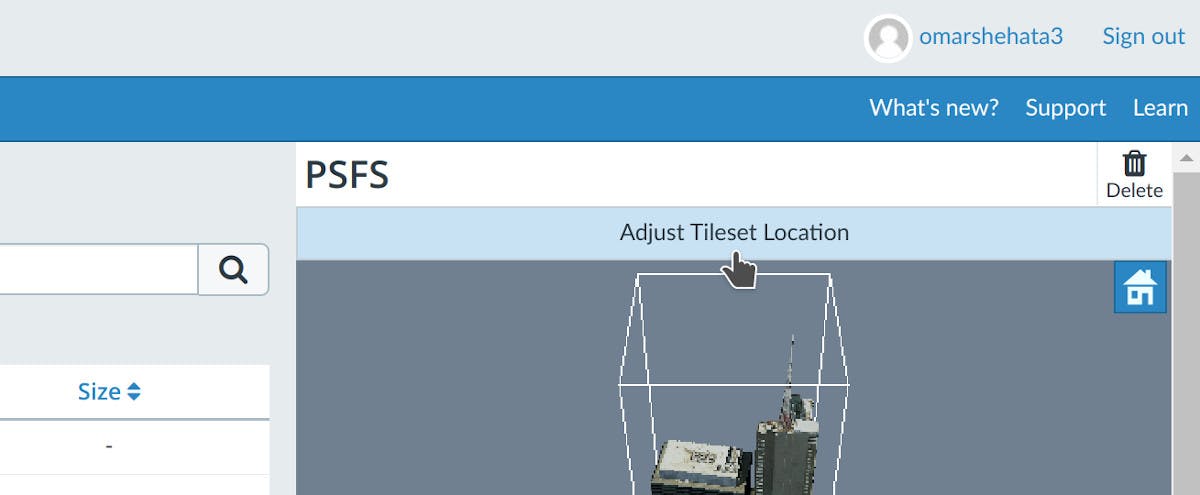
5Enter the address of the building, 1250 Cherokee Street, in the search box and click Next.
6Using the controls on the viewer, visually position and rotate the building to line up with the satellite imagery underneath. Your final settings should be approximately:
- Longitude: -104.9909
- Latitude: 39.73579
- Height: 1577
- Heading: -8
7Press Save.
Ensuring geolocation accuracy
For this tutorial, you manually positioned a new building. If a building is already georeferenced, Cesium ion will automatically place it in the right location. You can also geolocate it using the REST API. Learn more with the geolocation guide.
Now let’s add the new building to the scene.
1Get the asset ID for the building model we just geolocated, under the asset preview window.
2Add the code below in index.html.
- Replace
your_asset_idwith your asset ID.
// STEP 6 CODE
// Add the 3D Tileset you created from your Cesium ion account.
const newBuildingTileset = await Cesium.Cesium3DTileset.fromIonAssetId(your_asset_id);
viewer.scene.primitives.add(newBuildingTileset);

// Move the camera to the new building.
viewer.flyTo(newBuildingTileset);
1In index.html, add the button right inside your <body> tag, above <script>.
<button id="toggle-building">Toggle new building</button>
2Add the following CSS style tag inside the head tag.
  <style type="text/css">
    #toggle-building { z-index: 1; position: fixed; top: 5px; left: 5px; }
  </style>
3Add the following JavaScript in index.html.
// STEP 7 CODE
// Toggle the tileset's show property when the button is clicked.
document.querySelector('#toggle-building').onclick = function() {
  newBuildingTileset.show = !newBuildingTileset.show;
};
Now you can compare the scene with and without this new building!
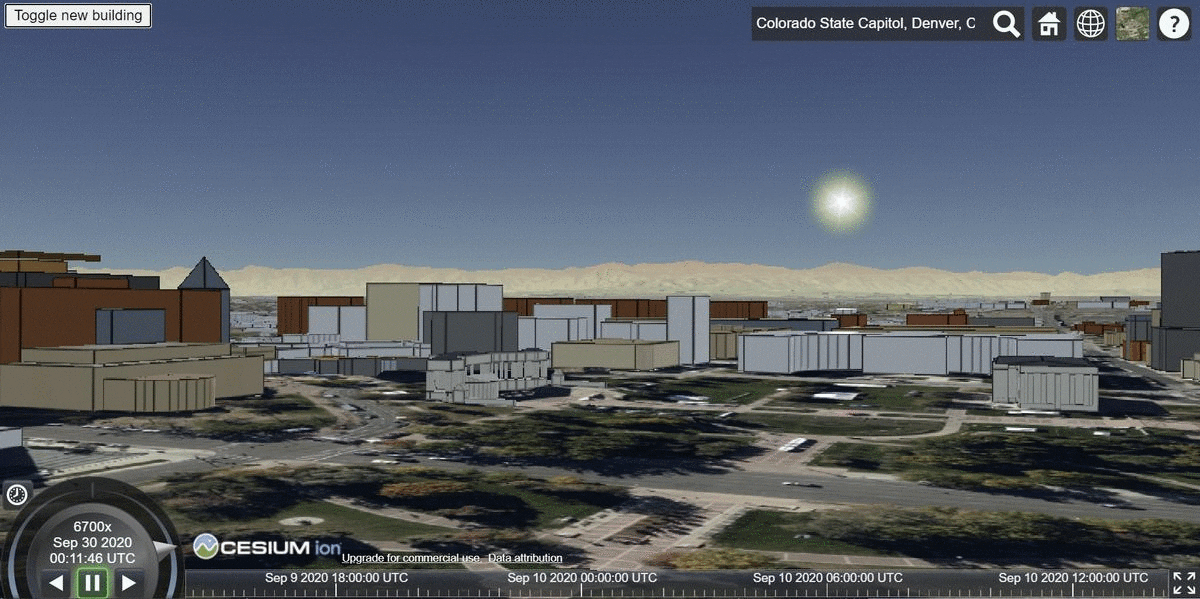
Denver’s panoramic mountain view is highly prized. How does this building affect the view from other locations, such as the Colorado State Capitol Building?
The impact on the view from the Colorado State Capitol Building.
To reproduce this, search for State Capitol Building, Denver, CO, USA and adjust the camera.
We can even explore how the view will change from the capitol entryway.
The impact on the view from closer to ground level.
<!DOCTYPE html>
<html lang="en">
<head>
  <script src="https://cesium.com/downloads/cesiumjs/releases/1.116/Build/Cesium/Cesium.js"></script>
  <link href="https://cesium.com/downloads/cesiumjs/releases/1.116/Build/Cesium/Widgets/widgets.css" rel="stylesheet">
  <link href="style.css" rel="stylesheet">
  <style type="text/css">
    #toggle-building { z-index: 1; position: fixed; top: 5px; left: 5px; }
  </style>
</head>
<body type="module">
  <div id="cesiumContainer"></div>
  <button id="toggle-building">Toggle new building</button>

  <script>
    // Your access token can be found at: https://ion.cesium.com/tokens.
    // Replace `your_access_token` with your Cesium ion access token.
    Cesium.Ion.defaultAccessToken = 'your_access_token';

    // Keep your Cesium.Ion.defaultAccessToken = 'your_token_here' line from above.
    // STEP 2 CODE
    // Initialize the viewer with Cesium World Terrain.
    const viewer = new Cesium.Viewer('cesiumContainer', {
      terrain: Cesium.Terrain.fromWorldTerrain(),
    });

    // Fly the camera to Denver, Colorado at the given longitude, latitude, and height.
    /* viewer.camera.flyTo({
      destination: Cesium.Cartesian3.fromDegrees(-104.9965, 39.74248, 4000)
    }); */

    // Add Cesium OSM Buildings.
    const buildingsTileset = await Cesium.createOsmBuildingsAsync();
    viewer.scene.primitives.add(buildingsTileset);

    // STEP 3 CODE
    async function addBuildingGeoJSON() {
      // Load the GeoJSON file from Cesium ion.
      const geoJSONURL = await Cesium.IonResource.fromAssetId(your_asset_id);
      // Create the geometry from the GeoJSON, and clamp it to the ground.
      const geoJSON = await Cesium.GeoJsonDataSource.load(geoJSONURL, { clampToGround: true });
      // Add it to the scene.
      const dataSource = await viewer.dataSources.add(geoJSON);
      // By default, polygons in CesiumJS will be draped over all 3D content in the scene.
      // Modify the polygons so that this draping only applies to the terrain, not 3D buildings.
      for (const entity of dataSource.entities.values) {
        entity.polygon.classificationType = Cesium.ClassificationType.TERRAIN;
      }
      // Move the camera so that the polygon is in view.
      // viewer.flyTo(dataSource);
    }
    addBuildingGeoJSON();

    // STEP 4 CODE
    // Hide individual buildings in this area using 3D Tiles Styling language.
    buildingsTileset.style = new Cesium.Cesium3DTileStyle({
      // Create a style rule to control each building's "show" property.
      show: {
        conditions : [
          // Any building that has this elementId will have `show = false`.
          ['${elementId} === 532245203', false],
          ['${elementId} === 332469316', false],
          ['${elementId} === 332469317', false],
          ['${elementId} === 235368665', false],
          ['${elementId} === 530288180', false],
          ['${elementId} === 530288179', false],
          // If a building does not have one of these elementIds, set `show = true`.
          [true, true]
        ]
      },
      // Set the default color style for this particular 3D Tileset.
      // For any building that has a `cesium#color` property, use that color, otherwise make it white.
      color: "Boolean(${feature['cesium#color']}) ? color(${feature['cesium#color']}) : color('#ffffff')"
    });

    // STEP 6 CODE
    // Add the 3D Tileset you created from your Cesium ion account.
    const newBuildingTileset = await Cesium.Cesium3DTileset.fromIonAssetId(your_asset_id);
    viewer.scene.primitives.add(newBuildingTileset);

    // Move the camera to the new building.
    viewer.flyTo(newBuildingTileset);

    // STEP 7 CODE
    // Toggle the tileset's show property when the button is clicked.
    document.querySelector('#toggle-building').onclick = function() {
      newBuildingTileset.show = !newBuildingTileset.show;
    };
  </script>
</body>
</html>
Next steps
If you have your own building model, try using it instead of the provided sample—glTF, OBJ, and FBX are all supported. Or place the building in your own city.
See the 3D models import guide to learn more.